Several of you have emailed or commented that you’d like to make a Tricornu but are having trouble with the sewing. Here’s a step by step tutorial to help you get through the hard part.

Step 1: Cut 2 squares the same size. Make 1/4″ snips at the midpoint of each of the edges.
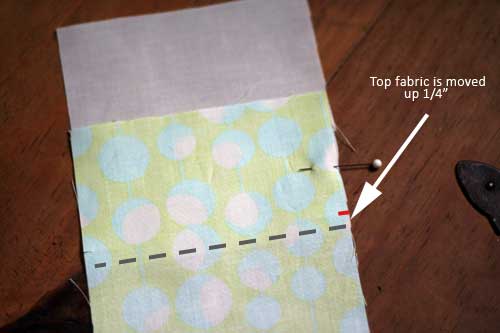
Step 2: With Right Sides together, align the top square so its top meets the midway point snip of the bottom fabric. Now, move the top fabric up 1/4″. Pin in place.

Step 3: Sew a 1/4″ seam about halfway down from where the 2 fabrics meet. Turn item 90 degrees.

Step 4: Rotate the top fabric 90° so the raw edges of both layers meet again. Use a pencil or other small instrument to work the fabric under the presser foot.

Step 5: Fold the fabric as pictured to prepare to sew the next seam.

Step 6: Sew a 1/4″ seam taking care not to sew through the fold (the fold is only there to help keep the fabric under control while you’re sewing). Stop the seam 1/4″ before the edge of the top fabric.
Continue in same manner, sewing along all edges leaving a gap to turn the piece inside out.

The final sewn item will look awkward, but once it’s turned right side out and stuffed it will take on its final shape.