 These mittens are double-thick and extra warm.
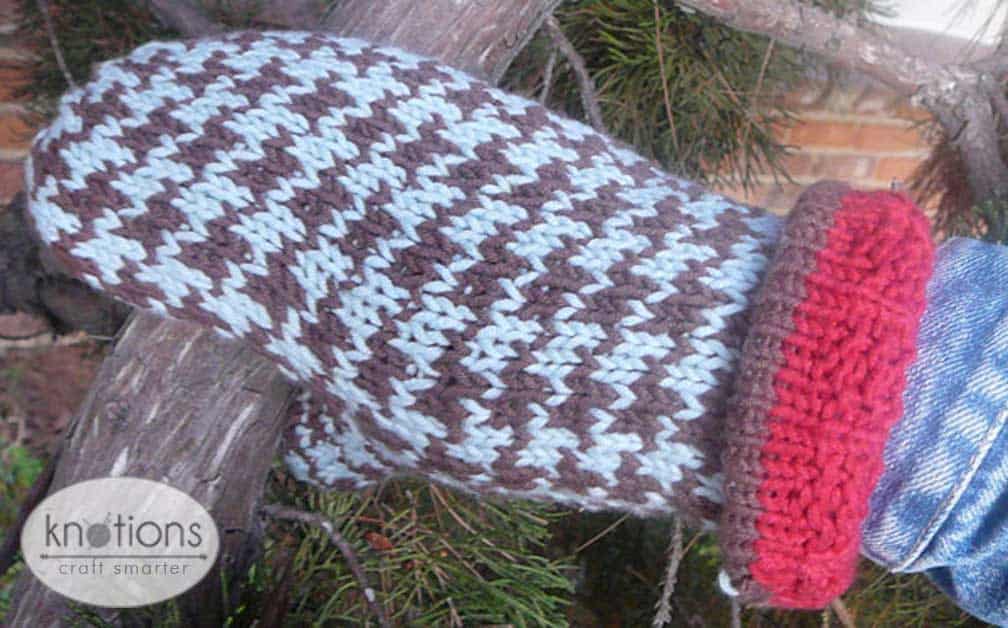
Wear the houndstooth pattern or the beaded rib pattern on the outside, depending on your mood and your wardrobe. Or show off both sides by turning down the cuff.
No gusset increases, very simple colorwork pattern, and worsted weight yarn make this a quick project.


Sizes
Finished Circumference: 8 (9, 10, 10.5)”
1.5-2” positive ease recommended to accomodate for the extra bulk of the second layer of the mitten.
Sample shown is 9”circumference and 12” from tip to cuff (24” from tip to tip).
Yarn
Beaded Rib Side
GGH Samoa (50% cotton, 50% microfiber; 104 yards [95 meters] / 50 g): 23/Berry Red (MC) 2 (2, 3, 3) balls
Houndstooth Side
Rowan All Seasons Cotton(60% cotton, 40% acrylic; 98 yards [90 meters] / 50 grams): Bark [Dark brown] (CC1), 1 (1, 2, 2) balls; Glacier [Blue] (CC2), 1 (1, 2, 2,) balls
Mission Falls 1824 wool would make a good substitute.
Needles
Size US#7 (4.5 mm): one long circular or two circulars or 5 dpns, depending on preference
Size US#8 (5 mm): one long circular or two circulars or 5 dpns, depending on preference
Gauge
18sts = 4” in houndstooth pattern (knit in the round)
20sts = 4” in beaded rib pattern (knit in the round)
18sts = 4” in stockinette stitch (knit in the round)
Notions
Waste yarn for provisional cast on; stitch holder (optional); tapestry needle
bbreviations
Please see our standard list of abbreviations.
Pattern Notes
Start with a provisional cast-on and complete one side of the mitten from the cuff down, then undo the provisional cast-on to complete the second side of the mitten. The houndstooth side is shaped only by using a larger needle for the thumb area instead of increasing for the thumb gusset, so the pattern is not interrupted by the increases. The ribbed side does not need a larger needle because it is much more elastic than the colorwork side. The mitten tops are shaped by doing three rounds of symmetrical decreases. Because of this both mittens can be worn on either hand.
The sample mittens are knit in a cotton-acrylic blend, at gauge recommended for the yarn but because they are effectively three layers thick they are quite warm. Turning down the cuffs would add extra warmth around the wrists. If you live in a very cold climate or prefer your mittens to be even warmer, try using a thicker yarn and knit at a gauge that is tighter than recommended for that yarn and/or use a wool/wool-blend.
The pattern is written for one long circular (magic loop) but can be worked on two cicrulars or five double pointed needles, depending on preference.
The easiest way to resize this pattern for a child would be to use dk weight yarn knit at gauge recommended for that yarn.
To make top-less mitts: Knit the body of the houndstooth side of the mitten until it reaches past the second knuckles (or to desired length), knit three rounds of CC 1, put live stitches on holder. Knit the thumb to the last joint of the thumb, knit two rounds of CC 1, put live stitches on holder. Work the body of the beaded rib side of the mitten until it reaches past the second knuckles (or to desired lenght), knit three rounds. Put live stitches on holders. Knit the thumb to the last joint of the thumb, knit two rounds. Tuck one side of the mitten into the other and graft the thumbs together using kitchener stitch. Weave in all ends. Graft stitches from mitten tops together using kitchener stitch.
Stitch Patterns
Beaded Rib Pattern (knit in the round)
Rnd 1: *K3, p1, rep from * to end.
Rnd 2: *P1, k1, p2, rep from * to end
Chart

Reversible Mitten Pattern (make 2)
Houndstooth Side
Using provisional cast on, CO 36 (40, 44, 48) sts; join to work in rnd being careful not to twist. With CC1 and smaller needle(s), knit 3 rnds. Using CC1 and CC2, work houndstooth pattern until cuff reaches desired length to base of thumb, just past the wrist. Keep in mind that if you will want to turn down the cuff, this part will need to be quite long. Switch to larger needles; continue in houndstooth pattern until work reaches to the part of the hand where thumb branches off the hand. Put the first 8 (8, 12, 12) stitches on a length of waste yarn or a stitch holder. Switch back to smaller needle(s), and CO 8 (8, 12, 12) stitches over the gap with CC1. Continue working in houndstooth pattern until the mitten reaches approximately 1/4” past the end of the fingertips, ending after working Rnd 4 of houndstooth pattern. Cut CC2.
Next rnd: *K1, k2tog, k1, rep from * to end; 27 (30, 33, 36) sts rem
Next rnd: *K1, k2tog, rep from * to end; 18 (20, 22, 24) sts rem
Next rnd: *K2tog, rep from * to end; 9 (10, 11, 12) sts rem
Cut CC1, leaving 8” tail. Pull tail tightly through rem sts.
Thumb
With smaller needle(s), pick up one stitch in the corner of the thumb opening, then pick up 8 (8, 12, 12) sts from where stitches were cast on over the gap left by thumb opening, pick up one more stitch at the other corner of thumb opening. Transfer 8 (8, 12, 12) sts from holder to working needle(s). There are now 18 (18, 26, 26) sts on the needle(s).
Work next rnd of houndstooth pattern, but knit each corner stitch together with the stitch that follows it;16 (16, 24, 24) sts rem. Cont in houndstooth patt until the thumb reaches 1/8” past the length of wearer’s thumb. Cut CC2. Knit 2 rows with CC1. Next rnd:: *k2tog, rep from * to end; 8 (8, 12, 12) sts rem. Cut CC1, leaving 6” tail. Pull tail tightly through rem sts.
Beaded Rib Side
Pick up 36 (40, 44, 48) sts from provisional cast-on. With MC and smaller needle(s), begin working in the rnd. Knit 3 rnds. Work Beaded Rib pattern until cuff reaches to the part of the hand where thumb branches off the hand. Next Rnd: work to last 8 (8, 12, 12) sts, put these stitches on a length of waste yarn or a stitch holder. CO 8 (8, 12, 12) sts over the gap with MC. Cont working in Beaded Rib patt until the mitten reaches approximately 1/4” past the end of the fingertips, ending after working Rnd 2 of Beaded Rib.
Put sts on holders or waste yarn and complete the thumb:
Thumb
With smaller needle(s), pick up one stitch in the corner of the thumb opening, then pick up 8 (8, 12, 12) sts from where stitches were cast on over the gap left by thumb opening, pick up one more stitch at the other corner of thumb opening. Transfer 8 (8, 12, 12) sts from holder to working needle(s). There are now 18 (18, 26, 26) sts on the needle(s).
Work next rnd of Beaded Rib Pattern, but knit each corner stitch together with the stitch that follows it; 16 (16, 24, 24) sts rem. Cont in Beaded Rib patt until the thumb reaches 1/8” past the length of wearer’s thumb. Purl 2 rnds. Next rnd:: *k2tog, rep from * to end; 8 (8, 12, 12) sts rem. Cut yarn, leaving 6” tail. Pull tail tightly through remaining stitches.
Weave in all ends, reinforcing thumb corners, if necessary.
Put the live mitten stitches back on smaller needles.
Next rnd: *P2, p2tog, rep from * to end of rnd; 27 (30, 33, 36) sts rem
Next rnd: *P1, p2tog, rep from * to end of rnd; 18 (20, 22, 24) sts rem
Next rnd: *P2tog, rep from * to end of rnd; 9 (10, 11, 12) sts rem
Cut yarn, leaving 8” tail. Pull tail tightly through remaining stitches and weave it in.
Finishing
Block colorwork side of mittens, if desired. Do not block the beaded rib side very aggressively because it should remain very elastic. When blocking, mittens should not be tucked into each other — both sides should be out.
About the Designer: Yuliya Sullivan
 Yuliya is a recovering sock knitting addict who teaches sock classes at Compatto Yarn Salon. Her favorite projects are done on tiny needles with plant-based yarns.
Pattern and images © 2008 Yuliya Sullivan.


Leave a Reply