From Fingering to Bulky: Maintaining Cable Integrity Through Weight Changes
One of the most liberating skills a cable knitter can develop is the ability to take a beloved cable motif and adapt it across different yarn weights. Whether you want to recreate a delicate fingering-weight pattern in cozy bulky yarn, or transform a chunky cowl design into an elegant lightweight shawl, understanding the principles of cross-weight adaptation opens up endless creative possibilities.
This article explores the technical considerations and practical techniques for successfully translating cable patterns across the yarn weight spectrum, using real examples to illustrate key principles.
Understanding the Challenge
Cable patterns don’t simply scale up or down linearly with yarn weight. A cable that looks balanced and elegant in worsted weight might appear compressed and crowded in fingering weight, or loose and distorted in bulky yarn. This is because several factors interact when you change yarn weight:
Stitch-to-row ratio: Most knitting has more rows per inch than stitches per inch. This ratio changes with yarn weight—bulky yarn typically has a ratio closer to 1:1, while fingering weight might be 1:1.5 or even 1:2. Cables that cross every 4 rows might look quite different across weights because the vertical spacing between crosses changes relative to the cable width.
Physical drape: Heavier yarns have more weight, which can pull cables downward. Lighter yarns create airier fabrics where cables might appear more prominent. The same crossing pattern can read as dramatic in fingering weight but subtle in bulky.
Cable definition: Thicker yarns naturally create bolder, more sculptural cables with deeper shadows. Finer yarns create more delicate, intricate effects. This affects both visibility and visual impact.
Case Study: Celtic Cables Across Three Weights
To understand these principles in action, let’s examine how similar Celtic-inspired interlacing cables work at different weights:


Notice how the same general interlacing pattern creates different visual effects at each weight.
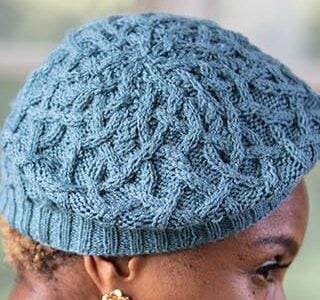
The Fingering Weight Approach: Kindred Spirits Hat
Working in fingering weight (Loops & Threads Woolike at 35 stitches/4 inches), the Kindred Spirits Hat demonstrates how fine yarn requires careful attention to maintaining cable visibility. The gauge of 40 stitches and 54 rows per 4 inches reveals that significant row-to-stitch ratio we discussed – for every stitch width, there are 1.35 rows of height.
At this weight, cable crosses need to happen frequently enough to maintain the weaving pattern while the fabric is still on the needles and relatively flat. If crosses are spaced too far apart vertically, the delicate strands between crosses become too long and the pattern loses definition. The designer chose cables that cross relatively often, creating a dense, intricate appearance that suits the fine yarn.
The ribbed brim (worked at an even tighter gauge of 40 sts/4 inches on US 1 needles) provides important context. It shows how much the cable section relaxes in comparison. This is a key consideration: fingering weight cables often need a fairly tight gauge to maintain crispness.
The Worsted Weight Middle Ground: Celtic Cables Cowl
Moving to worsted weight (Lion Brand Heartland at 24 stitches/4 inches), the Celtic Cables Cowl shows a more balanced stitch-to-row ratio. At this weight, cables have enough substance to hold their shape with less frequent crossing, while still creating elegant definition.
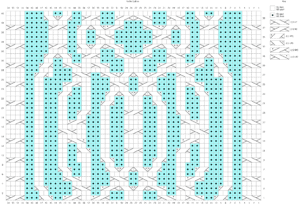
The Celtic Cables Cowl chart shows a 40-row repeat with balanced interlacing. This longer repeat works well in worsted weight where the yarn has enough body to support stretches between crosses.
The designer uses a 40-row repeat (the chart shows rows 1-40) for the interlacing pattern. This is significantly longer than would work well in fingering weight, but the worsted yarn has enough body to support these longer stretches between crosses. The cables remain distinct and sculptural without becoming muddy or compressed.
Working at 24 stitches and 19 rows per 4 inches, we see a ratio of roughly 1.27 stitches per row—closer to square than the fingering weight example. This means the cables appear more balanced and less vertically elongated.
The Bulky Weight Transformation: Cozy Cabled Cowl
In bulky weight (Lion Brand Lion’s Pride Woolspun at 13 stitches/4 inches), we see another dramatic shift. The Cozy Cabled Cowl works at 13 stitches and 11 rows per 4 inches—nearly a 1:1 ratio. This is critical: at this weight, stitches and rows are almost square, which completely changes how cables appear.

The bulky-weight cables create bold, sculptural texture with dramatic shadows and deep relief. The thick yarn bridges distances between crosses effectively.
The heavy yarn creates bold, sculptural cables with dramatic shadows. Crosses can be spaced quite far apart (relatively speaking) because the thick yarn bridges the distance effectively. The same crossing frequency that might look too tight in fingering weight becomes perfectly balanced in bulky.
What’s particularly interesting is that both this cowl and the worsted-weight cowl create successful Celtic-inspired interlacing patterns, but they achieve it through different means—the bulky version likely uses fewer cable strands or simpler crossing patterns, allowing the yarn weight itself to create the visual impact.
Practical Guidelines for Adaptation
Based on these examples, here are concrete strategies for adapting cable patterns across weights:
Adjusting Crossing Frequency
Going lighter (worsted to fingering): Increase crossing frequency by roughly 25-30%. If your original pattern crosses every 8 rows, try every 6 rows in fingering weight. The finer yarn needs more frequent crosses to maintain pattern clarity.
Going heavier (worsted to bulky): You can often maintain or even slightly reduce crossing frequency. The bulkier yarn holds the cable shape longer between crosses. However, test swatching is essential—some bulky yarns are quite soft and may need more frequent crosses than you’d expect.
Calculating Background Stitches
The reverse stockinette or garter stitch background around cables needs careful consideration:
For smaller weights: You may need to add background stitches. A cable flanked by 2 purl stitches on each side in worsted might need 3-4 purl stitches in fingering to maintain the same visual proportions. The finer gauge means those 2 stitches occupy less physical space.
For heavier weights: Consider reducing background stitches. Those same 2 purl stitches become much wider in bulky yarn—you might only need 1 purl stitch, or in some cases, cables can sit directly adjacent to each other.
Maintaining Cable Proportion
Cable width needs to scale with your gauge, but not always proportionally:
Simple cables (2/2 or 3/3 crosses): These usually adapt fairly directly. A 3/3 cable in worsted works as a 3/3 cable in fingering or bulky, though the visual impact will differ.
Complex interlacing patterns: These may need more significant redesign. A pattern using cables of 4, 6, and 8 stitches in worsted might become 3, 5, and 7 stitches in fingering, or 5, 7, and 9 in bulky. The key is maintaining the visual relationship between different cable elements, not strict mathematical scaling.
The Critical Role of Swatching

When adapting cables across weights, standard swatching becomes even more essential—but with specific considerations:
Swatch size matters more: Make swatches large enough to include at least 1.5 repeats of your cable pattern. You need to see how the cables look in context, not just as isolated motifs.
Observe over time: Pin your swatch up and look at it over several days. Do the cables maintain their definition? Do they look too tight or too loose? Sometimes issues only become apparent after you’ve lived with the swatch for a while.
Test blocking: Cables can change dramatically when blocked. Some yarn fibers bloom and soften cables; others tighten and crisp them. Always block your swatch the way you plan to block the final piece.
Try multiple needles: If your cables look compressed, try going up a needle size—but only for the cable sections, not necessarily the whole piece. Conversely, if fingering weight cables are too loose, you might need to go down a size.
A Worked Example: Adapting a 4-Stitch Cable
Let’s walk through adapting a simple cable from worsted to both fingering and bulky:
Original (worsted, 18 sts/4″):
P2, C4F, P2 (cable crosses every 6 rows)
Total width: 8 stitches = 1.75 inches
Adapted to fingering (28 sts/4″):
P3, C4F, P3 (cable crosses every 4 rows)
Rationale: Added one purl stitch on each side because the worsted’s 2 purls = 0.44″, but in fingering those 2 purls = only 0.28″. Three purls = 0.42″, closer to the original proportion. Increased crossing frequency from every 6 rows to every 4 rows because of the higher row gauge (6 rows in worsted = 0.96″, but 4 rows in fingering = 0.57″. We want crosses happening at roughly similar vertical intervals).
Adapted to bulky (12 sts/4″):
P1, C4F, P1 (cable crosses every 6-8 rows)
Rationale: Reduced purl stitches because 2 purls in bulky = 0.66″, too much visual separation. One purl = 0.33″, which maintains adequate definition. Kept or slightly increased crossing interval because bulky yarn holds shape well between crosses.
When Not to Adapt
It’s worth noting that some cable designs are optimized for specific weights and lose their character when translated:
Extremely intricate cables with multiple crossing directions often work best in worsted weight or lighter. Translating them to bulky can make them illegible—the thick yarn obscures the crossing pattern.
Bold, sculptural cables with long stretches between crosses may lose impact in fingering weight, appearing stringy rather than architectural.
Consider whether you’re better off finding or designing a different cable pattern that’s optimized for your target weight, rather than forcing an adaptation that compromises the design’s strength.
Conclusion
Adapting cable motifs across yarn weights is part technical calculation and part artistic judgment. The mathematical guidelines—adjusting for gauge, scaling background stitches, modifying crossing frequency—provide a starting point. But the real skill comes from understanding how yarn weight affects cable character: the boldness of bulky, the precision of fingering, the versatility of worsted.
By studying successful examples like the patterns discussed here, and by committing to thorough swatching and testing, you can develop an intuition for how cables translate across weights. This opens up your entire cable pattern library to reinterpretation—allowing you to recreate favorites in new ways, or to confidently design new pieces knowing you can adapt your cables to suit any project weight.
The key is remembering that adaptation is not mere mechanical translation. It’s a creative process of maintaining the essential character of a cable design while respecting the unique properties of different yarn weights.
About the Author: Jody Richards

Jody is the founder and lead editor of Knotions. She loves poring over stitch dictionaries and trying out new stitches.
She’s also on a mission to get everyone to embrace the blocking. And, to avoid using garter stitch edges in swatches.
And while she likes all things crafting (well ok, except that one thing), yarn crafts are her true love (and she has the stash to prove it).

Leave a Reply