Have you ever wanted a smoother bind off edge than the stair step edge that you typically get? That edge can take your gorgeous FO to something that looks…lackluster.
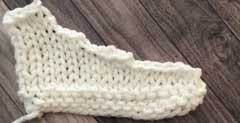
Take a look at the typical bind off edge:
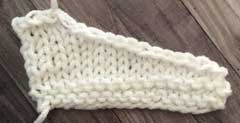
The Bias Bind Off might be the thing for you. See?
It’s great to use on garment necks, collars or anywhere you want to avoid that annoying stair step look. It’s a must-use if that edge is being left as is, and if it’s not going to be seen by itself, it’s still great because it’s much neater.
All that and it’s easy too! Read below for our easy steps.
How to Knit the Bias Bind Off
For our example we”ll pretend we have this for the instructions: BO6, work the rem, turn and purl row, BO4, work the rem, turn and purl row, BO2, work the rem.
Step 1: BO how ever many sts you’re instructed to BO at the start. Work the rest of the row. Turn. [in our example, it’s 6)

Step 2: Work until 1 st rem, slip that last stitch purlwise. Turn.

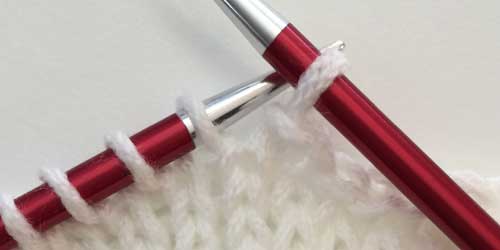
Step 3: Slip the first two sts purlwise,

and then pass that first stitch on the right needle over that second stitch (what you’d do in a regular bind off). One stitch bound off.
Bind off the rest of your sts (so, one less than you’re instructed since you bound off the first stitch already). Don’t forget to count that first stitch we bound off! Turn. [in our example, it’s 3, and the next time it’s 1]
Step 4: Repeat Steps 2 and 3 until you’ve bound off everything you need to bind off.
That’s it – you’re done! Let’s compare the two.
The regular (I call it “old way”)
And the improved, Bias Bind Off:
Isn’t that so much better? And it just took a small bit of pre-planning (really, you just need to know about it before you start).
Where Can I Use the Bias Bind Off?
It’s a great choice anywhere your bound off edge is going to be visible:
- collars
- sleeve edges (if you’re doing a bell or other shaped sleeve edge)
- necklines
- top-down shawls where all the sts aren’t bound off at once
You can also use it if your stair step edge is going to be hidden by another set of knitting, such as:
- necklines
- shoulders
- shawls where an edge is picked up
Once you learn this simple technique, you’ll be finding a ton of places to use it! It’s a great way to add some easy polish to your knitting!
Craft Smarter In the New Year
This post is part of our Craft Smarter in the New Year series in January 2018! Don’t miss any of our posts!

- Improved SSK’s (knit)
- Centered Double Decrease (knit)
- Stacked Increases and Decreases (knit)
- Post Stitches (crochet)
- Weaving in Ends (crochet)
- Jogless Stripes (crochet)
- Bias Bindoff (knit)
- Fix-a-Stitch Review (knit)
- One-Row Buttonhole (knit)

Leave a Reply