


A few years ago, I worked up one side of this coin purse, and fell in love with the flower motif, but I had no idea what I would do with it. The motif went into my WIPs bin, and sat… and sat… and sat until last year when I pulled it back out, and decided to make a bunch, and link them together to create a triangle shawl – one of my proudest moments was finishing that baby.
While I was working on the shawl, a bunch of ideas came to mind. I could use the motif to make a top, or rectangle wrap, or… a coin purse! And imagine in all yellow like a sun, or all white like a snowflake, or maybe a flower with a little lady bug or bee [button] sitting on one of the petals.
I specifically chose embroidery floss for the coin purse because it is 100% cotton, which is important for durability in something that will endure a lot sitting at the bottom of your purse.
You can substitute one strand of lightweight/sport weight yarn in place of the two strands of floss, but I recommend a 100% cotton. Gauge isn’t essential for this project, so if you are okay with a larger coin purse, you could also substitute for a worsted weight yarn.
Size
Before seaming, flower measures 3 1/8″ (7.95 cm) wide from tip of one petal to another. After seaming, purse measures 3 ¼” (8.26 cm).

Yarn
DMC Six-Strand Embroidery Floss (100 Mercerized Cotton; 8.7 yards [8 meters]/1.6 grams): Flower Center (CA), 2 Skeins; Flower Petals (CB), 3 Skeins
OR 45 yards [40 meters]/6 grams) of lightweight #3 yarn
Hook
H8/5mm Crochet Hook
Notions
Tapestry Needle
Size 4 [⅝” (1.6 cm)] Snap Button
Sewing Needle with Matching Thread
High Temperature Hot Glue Gun and Sticks, or Choice of Fabric Glue
Gauge
17 hdc = 4” (10.16 cm); 11 Rows = 3 15/16” (10 cm)
Abbreviations
Please see standard abbreviations.
Pattern Notes
This coin purse is worked holding two lengths (a total of 12 individual strands) of embroidery floss together throughout, but any weight yarn can be used with respective hook.
Beginning chain 1 does not count as a stitch.
Center of the flower is worked differently than typical. I work in this manner to keep my seam straight, and nearly invisible.
In the Center, join to the first stitch, not the beginning chain. In the Petals, join to the second stitch to lessen the level change.
Snap buttons are my favorite because they are so easy to sew on, and so easy to use. You may be able to use a magnetic closure in place of the snap button, though it hasn’t been tested.
Hot glue is added just behind the snap button after it has been sewn in place because snap button closures are very strong, and the embroidery floss fabric is pretty delicate. The hot glue helps the fabric from pulling when the snap button is opened.
Coin Purse Instructions
Flower – Make 2
With CA floss held double(12 individual strands total), ch 5. Join to the first ch to form a ring. Ch 1. Work 12 hdc into the ring. Join. (12 hdc)
R2: Ch 1. Work 1 hdc into the first hdc, 2 hdc into each of the next 11 hdc’s, and 1 hdc into the first stitch just to the right of the beginning chain 1. Join, and switch to CB. (24 hdc)
R3: In CB, ch 1. Sc into the first hdc, sk the next hdc, (3 dc, ch 2, 3 dc) into the next hdc, sk the next hdc, *sc into the next hdc, sk the next hdc, (3 dc, ch 2, 3 dc) into the next hdc, sk the next hdc, rep from * 4 more times. Join, and fasten off. (6 petals, 6 sc)
Finishing
Lay flowers down with WS facing, positioned so two petals are directly on top of each other. Cut a long piece of CB. Secure end of tail by weaving into the WS of the center top of a petal, then bring needle out of first dc to the left of the ch 2, and begin whipstitching through both layers. Whipstitch around the half of the first petal, then 3 full petals and then half of the final petal. Refer to the diagram to more easily envision it.
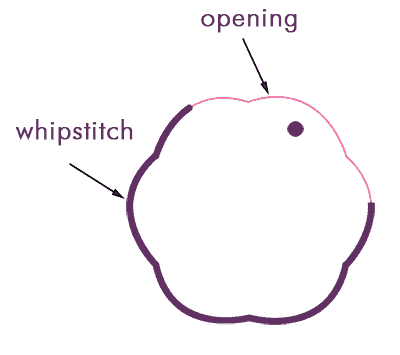 The remaining open part will be for the snap button and access to the inside of the coin purse. Weave in end.
Sew on Snap Button
Lay purse down with opening at top. Grab the fat part of the snap button, and position it at the center of the two petals at the top just where the color change is between the center, and petals with the nub facing down (and opening facing you). With sewing needle, and thread, sew in place.
Flip purse over. Grab the skinny part of the snap button, and mirror it with the nub facing you. Sew in place.
Lightly pull back at spaces in between snap button holes, and dab some hot glue for added security.
 ABOUT THE DESIGNER: ALEXANDRA RICHARDS
 ABOUT THE DESIGNER: ALEXANDRA RICHARDS
Alexandra is described as a “craft, coffee and cat addict”.
Though she has always been a crafty person, she picked up needlepoint on plastic canvas in 2006. In 2015, she learned to crochet, and began her blogging journey as EyeLoveKnots, named in honor of family members affected by Retinoblastoma – a cancer of the eye.


These are just beautiful. I wish I could knit this well.
Ps. thanks for stopping by to link up at https://thirtyminusone.com
So pretty, what a sweet little gift idea.
It would be a great gift! Perfect even for the person who “has everything”.
I love this! Found you on Joy Of Motion Crochet!
Thank you for stopping by, Elizabeth!
My daughter would love one of these (or more). Thank you for sharing the pattern at The Really Crafty Link Party. Pinned.
You’re welcome!
I’m so glad she’ll like it (them?)!
This is so cute!
I’m glad you like it!
These are so cute. Thanks for sharing…
They are, right? And a great use for those random colors of floss that we always seem to have around.