


![]()
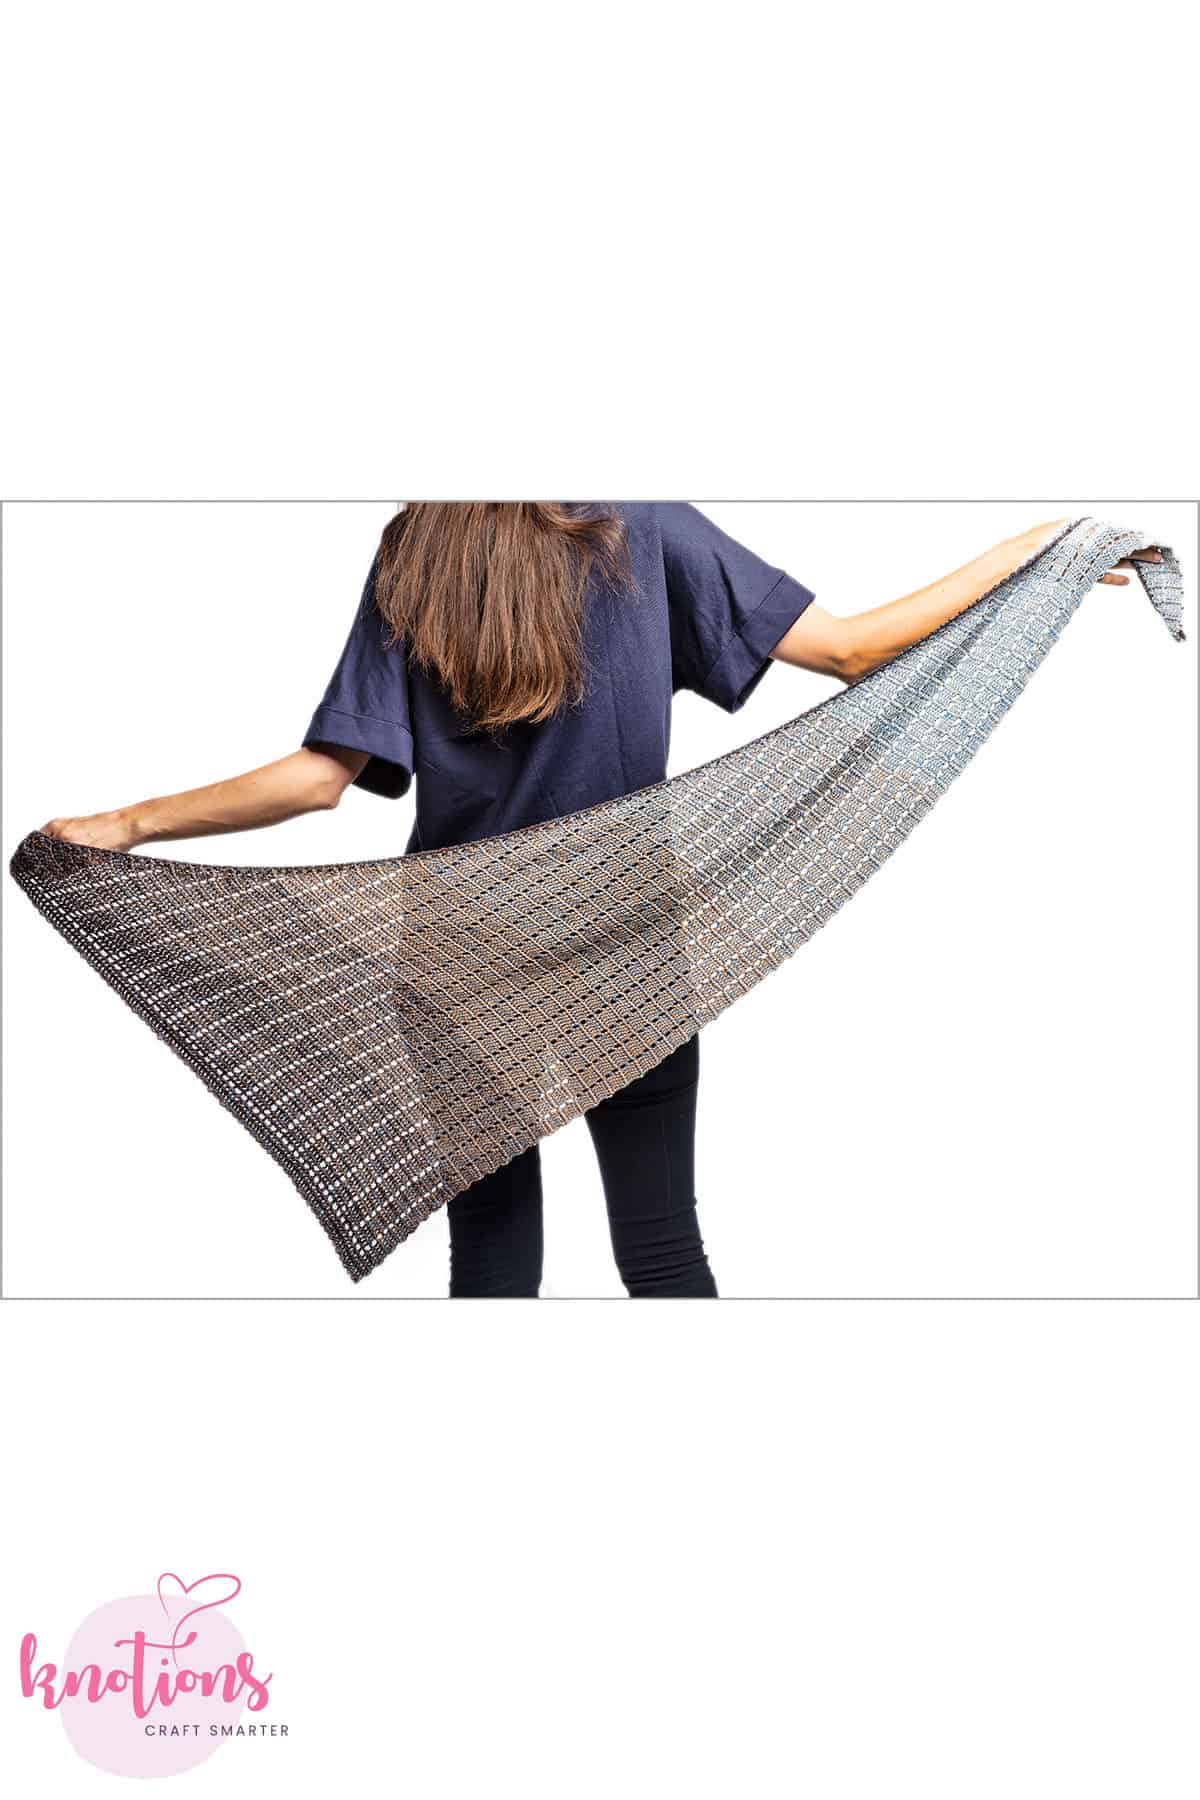
Caitriona (pronounced kəˈtriːnə) is the name of the actress who plays the leading role of Claire Fraser in the Outlander shows. I designed this shawl to feature Jazz Handz Fusion Fiber in the Outlander Series: Jamie Fraser Kilt colorway.
The stitch pattern resembles a plaid, bringing to mind the kilts worn on the show.
I enjoy learning new techniques and incorporating them into my patterns. In this pattern, I included a chainless turn to give a smooth and interesting top edge. The chainless turn is done by taking the hook out of the loop, turning the piece and inserting the hook back into the loop. It is used in combination with (sc, ch2, dc) to create the top edge that I’ve named “Chainless Turn Edge.”
US Terminology

Yarn
Jazz Handz Fusion Fiber (100% cotton) Outlander Series: Jamie Frasier Kilt (Motown Fusion) colorway
Size
150g/720yd cake
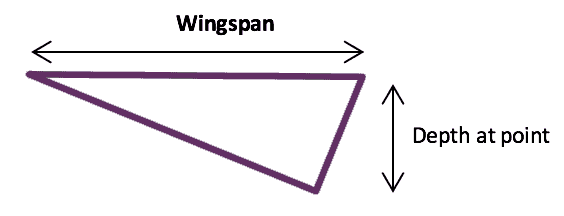
65” wingspan x 22” depth at point (165cm x 56cm)
100g/480yd cake
57” wingspan x 17” depth at point (145cm x 43cm)
Hook
E-size hook (3.5mm), or size needed to obtain gauge (Note: My crochet has a very loose tension)
Gauge
(in pattern, rows 1-18)

Notions
Tapestry needle
Size 6/0 Glass Beads (I used 102 in my sample, but the exact amount will depend on how many repeats you do in yours)
Special Stitches/Abbreviations
Please see our standard abbreviations.
Place Bead (see beading tutorial)
Chainless Turn (ct): take the hook out of the loop, turn the piece and insert the hook back into the loop
Bead Chain: Ch1, place bead, ch1
Bead Edge (called out as edge in stitch count): Ch1, place bead, ch1
Top Edge Loops (called out as loop in stitch count):
Beginning Loop: Chainless Turn Edge (cte): ct, sc between 1st & 2nd dc, ch2, dc in same sp between dc
End Loop: Into Chainless Turn Edge: 2dc in ch-sp
Shawl Instructions
Row 1: Make a slip knot and add a bead, Ch4, dc in back bump of 3rd ch from hook, dc in back bump of last ch
Row 2: Bead edge, 2dc in 1st dc, sk dc, end loop {1 edge, 2 dc, 1 loop}
Row 3: Beginning loop, sk dc, 2dc in next dc, dc in next dc {3 dc, 1 loop}
Row 4: Bead edge, dc in 1st dc, dc in next dc, 2dc in next dc, sk dc, end loop {1 edge, 4 dc, 1 loop}
Row 5: Beginning loop, sk dc, 2dc in next dc, dc in next 3 dc {5 dc, 1 loop}
Row 6: Bead edge, dc in 1st dc, dc in next 3 dc, 2dc in next dc, sk dc, end loop {1 edge, 6 dc, 1 loop}
Row 7: Beginning loop, sk dc, dc in next dc, ch1, dc in next 5 dc {6 dc, 1 ch1-sp, 1 loop}
Row 8: Bead edge, dc in 1st dc, dc in next 4 dc, ch1, sk ch1-sp, 2dc in next dc, sk dc, end loop {1 edge, 7 dc, 1 ch1-sp, 1 loop}
Row 9: Beginning loop, sk dc, 2dc in next dc, dc in next dc, ch1, sk ch1-sp, dc in next 5 dc {8 dc, 1 ch1-sp, 1 loop}
Row 10: Bead edge, dc in 1st dc, dc in next 4 dc, ch1, sk ch1-sp, dc in next 2 dc, 2dc in next dc, sk dc, end loop {1 edge, 9 dc, 1 ch1-sp, 1 loop}
Row 11: Beginning loop, sk dc, 2dc in next dc, dc in next 3 dc, ch1, sk ch1-sp, dc in next 5 dc {10 dc, 1 ch1-sp, 1 loop}
Row 12: Bead edge, dc in 1st dc, dc in next 4 dc, ch1, sk ch1-sp, dc in next 4 dc, 2dc in next dc, sk dc, end loop {1 edge, 11 dc, 1 ch1-sp, 1 loop}
Row 13: Beginning loop, sk dc, dc in next dc, ch1, dc in next 5 dc, (ch1, sk ch1-sp, dc in next 5 dc) across {11 dc, 2 ch1-sp, 1 loop}
Row 14: Bead edge, dc in 1st dc, dc in next 4 dc, (ch1, sk ch1-sp, dc in next 5 dc) across to last ch1-sp, ch1, sk ch1-sp, 2dc in next dc, sk dc, end loop {1 edge, 12 dc, 2 ch1-sp, 1 loop}
Row 15: Beginning loop, sk dc, 2dc in next dc, dc in next dc, (ch1, sk ch1-sp, dc in next 5 dc) across {13 dc, 2 ch1-sp, 1 loop}
Row 16: Bead edge, dc in 1st dc, dc in next 4 dc, (ch1, sk ch1-sp, dc in next 5 dc) across to last ch1-sp, ch1, sk ch1-sp, dc in next 2 dc, 2dc in next dc, sk dc, end loop {1 edge, 14 dc, 2 ch1-sp, 1 loop}
Row 17: Beginning loop, sk dc, 2dc in next dc, dc in next 3 dc, (ch1, sk ch1-sp, dc in next 5 dc) across {15 dc, 2 ch1-sp, 1 loop}
Row 18: Bead edge, dc in 1st dc, dc in next 4 dc, (ch1, sk ch1-sp, dc in next 5 dc) across to last ch1-sp, ch1, sk ch1-sp, dc in next 4 dc, 2dc in next dc, sk dc, end loop {1 edge, 16 dc, 2 ch1-sp, 1 loop}
Repeat Rows 13-18 for desired length.
The stitch counts in the curly brackets at the end of each row are only for the first repeat.
End after row 17 instructions
Short Edge Finishing
Row 1: Dc in each dc and ch-sp across to last 3 dc, 2dc in dc, 2dc in cte ch-sp
Row 2: Cte, sk dc, 2dc in next dc, (dc in each dc) across
Edging Row: Ch1, place bead, sl st in 1st dc, (ch3, sk 1 dc, sl st in next dc, bead chain, sk 1 dc, sl st in next dc) across
Top Edge Finishing
The top edge is pretty as is, so feel free to skip this section. I decided to carry the final color of the gradient across the top edge to visually tie everything together. If your piece curls more than you like, the top edge also stabilizes and flattens it.
At the end of the Short Edge Finishing, do 3 sc in the last st, rotate piece; 2 sc in ea loop across.
Fasten off, weave in ends, block as desired
Table of Stitch Counts
13b-18b = second time through the repeat
13c-18c = third time through the repeat
| Row number | row number instruction to use | number of double crochet | number of ch1-spaces | top edge loop style | bead chain |
| 1 | 1 | 1 | none | ch3, dc | no |
| 2 | 2 | 2 | none | 2dc in ch-sp | yes |
| 3 | 3 | 3 | none | chainless turn edge | no |
| 4 | 4 | 4 | none | 2dc in ch-sp | yes |
| 5 | 5 | 5 | none | chainless turn edge | no |
| 6 | 6 | 6 | none | 2dc in ch-sp | yes |
| 7 | 7 | 6 | 1 | chainless turn edge | no |
| 8 | 8 | 7 | 1 | 2dc in ch-sp | yes |
| 9 | 9 | 8 | 1 | chainless turn edge | no |
| 10 | 10 | 9 | 1 | 2dc in ch-sp | yes |
| 11 | 11 | 10 | 1 | chainless turn edge | no |
| 12 | 12 | 11 | 1 | 2dc in ch-sp | yes |
| 13 | 13 | 11 | 2 | chainless turn edge | no |
| 14 | 14 | 12 | 2 | 2dc in ch-sp | yes |
| 15 | 15 | 13 | 2 | chainless turn edge | no |
| 16 | 16 | 14 | 2 | 2dc in ch-sp | yes |
| 17 | 17 | 15 | 2 | chainless turn edge | no |
| 18 | 18 | 16 | 2 | 2dc in ch-sp | yes |
| 13b | 13 | 16 | 3 | chainless turn edge | no |
| 14b | 14 | 17 | 3 | 2dc in ch-sp | yes |
| 15b | 15 | 18 | 3 | chainless turn edge | no |
| 16b | 16 | 19 | 3 | 2dc in ch-sp | yes |
| 17b | 17 | 20 | 3 | chainless turn edge | no |
| 18b | 18 | 21 | 3 | 2dc in ch-sp | yes |
| 13c | 13 | 21 | 4 | chainless turn edge | no |
| 14c | 14 | 22 | 4 | 2dc in ch-sp | yes |
| 15c | 15 | 23 | 4 | chainless turn edge | no |
| 16c | 16 | 24 | 4 | 2dc in ch-sp | yes |
| 17c | 17 | 25 | 4 | chainless turn edge | no |
| 18c | 18 | 26 | 4 | 2dc in ch-sp | yes |
ABOUT THE DESIGNER: MARGO BAUMAN
Margo Bauman – aka flyingflower on Ravelry – learned to crochet from her Grandmother. While she occasionally spent some time working on crochet projects while growing up, and later in college, she didn’t devote much time to it until the 2000’s. Since then, she has won a considerable number of 1st place ribbons at the St. Mary’s County Fair for her exceptional work and she’s a member of the CGOA. Her beautiful crochet pieces can be seen at the woman’s cooperative called Fuzzy Farmers Market in Leonardtown MD.
Over the past few years, Margo has created a number of original designs. Her very first pattern, Oh, Honey! Tunisian Spa Cloth, was released as a free pattern on Ravelry in March 2015. Later that year she was a Crochet Awards (aka the Flamies) Judges Nominee.


If I don’t want to add beads to the edge what do I do instead?
given the beaded edge does add a bit of a wavy edge, i’d try maybe a single chain or 2 chains. just something to add a bit of a wavy edge.
since we haven’t tested it, i think you’ll need to do a bit of a trial and error first. maybe a small swatch to try it out first?