
The instructions will work for both top-down and bottom-up sweaters, but the wedge will either be smaller on top or on the bottom depending on which direction you’re knitting. This won’t impact how the short rows work.


How many short rows should I do?
You may have heard of the convention of knitting a certain number of short rows depending on your cup size. I don’t like that approach, and I find that it does not work for really large busts. I recommend a different approach.
Take a tape measure and write down two measurements – full bust length (#3 below) and outer bust length (#4).

The difference in these two measurements is a good approximation of the height of short rows you need to do. If your top has a lot of positive ease you may need fewer short rows than you measured. If your top has a lot of negative ease you may need to do more.
Note: I’m using inches but metric units will work exactly the same way.
Let’s take a real world example. Say you’re knitting a sweater:
- Gauge: 20 sts and 24 rows over 4 in / 10 cm
- Outer Bust is 13 inches
- Full Bust is 16 inches.
- Front width is 19 inches
Calculate the additional length needed
Additional length is Full Bust – Outer Bust. In our example it is 16 – 13 = 3 inches
This means you need to add 3 inches of length to the front of your garment to make up for the length that is taken up by the fullest part of your bust.
Determine how many rows make up the additional length
Step 1: Determine how many short rows you need
6 rows per inch x 3 inches = 18 rows.
Perfect! 18 is an even number. If our number wasn’t even we would have had to round up or down to make it even.
Step 2: Determine how many stitches you have to work with for the short rows
The short rows should start about 1 inch outside of the apex of your breast. This makes for a smooth transition and avoids a point right at the point of the breast (yeah, not so pretty).
Measure across the bust from apex to apex. Add 2 inches to it.
If the measurement from apex to apex is 8 inches, 8 + 2 = 10 inches.
Then, take this measurement and subtract it from the width of the front:
19 – 10 = 9 inches
Now, halve that number because half of it is on each side of the apex measurements.
9 / 2 = 4 ½ inches
4 ½ inches in number of stitches for our gauge is
4 ½ inches * 5 stitches per inch = 22 ½ stitches
We’ll decide in the next set of instructions if we should round up or down.
Step 3: Determine placement of the short rows
I recommend starting the short rows a half an inch in on each side of the body — this is just to keep the sides clean.
So, if we’re going to be working a half inch in on each side, that’s
4.5 stitches per inch * ½ inch = 2 ¼ stitches.
We’ll remove this from the number of stitches calculated in Step 2.
22 ½ – 2 ¼ = 20 ¼
20 ¼ is close to 20 so let’s round down to 20.
Step 4: Short row rate
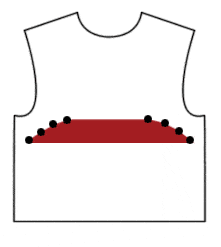
We’ll be giving some space between each wrap to avoid a discernible line on the sides of your bust. In the below illustration we have 8 wraps (4 on each side) for a total of 8 short rows.
In our example we’ll be doing 18 short rows over 20 sts. To make the math easy, let’s make it 18 short rows over 18 sts.
Note – we can’t change the number of rows (the 18 number) but we can nudge the 20 number a bit and still be OK. Designers do this all the time when they’re doing things like calculating decrease rate for sleeves or waist shaping and the like.
So, we’re going to do 18 short rows over 18 stitches. Since short rows are in pairs, this means we’ll be doing 9 short rows on each side (in the diagram above that would mean 9 black dots on each side).
18 stitches / 9 short rows = 2 stitches. This means we’ll be wrapping and turning every 2 stitches – or every other stitch.
In Pattern-ease
Here’s how I would write out these instructions:
Note: These instructions work for sweaters knit in the round and flat. Regardless of which method your sweater is knit, short rows are knit flat. This means if your in the round gauge is different from your knitted flat gauge that you’ll have to take this into account when inserting short rows into an in the round sweater.
Begin Short Rows.
Row 1 (RS): Knit until there are 3* sts rem, w&t
Row 2: Purl until there are 3* sts rem, w&t.
Row 3: Knit until there are 5** sts rem, w&t
Row 4: Purl until there are 5** sts rem, w&t
Cont in this manner for a total of 18 rows – 9 wrapped sts on each side.
If you’re knitting the sweater in the round:
Next Row: Knit across entire row, picking up and working wraps as you come to them.
If you’re knitting the sweater flat:
Next Row: Work across all sts on the row, picking up working the wraps on the right hand side of the sweater.
Next Row: Work across all sts (this will be the first full row you’ll work) picking up and working the wraps on the left hand side of the sweater.
* I calculated the 3 from Step 3 where we determined that the short rows would be placed 2 ¼ stitches in from the edge. I rounded 2 ¼ down to 2. So, the pattern instructs you to work until 3 sts rem and then wrap that next st. The first wrap is placed 2 sts in from the edge.
** I calculated the 5 by taking the 3 in Row 1 and adding 2 to it from Step 4 (Short row rate). This spaces each wrap 2 sts apart.
In action
I knit up a small sample to show you what short rows do.
The added length translates to a pouch in the sweater when both the top and bottom edges are held flat. You’ll also note that it’s not immediately obvious that there are short rows there. This is because we spaced them apart (Step 4). By spacing the short rows apart you create less of a discernible line in your knitting, making it harder to see. This is similar to spreading decreases out versus stacking them on top of each other.
Thanks so much for this post, it’s really helpful! I was wondering if the labels on the “top-down” vs “bottom-up” diagrams are reversed? It seems like the instructions are always to knit the widest rows first and they then grow smaller as you work, so I would expect the top-down chart to have the widest side of the trapezoid on top (the first short row knitted), and the bottom-up one to have the widest side of the trapezoid on bottom. Should that be the case, or am I misunderstanding? Thanks again!
I’m so glad they’re helpful!
Either way will work. The garment’s shape will be the same. I personally prefer to do them this way, but it’s really your choice – both the way you like to work and also aesthetics.
Thank you for your recommendations on short row shaping. I am trying to knit a sweater for my husband, ho has a pronounced stoop. The length of the “stoop” is 3″ greater than the length of his chest, measured from the top of shoulder. The curve of the back extend from his neck to his armpit. How would I insert the short rows and at what depth?
The sweater is knit from the bottom-up.
Thanks so much for your solution
have you started knitting it yet?
i ask because i’d probably do short rows in a larger area than the stoop, as a way to make it less-pronounced. so, even though you say it goes from his neck to armpit, i’d likely do as low as the waist area instead. this way it’s not just in that area, but it’s deeper.
does that make sense?
Hi. Thanks for your reply. Yes, I have started knitting. In fact I’m up to the armhole bind off. The rounding is upper back .
This is wonderful! Thank you so much! I’m knitting a Tegna (well… a top inspired by Tegna😉) and I need short rows in order to have a balanced top. Your math and written instructions are fantastic, thanks again!
I’m so glad you found them helpful! Short rows are confusing.
You are so skilled! Thank you for this. I’m hoping to knit a patterned cardigan for my 98 year old mother, who has a pronounced dowagers hump, leaving all her tops short in the back. Can you explain how I would determine how many short rows to do, and where I would place them? (I’ve only had one experience with short rows for neck shaping on a toddlers sweater – it wasn’t pretty lol)
Can you measure her?
I’d measure her on top of the hump and then on the sides. The difference is how much to add.
Then (and I don’t have any experience with this), I’d do short rows on the back that are similar to bust short rows. This way you have extra fabric for the hump but you’re not over-exaggerating it.
Does that make sense?
Thank you for such a fast response!!
Would I measure ACROSS her back, or is it the length that needs to be measured?
Would I be be able to maintain the pattern? I’m wondering if I should knit the back in a plain St stitch to keep things simpler.
I have a very difficult time visualizing things. I have trouble even rearranging the furniture lol
I’d measure up and down.
And I would DEF not have a pattern. Even if you kept the pattern it would draw attention to an area you don’t want to focus on.
Thank you so very much!!
Of course!
Let us know how it works out!
Good luck 🙂
WONDERFUL tutorial, Knotions. Thank you so much for sharing it with all of us.
I am the seamstress and knitter that does all the difficult fitting jobs. Without your clear, concise directions, I have spent frustrated hours in the past figuring out KNIT fittings for all these people. NO MORE! Your tutorial will put an end to all that.
Thank you again.
MJ, the SKEINdinavian
I’m so glad it’s helpful! Thank you 🙂
Hi!
Thank you for such an informative blog. I’m currently knitting a sleeveless, top down, in the round sweater that drapes in the front (Coachella by Fathom Harvill); I’ve already done modifications to give the back more coverage. The sweater is basically a tube with strategically placed arm holes that create a draping effect in the front. I don’t have much of a bust line, so the design causes the back of the sweater to rise. I’m currently at the mid-back point, a couple of inches below the arm holes. I know I need to add short rows to lengthen the back of the sweater, however, I’m at a bit of a loss when it comes determining how long to make each pair, where to place them, and how many regular rows to put between each short row pair to keep the fabric from bulging. The back is 56 stitches across and I think it’s about 2 inches high (or shorter than the front when I try it on), about 12 rows. I welcome any insight and advice you can give me. Please and Thank You!
eta the slipping of the first stitch when you turn. I forgot to include that originally!
Hey!
Ok, given I’m busty I have the reverse problem but I think I might be able to help you 🙂
So you need to add 12 short rows to the back of your sweater. I’d add a stitch marker at the middle (28 sts) just to make it a bit easier in the beginning.
This will be somewhat of a trial and error because we’re trying to fit you – but I’ll give you my guidance and it’ll be a good starting point.
I’d knit to the start of the back. Then knit to the mid-point (MP) and then 14 sts past it. w&t.
Sl1p, p27, w&t (first set of short rows are now done)
Sl1p, K30, w&t (pick up the wraps and work them from this point forward)
Sl1p, p30, w&t
Sl1p, k33, w&t
Sl1p, p33, w&t
Sl1p, k36, w&t
Sl1p, p36, w&t
Sl1p, k39, w&t
Sl1p, p39, w&t
Sl1p, k42, w&t
Sl1p, p42, w&t
Now the short rows are done and you could continue knitting in the round, picking up and knitting the last 2 wraps. BUT, I suggest trying it on now and seeing if it looks good. Does the curve make up for the rise in the back? Does it look natural? I spaced out the short rows so they didn’t form a stair step but you might need some more adjusting. The short rows are also more in the middle and not all the way to the edge. Again, I think this is what you’ll need but you’ll be the better judge when you try it on!
Either way – can you post back here when you’re done? I’d love to hear how it turns out! Good luck 🙂
Hi!
Thank you so much for the row by row breakdown. Your guidance and instructions worked out fantastically! I actually got the extra length I needed in the back in just 10 short rows. I tried it on and I was amazed and how well it worked out. Admittedly, I had to add a little part to each line that said: “knit/purl until * stitches left” before I could do the short rows right; I kept feeling like I was missing something or not doing them properly.
As for the short rows themselves, I did my version of a cross between Japanese short rows and pinning. I’m very new to short rows; I’ve only ever done them on socks. So, I’m feeling really good about my knitting right now. 😀
You saved me from much frustration and another UFO being added to my UFO pile (that I’m whittling down here and there)! Do you mind if I include a link to your website in my notes for this project on Ravelry?
Thanks again,
Ayesha
Yay!
I’m so glad it worked!
And yes of course – add the link to ravelry 🙂
OH! And thank you SO MUCH for the super speedy reply and help! I really really appreciate it.
You’re welcome! I’m so glad it helped 🙂
Hi!
How you calculate,how many turns and how many stitches she need to knit?
For the turns, Ayesha said she needed to add 12 rows, which would be 12 turns.
For the number of sts, I knew that she’d want the curve to be gradual so I started it with about half of the sts (28) in the middle, and then added 3 more sts on each side so it would be a more graceful curve.
In this case it’s not a perfect science, but it turned out to be a good estimate based on what Ayesha said afterwards. She did comment that she ended up only needing 10 rows instead of 12. Again, there’s no replacement for trying it on and seeing what it really looks like.
Does that help you?
The link for the measurement picture is broken. Where do I measure for “outer bust length” and “full bust length”?
Oops – it’s fixed now.
Sorry about that!
My pattern is for back shaping on a child’s romper on a circular needle it says working back and forth, beg shaping back as follows: work 41 sts, turn, sl first st and tighten slightly, work 81 sts,then turn. Cont working short row shaping in this manner, with 8 fewer sts each time 4 times on each side. Join and working in the red again, beg rods at center of back.What does this mean?
Does it say you should or shouldn’t wrap? I would think you should.
So, written another way, I’d say:
K41, w&t
sl1p, p81 (I’m assuming this is in St st), w&t
Sl1p, k73 (8 less than 81), w&t
Sl1p, p65 (8 less than 73), w&t
Sl1p, k57 (8 less than 65), w&t
Sl1p, p49 (8 less than 57), w&t
Sl1p, k41 (8 less than 49), w&t
Sl1p, p33 (8 less than 41), w&t
Now you’re done with the short rows and will go back to working in the round.
Sl1p, k to end of rnd, working wraps together with the stitches they’re wrapping, sm, k to end of rnd, working wraps together with the stitches they’re wrapping
All further rnds: Knit around (I don’t know if there’s shaping you have to do, but if there is you should do it)
Does that help?
Hi. thank you for this easy to follow instructions.
I loom knit (just can’t seem to get the hang of needle knitting lol) and I’m a very busty woman. I’ve been trying to loom knit a top for myself but I couldn’t find anything in loom knitting for shaping as it’s too tight over my bust and lots of fabric everywhere else!!!!
I have been searching for the past few weeks and yours is the best and easiest to follow instructions that I can translate into loom knitting.
I was getting frustrated because I have looked at sooooo many blogs and tutorials but they confused me and didn’t clearly explain (for me at least) how to actually do the short rows in practice.
Thank you very much for this, now I just need to finish the blanket I’m working on so I have the right loom gauge for the yarn for my top 😂😊
I’m so glad it helped! Now you’ll be finding all these places to add short rows 🙂