
KYOK is a pretty standard way to increase for shawls. It increases TWO stitches rather than the typical one stitch that you get from either a regular increase or a YO.
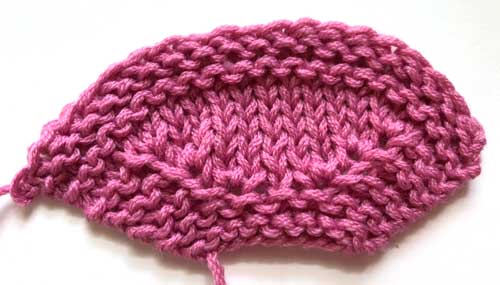
It might seem a bit odd and unusual – and the acronym/abbreviation certainly seems funky – but it’s really pretty simple!
How to Make the KYOK Increase
Although I’ve detailed 3 steps here, most people work it quickly and in one fell swoop. I wanted to show you each step in detail, but don’t let that discourage you.
We knit a few rows of garter stitch to start.
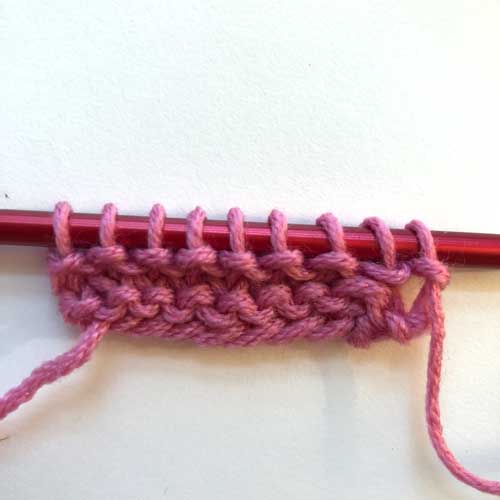
Step 1: K1 and DO NOT slip the stitch off the left needle
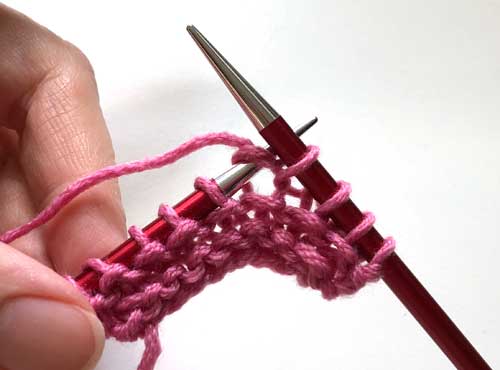
Step 2: Yarn Over (nothing unusual, just a regular Yarn Over).
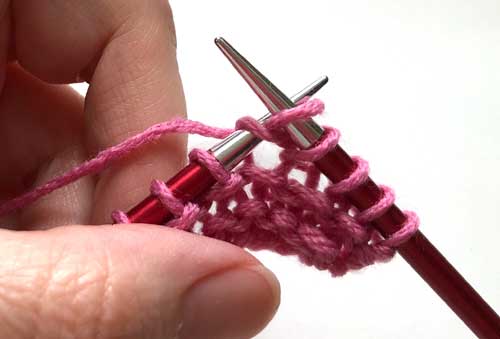
You now have 2 extra stitches on your right needle – the Knit stitch from Step 1 and the Yarn Over from Step 2. And remember, the stitch you knit into in Step 1 is still on your left needle.
Step 3: K1 in the same stitch you knitted into on Step 1. This time you DO slip the stitch off the left needle.

That’s it!
Here it is a few rows later.
It’s often used toward the edges of shawls (often tucked just inside a garter edge) so that’s what we’ve done here – we worked a 3-stitch garter edge and then tucked the KYOK in right next to it.
We’ve worked “k3, kyok, knit to 4 sts rem, kyok, k3“, followed by a few rows of stockinette.
Next time you see this increase, don’t shy away from it. Give it a try! It’s a simple increase to add to your arsenal and you’ll wonder why you haven’t tried it sooner.
An Alternative
If you don’t like the look of a KYOK or don’t enjoy working it, another option is the KFBF (Knit Front, Back, Front). It will create a little bar on the front of the work so it’s not good for all applications, but it could be useful for you and good to know.

See it in action: Our Blossom Shawl uses KYOK throughout to create its signature floral texture. Free to download.
Want to learn a new technique every month?
Year of Color 2026 is a free craft-along where we release a new knit and crochet pattern each month, each one built around a technique you might not have tried yet. Free forever, one square a month.
About the Author: Jody Richards

Jody is the founder and lead editor of Knotions. She loves poring over stitch dictionaries and trying out new stitches.
She’s also on a mission to get everyone to embrace the blocking. And, to avoid using garter stitch edges in swatches.
And while she likes all things crafting (well ok, except that one thing), yarn crafts are her true love (and she has the stash to prove it).
One thing I do to avoid a “bigger” hole: I work knit front, yarn over, knit into the back of the same stitch as step 1.
can you show the difference in increases and technique using
KFB and a newer stitch of KBF is there a difference I can’t find much info on this increase. I like learning new things and this one has me puzzled
Thanks
Sure! We love getting requests!
Just to give you some more info now, they’ll look very similar if someone is looking at it as a whole.
For the eagle-eyed: the purl bump will be in a different spot.
Most people do KFB but you can do either in most cases.
Very clear instructions that is easy to foll0w. Thank you.
Glad they were helpful :)!
And you’re welcome!