
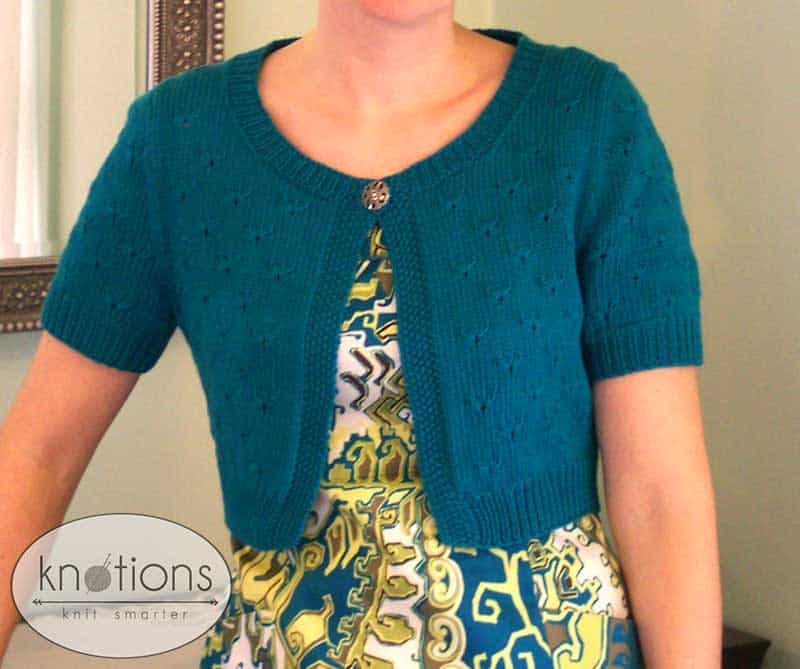
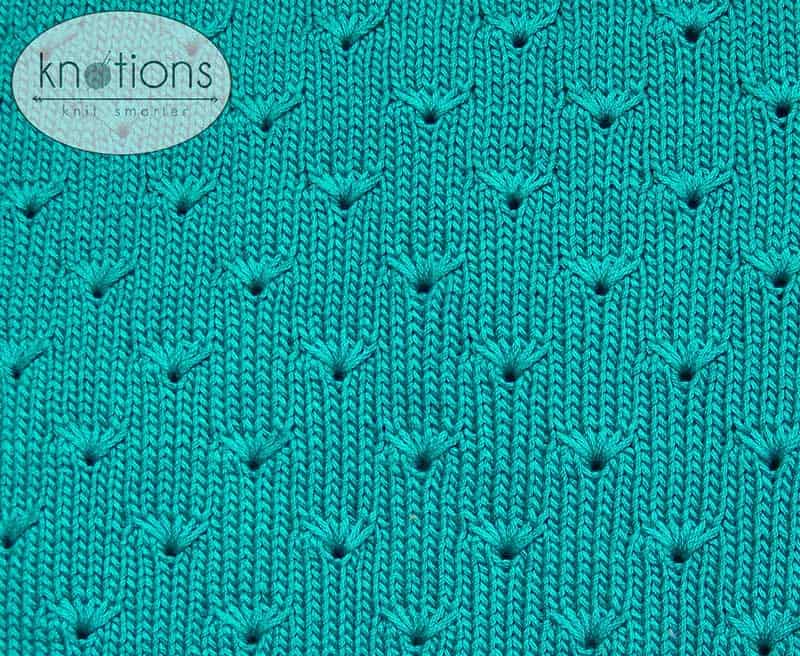
When I first saw this stitch pattern in the Harmony – Knit and Purl Guide![]() it immediately made me think of little lines of peacocks. I thought what an unusual and dainty pattern for a little cardigan. I loved how the pattern stitch formed little eyelets; a little bit lacy but still very refined. I picked a mercerized cotton with a little sheen to add to the refined look. The yarn also has great stitch definition that helps to show off the pattern. It doesn’t hurt that Cotton Classic is relatively affordable and also comes in loads of great colors. The sweater is a fifties inspired cropped cardigan with short sleeves; a great layering piece which is perfect for wearing over a fitted sundress or with a tank and shorts. Make it with the buttonhole and showcase a special button, or make it without and use a vintage brooch for closure to add to the 50’s style. With its cropped length and short sleeves, you can be done before the solstice.
it immediately made me think of little lines of peacocks. I thought what an unusual and dainty pattern for a little cardigan. I loved how the pattern stitch formed little eyelets; a little bit lacy but still very refined. I picked a mercerized cotton with a little sheen to add to the refined look. The yarn also has great stitch definition that helps to show off the pattern. It doesn’t hurt that Cotton Classic is relatively affordable and also comes in loads of great colors. The sweater is a fifties inspired cropped cardigan with short sleeves; a great layering piece which is perfect for wearing over a fitted sundress or with a tank and shorts. Make it with the buttonhole and showcase a special button, or make it without and use a vintage brooch for closure to add to the 50’s style. With its cropped length and short sleeves, you can be done before the solstice.
errata added July 5, 2017 and July 14, 2017
Just to confirm – as of June 5, 2018, all errata has been added
Sizes
Finished Bust Size 31 (35, 39, 43, 47, 51)” to fit bust 30 (34, 38, 42, 46, 50)”. 1-3” positive ease recommended. Shown in size 39” with approximately 2” of ease.
Yarn
Tahki Cotton Classic (100% cotton; 108 yds [100 m]/50 grams): #3786 Teal Green 5 (5, 6, 7, 7, 8) hanks
Needles
US#6 (4 mm): straight or circular for main body and sleeves
US#5 (3.5 mm): straight or circular for ribbing
Gauge
20 sts and 32 rows = 4” in st st.
20 sts and 32 rows = 4” in pattern stitch.
Notions
Tapestry needle
Stitch holders
One 1” button
Abbreviations
Please see our standard list of abbreviations.
Make Fan: Insert right needle through st 3 rows below the 2nd st on the left needle, pull through a loop, k2, pull 2nd loop through same st as 1st loop, k2, draw 3rd loop through same st as 1st two loops; 3 sts inc’d.
Pattern Notes
Total stitch numbers inc on row 1 of fan stitch pattern and decrease to beg st amount on row 2.
If there are not enough stitches to work a complete fan, work sts in st st.
When stitch counts are given, they are NOT counting the extra sts of Row 1. If you are counting on Row 1, be sure to adjust your expected stitch count accordingly (each fan will account for 3 additional stitches).
Stitch Patterns
Fan Stitch Pattern (repeat of 10 sts + 8 sts)
editor’s note: Someone who made this cardi noted that the stitch pattern is one stitch off. To make it even, you’d need to CO one additional stitch for each piece (back, left front and right front and each sleeve). Then you would knit that extra stitch.
For example, for the back you would CO 65 (73, 83, 93, 101, 111). All further stitch counts would also be off by one stitch.
This modification has not been tested or tech edited by Knotions but we believe it will work if you want each piece to be perfectly symmetrical.
Row 1 (RS): K2, make fan, *K6, make fan, rep from * to last 2 sts, k2.
Row 2: P2, [p2tog, p1] twice, p2tog,* p5, [p2tog, p1] twice, p2tog, rep from * to last st, p1.
Rows 3, 5, 7: K
Rows 4, 6, 8: P
Row 9: K7, *make fan, K6, rep from * to last st, k1.
Row 10: P7, *[p2tog, p1] twice, p2tog, p5, rep from * until 1 sts rem, p1.
Rows 11, 13, 15: K
Rows 12, 14, 16: P
Seed St (even number of sts)
Row 1: *K1, p1, rep from * across row.
Row 2: *P1, k1, rep from * across row.

Back
With smaller needles CO 64 (72, 82, 92, 100, 110) sts.
Row 1 (RS): *K1, p1, rep from * to end. Rep row 1 for k1, p1 rib until ribbing measures 2”, ending with a RS row.
Next row: Work in rib and at the same time inc 8 (10, 10, 10, 12, 12) sts evenly spaced across row – 72 (82, 92, 102, 112, 122) sts.
Change to larger needles.
Work 6 rows in st st (knit 1 row, purl 1 row).
Next row: K2 (7, 2, 7, 2, 7), work row 1 of fan st patt until 2 (7, 2, 7, 2, 7) sts rem, knit to end.
Next row: P2 (7, 2, 7, 2, 7), work row 2 of fan st patt until 2 (7, 2, 7, 2, 7) sts rem, purl to end.
Side shaping
Inc row (RS): K2, m1L, work to 2 sts before end, m1R, k2 – 2 sts inc’d – 74 (84, 94, 104, 114, 124) sts.
Work 5 rows without shaping.
Next row: K3 (8, 3, 8, 3, 8), work fan st patt until 3 (8, 3, 8, 3, 8) sts rem, knit to end.
Next row: P3 (8, 3, 8, 3, 8), work fan st patt until 3 (8, 3, 8, 3, 8) sts rem, purl to end.
Cont at est, repeating above instructions 3 more times (for a total of 24 more rows) interspersing fan sts so they appear like a diamond and not like a grid. Work an additional fan at both ends when there are adequate sts available – 80 (90, 100, 110, 120, 130) sts.
Cont even in patt until piece measures 6 1/4 (6 3/4, 7, 7, 7, 7 1/4)” from beg ending with a WS row.
Armhole shaping
BO 4 (5, 6, 8, 10, 12) sts at beg of the next 2 rows, work in patt to end – 72 (80, 88, 94, 100, 106) sts rem.
Dec row: K2, ssk, work in patt until 4 sts before end, k2tog, k2; 2 sts dec’d. Work 1 row in patt. Rep last 2 rows 2 (3, 5, 7, 9, 10) times more – 66 (72, 76, 78, 80, 84) sts. Cont even in patt until armhole measures 7 1/2 (8, 8 1/2, 8 3/4, 9, 9)”, ending with a WS row.
(Make a note of the last row worked of the fan stitch pattern. When you work the fronts make sure you end on the same row before the shoulder shaping.)
Shoulder shaping
Shoulders are shaped using short rows as follows:
Rows 1 and 2: Work in patt until 4 (4, 5, 5, 5, 5) sts before end, w&t.
Rows 3 and 4: Work in patt until 8 (9, 10, 10, 10, 10) sts before end, w&t.
Rows 5 and 6: Work in patt until 12 (14, 15, 15, 15, 16) sts before end, w&t.
Rows 7 and 8: Work in patt until end, work wraps tog with wrapped sts.
Place sts on holder.
Left Front
With smaller needles CO 36 (40, 44, 48, 52, 56) sts.
Row 1 (WS): Work 6 sts in seed st, pm, work in k1, p1 rib as for back.
Row 2: Work in k1, p1 rib to marker, sm, work 6 sts in seed st.
Rep rows 1 and 2 until ribbing measures 2”, ending with a RS row.
Next row: Work in seed and rib st patt and at the same time inc 2 (3, 4, 5, 6, 7) sts evenly spaced across the rib section – 38 (43, 48, 53, 58, 63) sts.
Change to larger needles.
Work 6 rows in st st, keeping 6 edge sts in seed st as established.
Next row: K2 (7, 2, 7, 2, 7), work row 1 of fan st patt until 8 sts rem, k2, sm, work 6 sts in seed st.
Next row: Work 6 sts in seed st, sm, p2, work row 2 of fan st patt until 2 (7, 2, 7, 2, 7) sts rem, purl to end.
Side shaping
Inc row: K2, m1L, work as est to marker, sm, work 6 sts in seed st – 1 st inc’d; 39 (44, 49, 54, 59, 64) sts.
Next row: Work 6 sts in seed st, sm, p2, work next row of fan st pattern until 3 (8, 3, 8, 3, 8) sts rem, p to end.
Work 6 more rows as est (no increases), keeping 6 edge sts in seed st.
Repeat inc row – 1 st inc’d; 40 (45, 50, 55, 60, 65) sts.
Cont in established fan st patt repeating inc row every 8th row 2 more times; 42 (47, 52, 57, 62, 67) sts. Work an additional fan at side edge when there are adequate sts available. Cont even in patt until piece measures 6 1/4 (6 3/4, 7, 7, 7, 7 1/4)” from the beg ending with a WS row.
Armhole shaping
BO 4 (5, 6, 8, 10, 12) sts at beg of next row, work in patt to end; 38 (42, 46, 49, 52, 55) sts rem.
Next row: Work 6 sts in seed st, sm, work in patt to end.
Next row (dec row): K2, ssk, work in patt until end; 1 st dec’d.
Next row: Work 6 sts in seed st, sm, work in patt to end. Rep last 2 rows 2 (3, 5, 7, 9, 10) times more; 35 (38, 40, 41, 42, 44) sts rem. Cont even in patt until armhole measures 3 1/2 (3 1/2, 4, 4 1/4, 4, 4)”, ending with a RS row.
Neck shaping
Place 6 sts on holder. BO 2 (3, 4, 4, 4, 5) sts, work in patt to end. Work 1 row. BO 5 (5, 5, 6, 6, 6) sts, work in patt to end. Work 1 row. BO 3 sts, work in patt to end;19 (21, 22, 22, 23, 24) sts rem.
Dec row: Work in patt until 3 sts before end, k2tog, k1. Work 1 row in patt. Rep last 2 rows 6 (6, 6, 6, 7, 7) more times; 12 (14, 15, 15, 15, 16) sts rem.
Cont even in patt until armhole measures 7 1/2 (8, 8 1/2, 8 3/4, 9, 9)”, ending with a WS row.
Shoulder shaping
Row 1: Work in patt to end.
Row 2: Work in patt until 4 (4, 5, 5, 5, 5) st to end w&t.
Row 3: Work in patt until end.
Row 4: Work in patt until 8 (9, 10, 10, 10, 10) sts before end, w&t.
Row 5: Work in patt until end.
Row 6: Work in patt until end, working wraps tog with wrapped sts.
Place sts on holder.
Right Front
With smaller needles CO 36 (40, 44, 48, 52, 56) sts.
Row 1 (WS): Work in k1, p1 rib as for back until 6 sts rem, pm, work 6 sts in seed st.
Row 2: Work 6 sts in seed st, sm, work in k1, p1 rib to end.
Rep row 1 and 2 until ribbing measures 2”, ending with a RS row.
Next row: work in rib and seed st patt and at the same time inc 2 (3, 4, 5, 6, 7) sts evenly spaced across the rib section; 38 (43, 48, 53, 58, 63) sts.
Change to larger needles.
Work 6 rows in st st, keeping 6 edge sts in seed st as established.
Next row: Work 6 sts in seed st, sm, k2, work row 1 of fan st patt until 2 (7, 2, 7, 2, 7) sts rem, knit to end.
Next row: P2 (7, 2, 7, 2, 7), work row 2 of fan st patt until 8 sts rem, p2, sm, work 6 sts in seed st.
Side shaping
Next row (inc row): Work 6 sts in seed st, sm, work as est until 2 sts rem, k1R, k2 – 1 st inc’d; 39 (44, 49, 54, 59, 64) sts.
Next row: P3 (8, 3, 8, 3, 8), work next row of fan st patt until 8 sts rem, p2, sm, work 6 sts in seed st.
Work 6 more rows as est (no increases), keeping 6 edge sts in seed st.
Repeat inc row – 1 st inc’d; 40 (45, 50, 55, 60, 65) sts.
Cont in established fan st patt repeating inc row every 8th row 2 more times; 42 (47, 52, 57, 62, 67) sts. Work an additional fan at side edge when there are adequate sts available. Cont even in patt until piece measures 6 1/4 (6 3/4, 7, 7, 7, 7 1/4)” from the beg ending with a RS row.
Armhole shaping
BO 4 (5, 6, 8, 10, 12) sts at beg of next row, work in patt to end; 38 (42, 46, 49, 52, 55) sts rem.
Next row (dec row): Work 6 sts in seed st, sm, work in patt until 4 sts before end, k2tog, k2 – 1 st dec’d.
Next row: Work in patt to marker, sm, work 6 sts in seed st.
Rep last 2 rows 2 (3, 5, 7, 9, 10) times more; 35 (38, 40, 41, 42, 44) sts rem. Cont even in patt until armhole measures 3 1/2 (3 1/2, 4, 4 1/4, 4, 4)”, ending with a WS row.
Neck shaping
Place 6 sts on holder. BO 2 (3, 4, 4, 4, 5) sts, work in patt to end. Work 1 row. BO 5 (5, 5, 6, 6, 6) sts, work in patt to end. Work 1 row. BO 3 sts, work in patt to end; 19 (21, 22, 22, 23, 24) sts. Work 1 row.
Dec row: K1, ssk, work in patt to end. Work 1 row. Rep last 2 rows 6 (6, 6, 6, 7, 7) more times; 12 (14, 15, 15, 15, 16) sts rem.
Cont even in patt until armhole measures 7 1/2 (8, 8 1/2, 8 3/4, 9, 9)” from beg ending with a WS row.
Shoulder shaping
Row 1: Work in patt until 4 (4, 5, 5, 5, 5) st to end w&t.
Row 2: Work in patt until end.
Row 3: Work in patt until 8 (9, 10, 10, 10, 10) sts before end, w&t.
Row 4: Work in patt until end.
Row 5: Work in patt until end, working wraps tog with wrapped sts.
Row 6: Work in patt until end.
Place sts on holder.
Sleeves (make 2)
With smaller needles, CO 52 (56, 62, 66, 72, 80) sts. Work in k1, p1 rib as for back for 1 3/4” [ending with a RS row.
Next row: Work in rib and at the same time inc 4 (4, 4, 6, 6, 6) sts evenly across row; 56 (60, 66, 72, 78, 86) sts.
Change to larger needles.
Work 2 rows in st st.
Inc row: K2, m1L, knit to 2 sts before end, m1R, k2 – 2 sts inc’d; 58 (62, 68, 74, 80, 88) sts. Work 3 rows in st st.
Next row: K2, m1L, k7 (4, 2, 5, 3, 2) sts, work row 1 of fan st patt until 9 (6, 4, 7, 5, 4) sts rem, k7 (4, 2, 5, 3, 2), m1R, k2 – 2 sts inc’d; 60 (64, 70, 76, 82, 90) sts.
Next row: P10 (7, 5, 8, 6, 5), work row 2 of fan st patt until P10 (7, 5, 8, 6, 5) sts rem, purl to end.
Cont in established fan stitch patt (no increases) until piece measures 3 (3, 3, 3 1/2, 4, 4)” from beg ending with a WS row.
Sleeve cap shaping
BO 4 (5, 6, 8, 10, 12) sts at beg of next 2 rows, work in patt until end – 52 (54, 58, 60, 62, 66) sts rem.
Dec row: K1, ssk, work in patt until 3 sts before end, k2tog, k1 – 2 sts dec’d. Rep dec row every other row 4 (2, 3, 5, 4, 8) times total. Then rep dec row every 4th row 6 (8, 9, 8, 9, 7) times. Then rep dec row every other row 3 times. BO 3 sts at beg of next 2 rows. BO 4 sts at beg of next 2 rows. BO rem 12 (14, 14, 14, 16, 16) sts.
Finishing
Join shoulders using 3 needle BO.
Neckband
Using smaller needles and starting at right front, place 6 sts from holder on to needle, work 6 sts in seed st as established, place marker, pick up and knit 35 (37, 39, 41, 43, 45) sts up right front, place 42 (44, 46, 48, 50, 52) back neck sts from holder to needle, knit across, pick up and knit 35 (37, 39, 41, 43, 45) sts down left front, place marker, place 6 sts from holder to needle and work in seed st – 124 (130, 136, 142, 148, 154) sts.
Next row: Work 6 sts in seed st, sm, work in k1, p1 rib to marker, work 6 sts in seed st.
Buttonhole row: Work 2 sts in seed sts, BO 2 sts, work 2 sts in seed sts, sm, work rest of row in established patt.
Next row: Work in patt until BO sts, CO 2 sts, work to end. Work 4 more rows in seed st and rib patt. BO all sts in patt.
Sew side seams of body and sleeves. Sew sleeves into armhole. Sew button opposite buttonhole on left front. Weave in ends. Wet block to measurements.


About the Designer: Sarah Hoadley
Pattern and images © 2009 Sarah Hoadley.


Hi! I am working on this sweet little cardigan now and I am a bit confused. I hope you can help. I am working on the back and I have done the first side shape increase row, worked the 5 rows of st st. As I understand the next two rows I am knitting K3, then fan pattern of K2, “K6, make fan, rep. from * to last 3 its remain), P3, P2, (P2 tog., p1) twice, P2 tog., *P5, (p2 tog., p1) twice, p2 tog. rep. from * to last st, purl to end.
Now is where I get confused: Am I repeating now the side shape increase row, then 5 rows in stocking st., the the above two rows or am I doing the complete Row 1 through 16?
I’m not quite following you, so I’ll try to explain the back in a different way and maybe it’ll work?
You’re doing 2 things at the same time – the increase rows (once every 8 rows) and the fan stitch pattern (2 rows every 8 rows). But since the fans are interspersed (meaning, the fans are not directly on top of each other, but rather they move over a half repeat for one set and then they move back again), we do this…
– Row 1: inc row
– Rows 2-6: plain rows (there are 5 of them)
– Rows 7 and 8: The fan stitch patt, with stockinette on the sides – how much depends on your size, but it’s the “3 (8, 3, 8, 3, 8)” part
You’ll work these rows a TOTAL of 4 times so you’ll have 8*4 = 32 rows total.
Does that help?
Yes, Thanks Knotions!! And thanks for such a swift reply!
Yay! Glad that worked!
Let us know if you have any other questions 🙂
Nevermind! I can see from the stitch counts in the “Sleeve Cap Shaping” section that there are only the three increase rows I’ve already worked, then the sleeve is worked even in pattern for 4″ (or however long one might want to modify it to be). 🙂
Hi, I’ve just started working the sleeves, and I have a question about the intructions for the sleeve increase that happen before the sleeve cap shaping starts. There are a couple of increase rows before you get to the first fan stitch row, and there are increases on that 1st fan stitch row. The instructions after that say to “Cont in established fan stitch patt until piece measures 3 (3, 3, 3 1/2, 4, 4)” from beg ending with a WS row.” Does that mean there are not supposed to be any additional increases? Or does it mean to do additional increases, but only on the RS of each fan stitch series? Or does it mean something else? The instruction to simply “continue in fan stitch pattern” is a little vague, especially considering that the rest of the pattern (for the back and fronts) has the increases happening on Rows 3 and 11 of the 16-row fan stitch pattern row repeats — not in Rows 1 and 9. Can you give me some clarification on the sleeve increase instructions? Thanks! (I have sent messages to the pattern author via Ravelry previously, on other issues, and never got a response, and I can see that her last post on the site was 8 years ago.)
I think most people who work this pattern (91 projects on Ravelry as of this writing) have figured out where the errors are and how to fix them, but they either don’t report them, or they report them and the pattern doesn’t get updated. Makes me wonder if this pattern was test-knitted by enough people or edited before it went out into the world! Its a great little cardigan, just needs more attention to the written pattern instructions.
Thanks for letting me know. I’ll be sure to get this in.
And every pattern in the magazine is tech edited. After this pattern was published, we implemented several changes including designer review of the pattern before it goes live.
I found another error in both the Left Front and Right Front sections, in the Side Shaping sections. After that first increaes row within the Side Shaping sections, there should be an instruction to work another 5 rows in the established patterns, without shaping, THEN work the next fan stitch.
Hi – I made the edits. I didn’t change the instructions for the Left and Right Front sections because the increase row *did* already have in it to work 5 rows plain. But, given you missed it (and I can see how) I put it on a separate line to make it more obvious.
I have it on my list. Since you found the fix I put it lower on my list. Do you need it though?
I’ve already taken the error into account, as well as another error — the fan stitch pattern is not perfectly centered on the back, the way the pattern is now written — in my project, but I posted my comment because I noticed a post that went out yesterday from Knotions that promotes this pattern and potentionally brings it to the attention of more knitters who may want to make it and run up against the problem. As I mentioned above, I wasn’t the first to notice the inconsistency within the pattern instructions regarding the number of stockinette rows that are supposed to follow the fan stitch rows. Someone else contacted the designer back in 2012 about that same issue. Although the designer responded to that person via email with a correction and said she’d contact Knotions to have the error corrected, the error still appears on Knotions website and in the downloadable PDF, and no errata has been issued — some 5 years later!
OK thanks. I’ll get it in over the next week or so.
I try to get erata in as quickly as possible and don’t remember this one being sent to me (but it was YEARS ago so I wouldn’t say for sure.
Hey – I’ve reviewed these instructions and the back looks centered to me. Can you explain more how it’s not? I think I’m missing something. Thanks!
Sure! The way the p2togs are worked on the WS of the fan stitches causes one of the stockinette stitches at the end of the WS (or at the beginning of the RS) to become part of the 5-sts fan. So, after the WS of the fan stitches are worked, you end up with one fewer stockinette stitch on the right end of the row than are on the left end (when viewing the RS of the work). Hence, the horizontal centering is one stitch off. I compensated for this by casting on (or increasing) one more stitch than the pattern calls for, and using that extra stitch as an extra stockinette stitch at the beginning of the RS of each fan stitch row. Again, after working the WS, that extra stockinette stitch disappears (it’s used in the last p2tog on the WS of the last fan stitch), and everything is centered horizontally. I have finished the project, and did not run into any centering or other problems doing it that way.
Thanks but I’m still not seeing it.
Row 1 should be: K2, then (Row 1 of the fan st, which is) k2 (so a total of k4), make fan, *K6, make fan, rep from * to last 2 sts, k2, then the final k2 (so again, you end with a k4). This combined with the Row 9 looks like it *is* centered. But it’s hard to tell given it’s interspersed as diamonds so what am I missing?
It looks centered after you complete the RS, but working the WS makes it go off-center. If you start the fan series on the RS with 4 knit stitches, and end it with 4, then, yes — it looks centered after you’ve finished the RS. But . . . work the WS, turn the work around, and you’ll see you’ll only have 3 knit stitches on the right end of the work (beginning of the RS) and 4 on the left side of the work (end of the RS). As I said, this is because the last p2tog on the WS “eats up” one of those original 4 knit stitches, and that “eaten” stitch becomes one of the 5 sts that are included in the fan, leaving one fewer “non-fan” stitches on the right end of the work than you have on the left end. Just work it on a swatch, and you’ll see what I mean!
If you want to think of it mathematically, try this: When you make the fan you are making 1 sts, knitting 2 of the existing sts, making anoher stitch, knitting another 2 of the existing stitches, then making a stitch. That’s 7sts in the fan, including 3 new ones you just made, and 4 that you already had). BUT . . . when you work the fan on the WS, you are doing this: p2tog, p, p2tog, p, p2tog. That’s 8 stitches you are using to finish the WS of that fan, not 7. So where’s that extra stitch coming from? It’s coming from one of the original knit stitches you worked at the beginning of the right side row, before you made the first “pull through” stitch for the first fan. That’s why, the way the pattern is written, you will always end up with 1 fewer “regular” stiches on one end of the work than on the other (and by “regular” stitches, I mean stitches that are not involved in the fan stitch. So the remedy is to have ONE MORE stitch before you start that first fan series on your needles than the pattern indicates you should have. The best way to remedy this issue, in my opinion, is to cast on an extra stitch when you start any given piece of the pattern, so that you have that extra stitch from the start. That allows everything to be properly centered horizontally. Does that make sense? I really think you’ll see what I mean by actually working a swatch to experiment with it. Let me know what happens!
Okay, so here’s you swatch: Cast on 12 sts, then:
RS: k4, make fan, k4 (now you have 15 sts)
WS: p4,[p2 tog, p1] twice, p2tog, p to end. (12 sts)
You’re back to 12 sts after that WS is worked, but if you flip your work around and look at the RS, you’ll see you have:
V V V V [5-st fan] V V V (where the Vs are knit stitches)
So, starting with 12 sts doesn’t give you a fan that’s centered on the fabric horizontally.
Here’s the fix: Cast on 13 sts, then do this:
RS: RS: k5, make fan, k4 (now you have 16 sts)
WS: p4,[p2 tog, p1] twice, p2tog, p to end. (13 sts)
You’re back to the 13 sts (same as your modified cast-on), and the work now looks like this on the RS:
V V V V [5-st fan] V V V V
Ta-da! Centered! I think the pattern instructions should have had an odd number of cast-on sts for each pattern piece, with the RS fan instructions having you knit one more st at the beginning of the row (before the 1st fan) than you knit at the end of the row (after the last fan).
But we don’t want a single fan centered because the next one goes over by 5 sts. So we’d have a repeat of a multiple of 10 sts + 8 for a single repeat, so the minimum is 18, right? And we’d always have a 5 st area to its right for the next fan. I’m still not following you.
I worked up a swatch of a single repeat. I only did 2 rows of stockinette at the top just because I wanted to get this up as quickly as I could.
This shows that the whole rep is centered – not a single fan, but the 2 fans together.
What do you think?
I was only suggesting a small swatch with one fan so that you could see what I’m talking about. Yes, the fan pattern will be staggered when you get more than one fan series done, so that the fans are in a diagonal and not a grid layout with respect to each other, but that wasn’t the point of this particular swatch I suggested you do. I could have suggested you cast on the full number of stitches that the pattern indicates for the back, but I it wasn’t necessary for you to do that — or even to do as large a swatch as you did — for you to see the problem.
I can see the problem on the photo you posted. If you look at that first series of fans, the ones closest to the cast on edge, I see that there are 2 knit stitches to the left of your farthest-left fan, but only one knit stitch to the right of the farthest-right fan. Therefore, the pattern is not perfectly centered horizontally on the fabric. It’s off by 1 stitch. You can also see that off-centering on that second series of fans (well, just the one fan, on your swatch). There are 7 knit stitches to the left of the fan, and only 6 to the right. Again, that 1-stitch difference makes your pattern off-center by 1 stitch. This may not bother some people, but it bothered me! And when there’s such an easy fix, as I described previously, I figure, why not use it to center the pattern perfectly on the fabric. Do you see now what I’m talking about?
I see it! Thanks 🙂
I’m not going to make this change because it’s not really an error and it’s been that way all this time and it’s how it was submitted to Knotions.
I’m glad you were easily able to see how to modify it to suit your needs though!
That may have been the way the pattern was “submitted,” but that doesn’t mean it’s error-free, or that the horizontal off-centering of the fan stitch pattern that I described is not a design error. My “needs” are not any big modification of the pattern, they are just to work a pattern without obvious errors. There are additional errors in the pattern, as well, that have been noticed and commented upon by other people working the pattern, and those errors were also either “submitted” by the designer, . . . or inserted during editing. As I mentioned before, one Raveler posted in her pattern comments the content of an email she received from the designer, giving corrected instructions for an error that she (the designer) said was inserted during editing, so who knows where each error orginated, and I don’t really care. I’m just urging you, since this pattern is published on your website, to make the corrections for the benefit of would-be-knitters of this pattern.
The designer has not responded to any of my messages to her via Ravelry. I don’t see that she’s had any activity there in the last 7-8 years, and there seems to be no other way for me to get in touch with her, so that she might “submit” an errata to you herself. Apparently, my comments on Ravelry, as well as comments by other Ravelers who worked the pattern, may have to suffice to put would-be-knitters of this pattern on notice of what to look out for!
Thanks for your thoughts.
I’m going to keep the pattern as is.
This pattern is still not updated.
Hello,
Hi! I am working this pattern and have a question about the instructions regarding the spacing (row-wise) of the fan stitches.
On page 2 of the pattern, where the Fan Stitch Pattern is written out, there are 5 rows between the “make fan” rows (Row 1 and Row 7). However, on page 3 of the pattern (and in other places throughout the pattern), the instructions have me working 7 rows between those “make fan” rows. For example, after the first “make fan” row, there’s the WS row where the p2togs happen, then there’s an increase row (RS), then the pattern says to work 5 rows without shaping. I assume I’m not supposed to start another fan stitch pattern during those 5 rows, because the very next row is a “work fan” row. This appears to space the “make fan” rows out vertically by 2 more rows than the Fan Stitch Pattern on the 2nd page would suggest . . . or am I misreading the pattern instructions?
Thanks in advance for any clarification you can give me. I’m eager to resume knitting as soon as possible!
Allison
I’m so sorry you’re having this difficulty!
I need to look at this in more detail (it’s been a while!)
Give me a few days and I’ll get back to you here.
Okay, thanks! I look forward to hearing from you. 🙂
UPDATE: I was browsing other Ravelers’ projects for this pattern and came across this errata that was received by another Raveler from Sarah Hoadley, the pattern designer. Here’s the quoted text from Sarah’s email, which the Raveler posted:
“First of all I apologize for the problem, it appears there were some changes made in the editing of my pattern. The fan stitch pattern should only be the first 2 rows with 6 rows of st st in between. In other words only read rows 1 and 2 of the fan stitch pattern and ignore the rest.”
(There was some additional text by Sarah, but it appears that that text has already been incorporated on the Knotions webpage and in the downloadable pattern PDF file.)
As Sarah says in her email, partially quoted above, the Fan Stitch Pattern should have 6 rows of stockinette (not 4) in between the 2-row fan stitch pattern, yielding an 8-row repeat altogether. This corresponds to the every-8th-row repeat of the increase rows, and solves the problem I initially inquired about in this Comments section.
So, the description of the Fan Stitch Pattern in the “Stitch Patterns” section of the pattern — both on the Knotions webpage, as well as on the downloadable PDF — needs to be updated to reflect that there are 6, not 4, rows of stockinette between each “work fan” row. That means you’ll need to change your 12-row description of the pattern to a 16-row description. This accounts for 2 repeats of the “make fan” rows, with 6 stockinette rows in between, AND with the first and second “make fan” rows being offset by 5 stiches, so that they are not right on top of each other in a grid pattern, and instead appear in a “diamond” pattern in relation to each other on the finished fabric.
I hope this makes sense!
Thanks! This is very helpful 🙂 I’ll get this updated tomorrow.
Oops, I mean to say at the end:
This accounts for 2 repeats of the “make fan” rows, with each repeat being followed by a WS row with all the P2togs, then 6 rows of stockinette, AND with the first and second “make fan” rows being offset by 5 stiches, so that they are not right on top of each other in a grid pattern, and instead appear in a “diamond” pattern in relation to each other on the finished fabric.
Thanks for this – it was very helpful!
I made the edits and noted them as an errata (they’re in red). The PDF is automatically updated so it’s current as well.
Thanks again!
There have been multiple errors/changes talked about within this post. It is not at all EASILY clear looking at the contents of the pdf whether the pdf download reflects ALL of this.
Respectfully, I submit:
I really think ALL of the pattern writing should be redone and “DATED”, noting that all issues and necessary corrections were addressed per all of the comment postings (both from those who have worked the piece and found problems, and from the designer who has made clarifications) — and then reattach the pdf download.
If I was wanting too do this pattern, I would Not be clicking on it based upon all of the comments made. Frustration could lead to a lack of interest in Knotions’ posted patterns.
good point!
i do believe they’re all noted in the errata of the pattern (which shows as RED so it’s there immediately), but i’ll check to confirm.
and to be clear, the PDF is generated from the HTML of the pattern, so if the pattern is correct, then the PDF is automatically correct.
but to confirm, i’ll review it on Monday to make sure they’re all there.
thanks for your comment – it’s reasonable and i don’t want to frustrate readers!
I added this note to the pattern but I also wanted to post this to you as well. Just to confirm – as of June 5, 2018, all errata has been added AND (like all Knotions patterns), it’s automatically included in the PDF.