Last week we focused on joins – covering the traditional join, Russian join, Magic Knot and Hunter’s Bend. Many of you commented that your favorite join was splicing.

Why splicing
This took me by surprise at first, but as I thought about it, it made sense. With splicing, you get:
- equipment-free joins (no need for a darning needle or scissors)
- no waste (your join uses the ends of the yarn and there’s nothing to cut)
- compact joins that aren’t visible or discernible to the touch
Splicing is not good for…
While this is a great and easy join, its primary use is joining a new ball of the same color. As you’ll see, it blends old and new so you don’t get a clear divide between the two balls.
And, given that you’re basically felting the yarn, you need an animal fiber (wool, alpaca and others). This will not work in vegetable fibers (cotton, linen and others). Regarding blends with man-made fibers (e.g. nylon, Lycra) it will depend. If the yarn is mostly animal fibers it will likely work. Give it a try with a few scraps.
Materials
- Old yarn
- New yarn
- Liquid (water or spit)
Yes, spit. I opt to wet both ends with water, but this also goes by the name Spit Splicing and many people just use a little spit, making this a truly Spartan join without needing anything extra.
 If you’re like me and you’re not using spit, wet the ends of both the old and new yarn by dipping them in a bit of water. Be careful not to just leave it lying in the water because wool’s wicking property will just suck up the water and you’ll be left with a whole lot of wet yarn (ask me how I found that one out!). You don’t need the yarn to be very wet.
Now for a little elbow grease

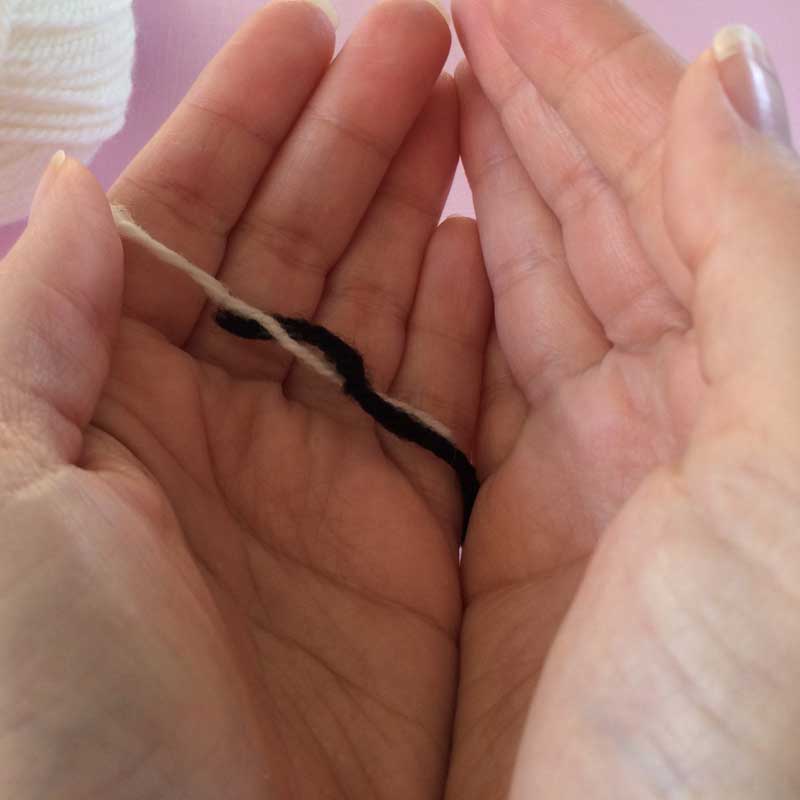

Put the old and new yarn opposite of each other, overlapping for about 2-3 inches. Place it in the palm of your hands and rub back and forth to create friction. This isn’t the time to be gentle. You want to felt the two ends together and create a compact join. I also added a bit of water after rubbing for a few moments just to encourage it to merge.

When you’re done it will look like this.
Note that I used a 100% wool (white) and an 80% acrylic, 20% wool (black) for demonstration purposes. So it’s definitely possible to use this join with partly acrylic yarns.
You’ll be knitting with this yarn, so you’re – in essence – weaving in the ends as you go. And it’s even more sturdy because the yarn has been felted to itself. After a few rows you’ll get this:
As you see, no discernible ends, no change in stitch thickness, but you do get a muddy mix of the two colors – making this a great join for adding another ball of the same color.
As I mentioned, my favorite join is the magic knot, so if you’re a splicer – what’s your advice? Any tips you’d like to share?
This type of splicing works well with pure wool yarn, but some of us can’t use pure wool because of extreme sensitivities (my family can’t wear it – it causes them ugly, uncomfortable rashes). Yes, it’s a good method for pure wool, but I can tell you from experience it doesn’t work with alpaca or wool/synthetic blends (the only wool yarns I can use) that don’t felt. So you might want to try it out on a two small bits of your project yarn to be sure you can use this method for your knitting project if you’re using unfamiliar yarn.
It’s still a good thing to be comfortable with the other methods of joining new yarn for the day when you come across a non-felting yarn. I belong to two different large groups of knitters and even our members who work mostly with pure wool don’t rely on this joining method. Russian join is the preference in both groups and is always the first method recommended when the issue of joining new yarn comes up.
I thought you were going to cover splicing like my Mother taught me years ago — spreading apart the plies of both the old and new yarns, then dropping 1 ply of old while picking up 1 ply of new along about 10 stitches of work. This means that the yarn weight never varies, and you have a gradual transition into a new ball of yarn. You don’t have any bumps where you are working in tails either. It is somewhat tedious, but works beautifully when you have to add-in a new ball in a conspicuous spot. Sometimes this happens when you unexpectedly find a knot while working across a sweater front!!! Been there …
Thanks! I’ve seen it both ways. I covered this way because of its simplicity. I was surprised that I didn’t see a difference in thickness once I felted them together. The felting made it more compact.
You’re right though – logically it makes sense if you always have only the same number of plies.