 There are so many techniques you can use to seam and join pieces together. This list is just a few of them, and each can be slightly modified for whatever you are working on specifically. I am going to be referring to joining squares, but you can use these techniques to join lots of things.
Join As You Go (JAYG)
First one is a join-as-you-go (JAYG) method, in which you work as normal in your current square, then single crochet from behind into the previous/other square, and then as normal again into your current square, and continue alternating. This method is worked as you work the last row/round.
This is a very common method of joining you may find helpful in joining granny squares, or in things like shawls comprised of motifs.
The sample is worked (and explained) in single crochet, but depending on the project you are working, you may find it more helpful to replace the single crochet into the previous/other square with a slip stitch. You will know depending on how it looks as you go. If it has too much space in the loopy area in between, try a slip stitch to smooth it out.
I always recommend working the first cluster first, then begin joining at the outside corner as shown because it keeps it consistent, and easiest to access.
In continuing with a granny square, you can see the other square has three rounds, and my current square only has two – this is correct. As mentioned before, we JAYG in the last round, so to begin, chain 2. Work 2 double crochet’s into this space…

Normally you would work a chain 3 for the corner, but not when joining. We chain 1…

… then insert hook into the other squares corresponding corner space working from behind/the wrong side – wrong sides of the squares should be laying on top of each other or closely as you work this step.

Complete a single crochet over this corner space. Think of this as the second chain of your typical chain 3.

Chain 1 – think of this as the third chain of your typical chain 3.

Now working into your current square as normal, work 3 double crochets into the same chain space to complete your corner.

Normally, your next step would be to chain 1, and then work your next cluster, but when using this joining technique, we don’t chain 1. Instead, insert hook into the other squares next chain space from behind/the wrong side.

Complete a single crochet over this chain space.

Now working back into your current square as normal, work 3 double crochets into the next chain space.

From behind, single crochet into the other squares next chain space, then in current square, work 3 double crochet’s into the last corner chain space

Chain 1.

From behind, single crochet into the other squares corner chain space…

Chain 1.
 Continue working the rest into the current square as normal.

When joining to squares that have already been joined, work the single crochet as the join into the actual join to keep the center clean and consistent.


Show four squares joined together.


Mattress Stitch
Next up is the Mattress Stitch. This method isn’t quite my favorite, but I find it the most useful when joining odd motifs that other methods don’t work for – like circles. Last year, I made a table runner out of circles. I laid out the circles, and went around using the mattress stitch to join just where the circles touched one another, and it came out completely seamless.
I prefer to use this technique on a smaller scale because you have to cut the piece of yarn you will be using so you can thread it onto a needle, but I have known makers to use the mattress stitch to seam full afghans, and it’s also common in garment making.
I am using a piece of contrasting yarn to show the stitching, but you should use the same color as your project for invisibility (or the same color as one of your squares if you are joining two different colored squares).
I also recommend working into the back loop only of the stitches, but I have seen this method worked into both loops. Personally, I think it’s easier to pull closed and be more hidden when working only into the back loop.
Cut a piece of yarn in a length respective to the area being worked. Thread one end into a needle; I like to use a #18 tapestry needle for worsted weight yarn. Lay squares down with the right side facing you. Insert needle from the wrong side through the back loop only of the first stitch, leaving a tail at the end to pull later and weave in.

Insert needle from the wrong side through the back loop only of the first stitch of the next square. A little slack is okay between squares.

Insert needle from the wrong side through the back loop only of the next stitch of the original square.

Insert needle from the wrong side through the back loop only of the next stitch of the next square.

Once you have several stitches worked (I like to do about five at a time), hold the bottom tail with one hand, and the working tail with the other, and pull to tighten.


Continue working from one square into the corresponding stitch of the other square, and tighten as you go.

Pull Loop Through (PLT)
The Pull Loop Through (PLT) Method is one that I don’t see used nearly as much as I think it should be. It has become my absolute favorite, and I use it every chance I get. I love the ease of not having to sew anything together, and the twisted look of the area worked over.
This is a join-as-you-go type of method, worked in a final row/round. My favorite time to use it is with basic granny squares or similar motifs, but I have also used it to join the ends of a scarf together, and also combined with a continuous join.
In the sample, I am joining the top of two panels of the Granny Stitch pattern, but it also works joined to the foundation chain.
You can use this technique working in any stitch pattern, and in this, you would work respectively. In this sample, I am continuing with the Granny Stitch pattern my sample is worked in.
A separate example, if you were working in single crochet, initially, you would work a single crochet into your first stitch, then proceed with the PLT technique, and continue to work in single crochet.
Chain 2.

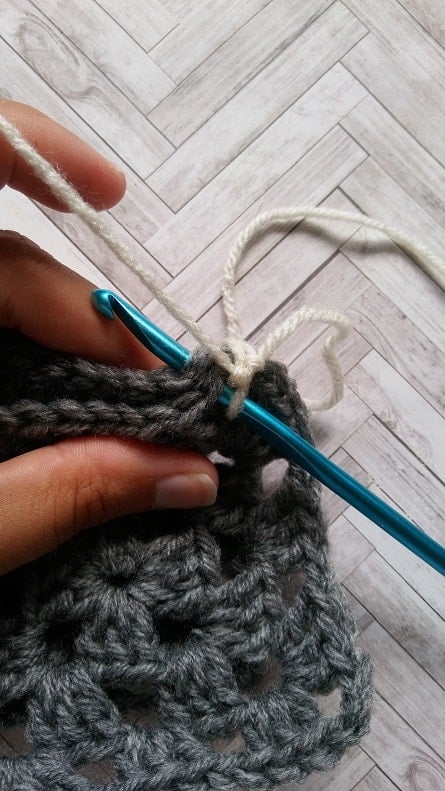
Begin PLT: Pull up a loop so the stitch doesn’t fall out, and remove hook…

Insert hook from the right side into the respective stitch of the other square…

Grab loop on hook, and tighten the loop as normal on the hook…

Pull loop through. PLT done!

Double crochet into the next stitch (in this case a space).

PLT Again: Pull up a loop, and remove hook…

Insert hook from the right side into the next stitch of the other square…

Grab loop on hook, tighten, and pull through.

Continue working in pattern using the PLT Method in between.

Single Crochet Through Both Layers
Single Crocheting Through Both Layers is one of the first joining techniques I learned, and I used it to make several blankets, women’s tops, and even a scarf. It is easy to use.
In the case of a blanket (shown in this tutorial), you simply lay out the squares in the order you want them to be in, then carefully lay the squares two rows at a time on top of one another with wrong sides facing in the same direction as they will be shown, and then single crochet all the way across. Then you rotate the piece and work across the other way.
While this technique is easy to use, it can be a little overwhelming depending on the size of your project because you could have long stripes of squares to crochet together.
This technique also creates a visible ridge along the top. This can be a nice decorative element if that is what you are going for. Alternatively, if you don’t want to see the ridge, you can work from the wrong side of a project. It will still leave a ridge/bump, but on the wrong side. If you prefer a smaller ridge, but still want to use this technique, you can use a slip stitch instead. Working from the wrong side is nice for assembling garments if you don’t mind the ridge.
Lay your squares out, or position them so they will be joined exactly how you want. Keep in mind, you will be joining at the center of two rows as a time, so the top of the bottom square will join to the bottom of the top square. Working through both layers, join yarn at the right corner chain space. Chain 1, and complete a single crochet.

Insert hook into the next stitch working through both layers (and complete the single crochet).
Continue working in this manner all the way across over into the next corner chain space.

To continue joining another set of squares, work a single crochet two together (sc2tog) over the last corner chain space of the square just finished and the corner chain space of the next set of squares.

Continue working across the same way as before. Once to the end, fasten off.


After working strips across in one direction, you will need to rotate, and work squares down going in the other direction. Begin by working in the same manner over to the second corner chain space.

You are now where the previous joins single crochet decrease is. You will not work a decrease in this direction, but instead, simply chain 1, then single crochet into the next set of squares corner chain space.

Work to the end as before.

Once laying flat, you will have some fun ridges.


Whipstitch
Last one for today is Whipstitching. When I am not using the Pull Loop Through Method, I use whipstitch. It is so easy, and almost therapeutic (to me) to just sit and sew pieces together. And that’s simply it – hand sewing pieces together.
In my sample, I am whipstitching two granny squares together as they lay on top of each other with the right sides facing each other, and the wrong side facing me. I have also used this technique from the right side holding two squares flat on a surface, and I’ve seen it worked in just the back loops only of the two squares. It’s a matter of personal preference, and the project type you are working. You may find one to be more useful than the other. The way shown in this tutorial though is the most common way I use this technique.
As mentioned, I am joining granny squares, but this is an excellent technique for assembling garments too.
I am using a piece of contrasting yarn to show the stitching, but you should use the same color as your project.
Lay square together with the right sides facing each other. Cut a piece of yarn respective to the area being worked. Thread one end into a needle, and secure near the right corner (or if you haven’t fastened off your work yet, and are at this point, simply cut a long tail, thread, and you are ready to start).

The tail of your yarn should be coming out of the top square.

Insert needle from the wrong side of the bottom square through both layers working into the mirrored stitches of the squares.

You will see one loop here.

Insert needle from the wrong side of the bottom square into the same stitch as before, and then diagonally through the next stitch to the left of the top square.

Now you see two loops together. Continue in this manner all the way across working into the next set of mirrored stitches, and then diagonally.

This shows from the wrong side laying flat.

This shows from the right side laying flat.

And there you have it! Five techniques for joining/seaming with a few modifications to them.
 ABOUT THE Instructor: ALEXANDRA RICHARDS
 ABOUT THE Instructor: ALEXANDRA RICHARDS
Alexandra is described as a “craft, coffee and cat addict”.
Though she has always been a crafty person, she picked up needlepoint on plastic canvas in 2006. In 2015, she learned to crochet, and began her blogging journey as EyeLoveKnots, named in honor of family members affected by Retinoblastoma – a cancer of the eye.
Thanks for this tutorial. So useful, and all the photos make it very easy to follow. Thanks for joining in my party for August too.
Great tutorial! Love these detailed instructions… a diyer’s dream! 😉 (We don’t want to make mistakes!) So blessed to have you at Tuesday Turn About!
The Whipstitch and Mattress stitches look good to me, but what do I know? I’m still waiting to try my first granny square.
Excellent information in this post! I’ve tried most of the joining techniques but never the ridged one. Pinned to my knit|crochet board. Thanks for sharing your tutorial with us at the Talk Of The Town party!
Excellent information! Pinning.