I won’t start out by arguing whether you should use charts in your knitting. You know if charts sync up with your way of thinking.
If you want some help with charts – or if you just want a refresher – continue reading.
Charts give you a way to visually represent knitting.

How most charts work
I say “most” because there are other ways to indicate knitting on a chart. I’m going to show you the way I see most charts presented (and it’s the way I do charts as well).
Numbers on the side
These indicate 2 things:
- which row/rnd you’re on
- which side you start on. Numbers on the right are for RS rows and numbers on the left are for WS rows.
Let’s look at our sample again.
We have an 8 row repeat, knit flat.
Direction of Reading
You start reading at the edge where the number is and move in the opposite direction. So, if the number is on the right, read the chart moving to the left (and the opposite). If you’re right-handed this will be the same way you’re knitting.
Looking again at our sample…
The odd-numbered rows (rows 1, 3, 5, etc.) are RS rows and then even-numbered rows (2, 4, 6, etc.) are the WS rows.
In the round or flat?
Bottom to Top
Regardless of the method of knitting, all charts are read from bottom up to the top.
Worked Flat
If a chart is for something worked flat, you’ll find numbers on both the right and left. Typically you’ll find all the odd numbers on one side and all the even numbers on the other.
Our sample chart is a good example of this:
Worked in the round
If a chart is for something worked in the round, every round starts on the right. You’ll find all numbers on that one side.

Here’s that same chart, but for in-the-round. Note all the round numbers are on the right, and the key doesn’t have RS and WS stitch descriptions because it’s not necessary.
What about WS rows?
This is somewhat a matter of the chart maker’s preference. A lot of stitch patterns have what are called “rest rows” where you just work the stitches just like the previous row. So, if the stitch below is a purl as it faces you, you purl it. For YO’s you need to get instructions on how to work them. (or like in our sample chart, we see the WS rows). Sometimes they’re knit and sometimes they’re purled. The pattern should tell you which it is if it doesn’t have WS rows.
If the pattern doesn’t have rest rows – meaning that there are things going on (like decreases and increases) then the WS rows must be charted.
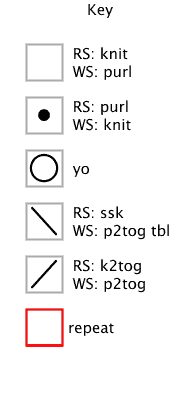
Key
Every chart should have a key. It might just tell you what the symbol means and it might tell you how to work the symbol. Here’s the key in our sample chart.
What you see
The chart shows you what you see when looking at the RS. The symbols often look like what you’re doing (purls look like little bumps, YO’s are circles, and the decreases lean in the direction it slants) If your chart is for something in-the-round, you’re set.
If it’s for something flat and includes the WS rows, those rows are actually worked in the opposite of what you see on the chart. So, a purl stitch is really worked as a knit, and a k2tog is really a p2tog. The key should tell you how to work the symbol when on both a RS and a WS row (look above at our key). YO is just listed once because the symbol is worked the same way regardless of it being on a RS or WS row.
Outlines
A repeat is often shown as an outline. It may tell you how many times to work it, or you may need to figure that out yourself by counting what’s after the repeat.
Here’s our chart again. The repeat is outlined in red. There are 2 sts on either side that are just worked once. In this chart, looking at Row 1, you’d work: K2 (the first 2 sts), *k2, k2tog, yo, p, yo, ssk, k2, rep from *, k2.
Once you’re at the top of the chart
If you work all the rows of the chart, you often start over again at the bottom. Your pattern should tell you something like “work X reps” or “work until it’s Y inches”.
The shape is “off”
Regular knitting stitches are not square – a knit stitch takes up more space horizontally than vertically. This means the stitch is wider than it is tall.
Here’s a good way to remember it. Take a typical gauge – 1824 (that’s 18 sts and 24 rows per 4″). Now if you think about it, it takes 18 sts widthwise to go the same as 24 sts lengthwise. So, the stitch is wider than it is tall.
This is exacerbated in garter stitch.
Speaking of garter stitch…
Garter Stitch Charts
Even though garter stitch that’s worked flat is knit every row, garter stitch is indicated on a chart as a row of knits followed by a row of purls.
Well that’s confusing, right?
Keep in mind that the chart is showing you what you see – and not necessarily what you knit. The back-side of garter stitch is really just a purl stitch.
And you guessed it, here’s our chart again:
You can see a two-stitch garter stitch edge on either side. On RS rows, it’s shown as a knit, and on WS rows, it’s shown as a purl. But, when you look at the key, you can see that the symbol for those edges on WS rows are actually knit as well.
Putting It All Together
Let’s look at Row 2. It’s a WS row so it’s read from left to right. Remember to look at the WS definitions of the sts in the key.

If you were using written instructions, it would be:
Row 2 (WS): K2, *p3, k3, p3; rep from * until 2 sts rem, k2
Before you start
- read the chart
- read the key
- make sure it all makes sense to you and it’s error-free
A few charted patterns from Knotions


What would you suggest?
What did I miss about charts? I re-wrote this article several times just to keep adding to it. I have to admit, given I’ve been using charts for so long, it was hard for me to think of how I felt when first working with a chart.
What would you suggest I add?
What would you suggest?
What did I miss about charts? I re-wrote this article several times just to keep adding to it. I have to admit, given I’ve been using charts for so long, it was hard for me to think of how I felt when first working with a chart.
What would you suggest I add? Leave a comment to let me know!

About the Instructor: Jody Richards

Jody is the founder and lead editor of Knotions. She loves poring over stitch dictionaries and trying out new stitches. And while she likes all things crafting (well ok, except that one thing), yarn crafts are her true love (and she has the stash to prove it).
She’s a serial starter-of-projects and has a serious problem with finishing things without a deadline.
And don’t get her talking about hand-dyed yarns. You’ve been warned.
I have a kerchief chart and it has numbers IN the chart boxes but they don’t say what it means? No symbols, just a number. Does that mean put that many stitches because I wouldn’t think so with the chart…charting everything
It needs to be explained somewhere. I’ve also seen it to indicate how many stitches to decrease. I would check the pattern and if not, email the designer. That is NOT standard.
Unfortunate for me, but thank you very much for a quick and helpful reply! Thank you 🙂
Good luck to you.
I am working from a chart that is 41 stitches wide. I had no problem for the body of the sweater but now I am starting the sleeves and the instructions indicate start from point A which is 10 stitches away from the left edge. I assume I knit those 10 stitches from left to right and then start at the left edge for the repeat. But then what? Do I now ignore that starting point A and just go back-and-forth as I did for the body of the sweater, adding the increases per the instructions?
They only want you to do a portion of the patterning on the sleeve. So, you’ll NEVER work the other part of the chart for the sleeve.
Given that it looks like they want you to do the column of the Fancy Stitch, I’d say that the stitches that you increase for the sleeve would just be knits.
I don’t know what sweater you’re actually working on, but I’m pretty sure that’s what you should do. Where is the fancy stitch? The only other thing that I could think of is that you should add Fancy Stitch as you increase.
Can you tell what they want you to do in the pics? If you give me those, I might be able to better answer.
Either way – good luck! It’s a beautiful sweater 🙂
I think it would be helpful yo talk about “no stitch” spaces. That is a common question I’ve seen. I know to ignore them and work the next stitch, but I think that is something I’ve learned that wasn’t intuitive at first. Also, you could cover charts that include repeats.
Great point about the repeats! That’s one I haven’t covered yet.
But we do have a whole post on no-stitches https://knotions.com/issues/april-2018/tutorial-april-2018/tutorial-no-stitches-in-knitting-chart/. Does that cover what you were thinking? Or did we miss something? (entirely possible)
Ooh, yep, you have the “no stitch” symbol well covered. Great tutorial. I must have missed it! (I love charts. Even when I am knitting someone elses’s pattern, I will create a chart if there isn’t one already. The visual representation really helps me keep track of where I am in the row.)
I do the same thing! It’s SO much easier for me than just executing words. I remember back in the day, using a Debbie Bliss pattern for a cabled cardi that DIDN’T have charts and just how crazy I must have been to do it.
I love your tutorials! I have always been intimidated by charts but this tutorial helped to take away that fear. 🙂 Also, thank you for the ability to save these tutorials and patterns as PDFs. I love having a copy I can refer to when I can’t be online.
I’m so glad it helped!
I think it would help if you explained, stitch by stitch, the 2nd row of the chart so knitters can actually see the left to right reading and reversal of stitches. That is where people get confused. Good article, thanks.
Great suggestion! I’ll add it in. Thanks 🙂
I added the written for Row 2. What do you think? I like it and think it’s a great addition. Thanks again!
I feel that you did great. I have never done a chart and I think I can now. I understood what you said and made it simple. Thanks so much for doing this tutorial. I really appreciate it. Linda
Wow what an amazing compliment! If this article gives you even a bit of an extra understanding about charts then I’ve done my job 🙂
How do you insert a chart into a chart? Leaves & Berries Chart says to insert a Leaf Chart into one st…??
which pattern is this? let me know which one and i’ll try to help.
Pattern Wendy Johnson the van dyke socks,
The chart only has odd numbers and says even numbers are to knit
The pattern says work only 9 rows . I wonder do I just work the 9 tows over and over till I get to the ankle … do I knit one chart and then knit the 2 row.
I’m not familiar with the pattern, but I would think you’d work rows 1-9 repeatedly. I’m confused why you’d think you’d start working on row 2 though and there might be something I’m missing about the pattern.
Let me know?