Have you wanted to do garter stitch, but with some modification? The amount of projects in just plain garter stitch is a ton! You can do this with many garter stitch projects. If there are any increases or decreases, just make sure that you do them so your project has the same shape.
You do need to use a circular needle to do this technique though. A straight needle will NOT work.
Materials
At least 2 colors of yarn
A circular needle in the right size for the yarn (you NEED a circular needle; straights will NOT work for this tutorial)
For this tutorial, we’ll assume you’re using 2 colors. But, you can really use as many colors as you want.
Our MC is yellow and the CC is pink.
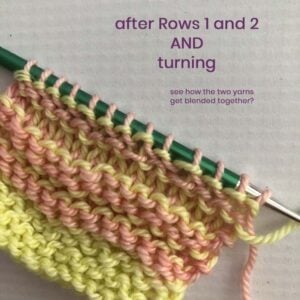
Row 1 (RS): Using MC, knit the entire row. DO NOT TURN. Instead, slide the stitches to the opposite end.
Row 2 (RS): Using CC, knit the entire row. TURN like you normally would.
Repeat these 2 steps until it’s the desired length. Your first repeat will be on the RS and the next will be on the WS. It will continue to swap back and forth like that.
You’re done!
Practice makes perfect
The only thing you need to practice here is not turning, and sliding the stitches instead. And you’ll also want to make sure that you like the colors that you chose.
If you want to try this out first, I suggest casting on a small number of stitches. It’s really an easy technique!
About the Instructor: Jody Richards
 Jody loves poring over stitch dictionaries and trying out new stitches. And while she likes all things crafting (well ok, except that one thing), yarn crafts are her true love (and she has the stash to prove it).
She’s a serial starter-of-projects and has a serious problem with finishing things without a deadline.
And don’t get her talking about hand-dyed yarns. You’ve been warned.


Leave a Reply