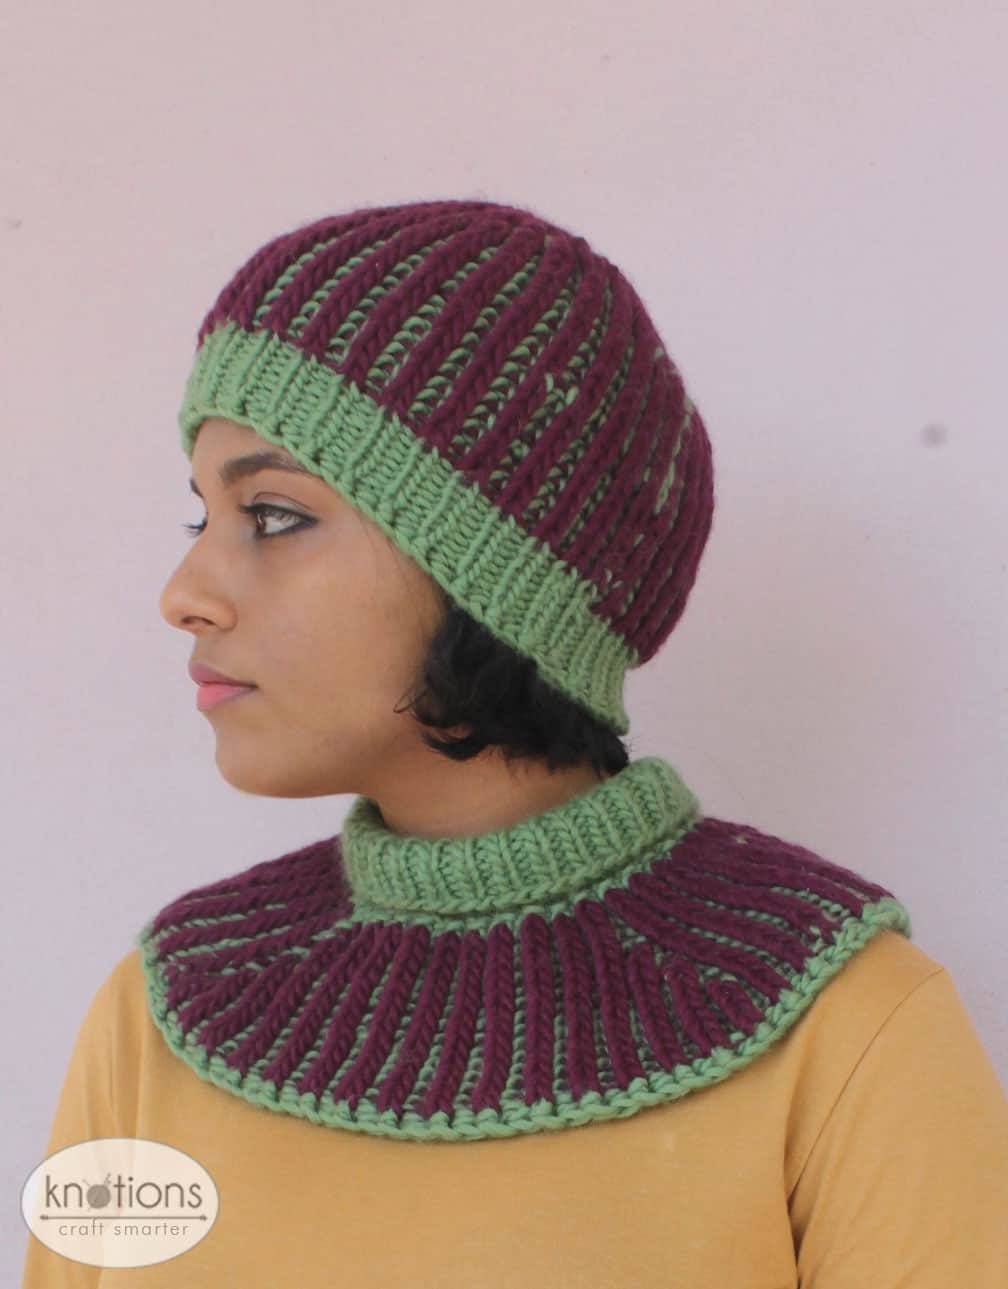
 If you love the look of two-color brioche but are intimidated by brks and brps, this reversible hat design is for you! It applies the easier technique of “knit below” to obtain brioche fabric with very little effort. No previous experience with brioche knitting is needed. The hat is worked top-down to allow size adjustment for a perfect fit. The swirling pattern on the crown is reminiscent of the hanging tentacles of a jellyfish floating on the sea.
TUTORIALS FOR THIS PATTERN
Size
To fit a 21” – 23” head
8” (20 cm) height (from crown to edge) x 16″ (41 cm) circumference at lower edge.
Size can be adjusted up or down to fit. See below.

Yarn
Valley Yarns Berkshire Bulky (85% wool, 15% alpaca; 108 yards [98.8 meters]/100 grams); MC Mistletoe (37), CC Plum (20); one skein each. Actual usage: MC 58 gm, CC 43 gm.
We thank Webs for their generous yarn support for this design! Check out their Valley Yarns Berkshire Bulky.
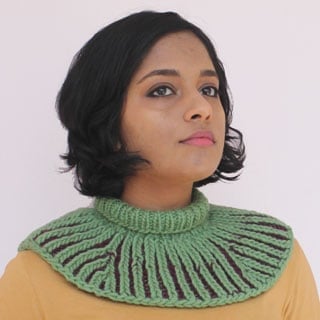
(To make both this hat and its companion piece Unbrioched Cowl, an additional ball of MC is needed. If you plan to make both pieces, it is suggested that you work the hat first so as to allow optimal yarn usage and size adjustment for the cowl.)
Needles
Size US 2 (3 mm) and US 6 (4 mm) 40” circular needles or longer for magic loop technique (or dpn’s and 32” circular needles if preferred)
3 mm crochet hook (for circular CO)
Optional: 4 mm crochet hook (for a neat finish to BO)
Notions
Stitch markers; tapestry needle; waste yarn (for lifelines)
Gauge
Approx 18 sts and 17 rounds = 4” [10 cm] in 1×1 rib with smaller needle.
Approx 12 sts and 24 rounds = 4” [10 cm] in body pattern worked even (alternately working rnds 1 & 2 only) with larger needle.
Note: Since this is a ribbed pattern, there will be no significant change in gauge after blocking. Brioche fabric is typically worked on smaller needles than would be usually used for a given yarn thickness.


Abbreviations
Please see our standard abbreviations.
k1b – knit the stitch one row below the next stitch on the left needle (below the stitch you would usually knit). Once you knit this stitch in the row below, drop the stitch on the left needle (the one you would have usually knitted) off the needle.
p1b – purl the stitch one row below the next stitch on the left needle (below the stitch you would usually purl). Once you purl this stitch in the row below, drop the stitch on the left needle (the one you would have usually purled) off the needle.
Hat
Body
With a 4 mm crochet hook and MC, use Emily Ocker’s circular CO to CO 8 sts. Transfer the sts onto the larger needle.
Set-up rnd: With MC, (p1, k1) around. Pm for the first st of the rnd.
Rnd 1 (and odd rnds other than the incr rnds): With CC, (p1b, k1) around.
Rnd 2 (and even rnds): With MC, (p1, k1b) around.
Avoid twisting the yarns when picking up a new color for the next rnd. Tie the yarn tails of MC and CC loosely together on the WS to keep them out of the way. Counting the sts is easier if a split ring marker is used to mark the center of the round; slip the marker onto the right needle when you reach it.Note that you should always be working into a round of the other color, and that all incr are always worked into a knit st.
Rnd 3 (first incr rnd): With CC, *p1b, (k,yo,k) (centred double incr). Rep from * three times; 16 sts. Pm for first st of rnd.
Rnd 4 (and all rnds following an incr rnd): With MC, follow pattern for even rounds, working k1b, p1, k1b into the k, yo, k respectively of the incr round (see tip).
Rnds 5 & 6: follow pattern for odd and even rounds.
Rnd 7 (second incr rnd): With CC, *p1b, k1 around, working (k,yo,k) (centered double incr) into every fourth st (sts 4, 8, 12 and 16); 24 sts. Pm for first st of rnd.
Rnd 8: same as rnd 4.
Rnd 9 (third incr rnd): With CC, *p1b, k1 around, working (k,yo,k) (centred double incr) into every sixth st (sts 6, 12, 18 and 24); 32 sts. Pm for first st of rnd.
Rnd 10: same as rnd 4.
Rnd 11 (fourth incr rnd): With CC, *p1b, k1 around, working (k,yo,k) (centered double incr) into every eighth st (sts 8, 16, 24 and 32); 40 sts. Pm for first st of rnd.
Rnd 12: same as rnd 4.
Rnd 13 (fifth incr rnd): With CC, *p1b, k1 around, working (k,yo,k) (centered double incr) into every tenth st (sts 10, 20, 30 and 40); 48 sts. Pm for first st of rnd.
Rnd 14: same as rnd 4.
Rnd 15 (sixth incr rnd): With CC, *p1b, k1 around, working (k,yo,k) (centred double incr) into every twelfth st (sts 12, 24, 36 and 48); 56 sts. Pm for first st of rnd.
Rnd 16: same as rnd 4.
Rnd 17 (seventh incr rnd): With CC, *p1b, k1 around, working (k,yo,k) (centered double incr) into every fourteenth st (sts 14, 28, 42 and 56); 64 sts. Pm for first st of rnd.
Rnd 18: same as rnd 4.
Rnd 19 (eighth & last incr rnd): With CC, *p1b, k1 around, working (k,yo,k) (centered double incr) into every sixteenth st (sts 16, 32, 48 and 64); 72 sts. Pm for first st of rnd. At this point you should be about 2” from the CO.
Rnd 20: same as rnd 4.
Rnds 21 to 46 follow pattern for odd and even rounds (After rnd 46, you should be about 6.5” from the cast on).
You’ll now be working in just one color.
Ribbing
Setup (decr) round: With 3 mm needle and MC, *(p1, k1) 7 times, p1, k3tog. Rep from* three times until end of rnd; 64 sts.
Rnds 1 to 7: Work p1, k1 rib around.
With 4 mm circular needle, BO in p1, k1 rib using Jeny’s surprisingly stretchy BO. (Optional: For a neat finish, after the last st of BO, use a 4 mm crochet hook to chain 1, then work a slip st under both chain loops of the first BO st of the rnd.) Cut yarn and pull through loop on hook.
Finishing
Pull the CO tail tightly to close the crown center. Neaten the stitches (see tip). Wet block without stretching the fabric.
Weaving in ends: For a neat reversible look, weave in the ends in the purl trough between two knit rib columns (on the WS for MC, and on the RS for CC). For MC, thread the yarn needle with the yarn tail, and pass it through to the WS. Next, working on one side of the purl trough (either right or left), pass the needle upwards through 4 or 5 horizontal sts of the same color and pull yarn through. Then cross the needle across to the other side of the purl trough and pass it downwards through 4 or 5 horizontal sts of the same color on the other side, pull yarn through. Stretch the fabric for even tension and clip yarn end. Repeat the process on the RS for weaving in CC.
Helpful tips
- Mistakes in brioche fabric can be tedious to correct later. Keep a correct rnd count and check each rnd for correctness after it is worked. Use of a lifeline for every incr rnd is recommended; leave enough slack in the line to permit trying on of the hat. Check for correctness of rnd before moving the lifeline upwards to the next incr round.
- For ease of working, use the same colored sm(s) along the same rnd. Use a different colored marker for the first st of the rnd, and move it upwards along the rnds from time to time.
- To work into the st below, it is usually easier to feel (rather than see) the space to be worked into between the left thumb and index finger.
- On the rnd following an incr rnd, p1b is easier to work into if the space to be worked into is first felt, and then opened from behind by the tip of the right needle.
- On the rnd following an incr rnd, when k1b, p1, k1b is worked into the incr group below (k, yo, k), the k1b’s are worked into the same space.
- Neatening the rib lines: gently pull apart the two purl troughs on either side of a knitted rib line. The knit rib will move into the correct position.
- Correcting mistakes: First, transfer the sts on one side of the mistake to a spare circular needle. Then carefully drop down stitches along a knit column to the level of the mistake (RS for MC and WS for CC). Undo the wrong st. Insert a crochet hook through the correct knit st below the mistake. This should leave you with a ladder of alternating color rungs (CC rung nearest to hook on RS and MC rung nearest to hook on WS). Pass the hook underneath the nearest 2 rungs above it (the lower rung of the color opposite to that on hook, and the upper rung of the same color as that on hook). Hook the upper rung (same color) and pull through the st on hook. Continue upwards in the same manner, finishing with a st of MC on hook if the round on the needles is in MC. If the round on the needles is in CC, the uppermost rung will be CC; draw the CC rung through the MC st on hook as instructed above to complete the column. Slip the last st of the corrected column back onto needle and continue the work.
- Since the construction is top-down, any smaller or larger size can be achieved (see below).
Adjusting hat size
Measure the hat on the recipient’s head from time to time.
For a smaller size, stop working incr rounds when the crown is covered and skip to instructions for the body.
For a bigger hat, after rnd 19, continue to work incr rounds every other rnd until the crown of the head is covered, then work the body.
If the desired circumference of the hat is known, the correct size can be worked after calculating the required radius of the crown by using the formula [2 x pi (3.14) x radius (of hat from crown center) = circumference]. Stop working the crown increases when the calculated radius is reached.
 About the designer Padma R
 About the designer Padma R
Padma’s adventures with ribbing began with a hat for a teenage nephew – the stretchy brioche texture left her smitten! One day, while trying on the brim for size, it slipped down around her neck, and the idea for a cowl was born. Next, her interest shifted to two-color brioche and adjustable sizing. Not finding any methods for increasing in two-color Fisherman’s rib, she set about experimenting to find her own. The results are incorporated in this design and its companion the Unbrioched Cowl. She finds it exciting that sometimes, results produced with a supposedly complex technique can be achieved in a much simpler way.


Leave a Reply