
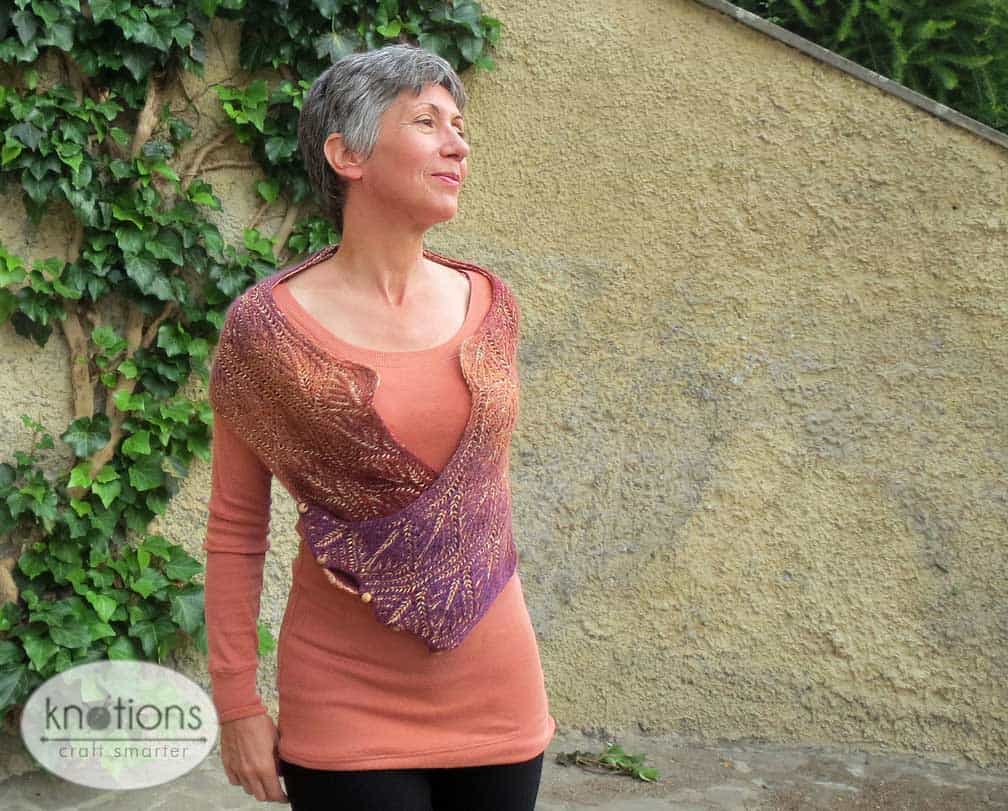
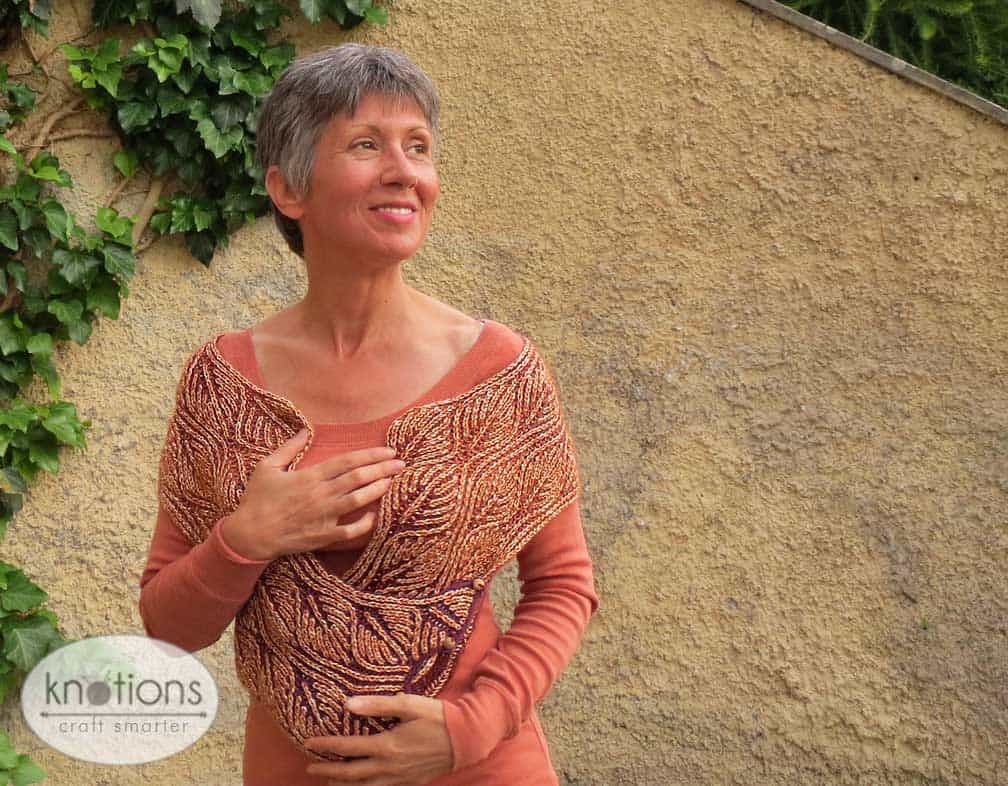
Autunno (Autumn in Italian) is a multifunctional piece that can be worn as a cowl, an infinity scarf or as a vest.
And it is reversible, too! So it has multiple ways you can wear it.
Autunno is worked in a dynamic two-color brioche pattern that makes the fabric undulate, mimicking the movements of falling leaves blown by the wind. Brioche stitch worked flat is a little complex to handle at first, but has the big pro of having 3 rest rows for every “pattern” row.
This design requires attention, but the result is rewarding!


Tutorials
Size
8×51″ (20×130 cm).
Size is easily customizable, either using a different yarn weight and needle sizes or working more repeats.

Yarn
MC:Lana Grossa Alta Moda Cashmere Fine (80% wool, 10% cashmere, 10% Polyamid; 350 yds [320 m]/50 gr) Color 109 CC/pink/raspberry/antique pink, 2 skeins.
CC:Madelinetosh Tosh DK (100% merino; 225 yds [206 m]/100 gr) Color Pink clay, 1 skein.
Needles
Size US 5 (3.75 mm): 24” circular.
This pattern requires a circular needle as you will be sliding sts to the other side of the needle. A flat needle will not work.
Notions
1 marker; 5 (9 if you want to make the “vest” version) buttons with 0.6″ (1.5cm) diam.; tapestry needle
Gauge
25 sts and 35 rows = 4” [10 cm] in St st after wet blocking.
25 sts and 40 rows = 4” [10 cm] in two-color brioche stitch.
(Gauge is not critical for this project)
Abbreviations
Please see our standard abbreviations.
brk: (brioche knit) knit the stitch (which was slipped in the row before) together with its yarnover.
brkyobrk: (brioche increase) brk1, yo (yarn forward under needle then over needle to back), then brk1 into same stitch. 2 sts increased
brLsl:(brioche decrease that slants to the left, involving 3 sts) slip the first stitch knitwise, brk the following two stitches together, pass the slipped stitch over.
brp: (brioche purl) purl the stitch (which was slipped in the row before) together with its yarn over.
brRsl: (brioche decrease that slants to the right, involving 3 sts) slip the first stitch knitwise, knit the next stitch, pass the slipped stitch over, place stitch on left hand needle and pass the following stitch over. Place st on right hand needle.
sl1yo: slip 1 purlwise, while bringing the working yarn over the slipped stitch.
Charts
Please note: both charts and the CO number were updated on November 1, 2017. Charts were again updated on November 5, 2017 just to make them easier to print in Black & White (NO CHANGES were made to the content of the charts).
We’ve split the charts into two just to make it easier to print. BUT – the two charts together form a single repeat. So if we say to work 2 repeats you’ll work TWO of each chart, as in – Chart 1, Chart 2, Chart 1, Chart 2.
Chart 1

updated November 1, 2017, made black on November 5, 2017 so it’s easier for Black & White printing
Chart 2

updated November 1, 2017, made black on November 5, 2017 so it’s easier for Black & White printing
Techniques
Two-color Italian Cast On
- Take the two tails of your yarns and tie them together in a slip knot.
- Take your knitting needle and slide the slip knot onto it and tighten it down. This stitch will not be worked and will not count after this cast-on row.
- Insert your index finger and thumb between the two strands of yarn (MC on thumb, CC on index) and spread them apart.
- Swing your needle over the top (CC) strand of yarn, then underneath both strands.
- Bring your needle between the two strands and under the top (CC) strand. You should now be back to your starting position, with one MC stitch on the needle.
- Bring your needle in front and under the bottom (MC) strand, then up between the two strands.
- Bring your needle over the top (CC) strand, around, and under the bottom (MC) strand. You should be back at your starting position, with a CC stitch on the needle.
Repeat steps 4 – 7 until you have cast on the number of stitches required by your pattern.
For more information: Nancy Marchant’s tutorial or video below.

Two-color Brioche Stitch
- Cast on an odd number of stitches onto a double-pointed or circular needle, using two-color italian cast on.
- Setup row (“WS”): with MC *purl 1, slip 1 stitch purlwise, work a yarn-over placed over the slipped stitch, repeat from *, ending purl 1. Push all the stitches to the other end of needle.
- Setup row (“WS”): with CC, slip 1, *knit 1 stitch and the yarn-over worked in the previous step together, slip 1 stitch purlwise, work a yarn-over placed over the slipped stitch, repeat from * to last 2 sts, knit 1 stitch and the yarn-over worked in the previous step together, drop CC, leaving yarn to back, sl1. Turn the work.
- MC Row 1 (“RS”): with MC knit 1, * slip 1 stitch purlwise, work a yarn-over placed over the slipped stitch, knit 1 stitch and the yarn-over worked in the previous row together, repeat from *, ending knit 1. Push all the stitches to the other end of needle.
- CC Row 1 (“RS”): with CC slip1, *purl 1 stitch and the yarn over worked in the previous step together, slip 1 stitch purlwise, work a yarn-over placed over the slipped stitch, repeat from *to last 2 sts, knit 1 stitch and the yarn-over worked in the previous step together, drop CC, leaving yarn to back, sl1. Turn the work.
- MC Row 2 (“WS”): with MC purl 1, *slip 1 stitch purlwise, work a yarn-over placed over the slipped stitch, purl 1 stitch and the yarn over worked in the previous row together, repeat from *, ending purl 1. Push all the stitches to the other end of needle.
- CC Row 2 (“WS”): with CC, slip 1, *knit 1 stitch and the yarn-over worked in the previous step together, slip 1 stitch purlwise, work a yarn-over placed over the slipped stitch, repeat from * to last 2 sts, knit 1 stitch and the yarn-over worked in the previous step together, drop CC, leaving yarn to back, sl1. Turn the work.
For more information: Nancy Marchant’s tutorial or video (below) from KnittingStitchPatterns.

I-cord Bind off
*Slide all sts to the other end of needle, k 3, then k tog the remaining st on needle and one st from the body; rep from *
I-cord
*k 1 row. Do not turn the work, just slide the sts to the opposite end of the needle. Now the working yarn is at the “wrong” side of the row. Knit next row, pulling the working yarn up the back of the piece.
Repeat from * until you have reached the desired length.
Knitted Cast On
- Knit a stitch as normal, but DO NOT slip stitch from left needle
- Place the newly formed stitch back on the right needle back on left needle, without twisting it.
Repeat Steps 1-2 until you have the desired number of stitches.
For more information: tutorial (from simple-knitting.com) and video.
Pattern
With Two-color Italian CO, CO 27 sts, pm, CO 28 sts; 55 sts.
To obtain a wider piece it’s possible to add more repeats of the pattern. Each repeat is approx 4” [10 cm] wide and is worked on 24 sts, so CO accordingly. Also, take into account that you’ll need 2 more buttons (4 for the “vest” version) per each repeat you are going to add.
Setup row:
MC: p1, *sl1yo, p1, repeat from * to end. (drop the knot from the Italian CO without working it). Push all the sts to the other end of needle.
CC: sl1, *brk, sl1yo, repeat from * to last 2 sts slipping M when you encounter it, brk, drop CC, leaving yarn to back, sl1. Turn the work.
Start working in pattern:
Remember to work both charts – they’re just split up for your convenience when printing.
MC RS:
K1, * work 1 Autunno repeat to marker, sm (if any), repeat from * to 2 st before end, sl1yo, k1. Push all the sts to the other side of the needle.
CC RS:
Sl1, * work 1 Autunno repeat to marker, sm (if any), repeat from * to 2 sts before end, brp, drop CC, leaving yarn to back, sl1. Turn the work.
MC WS:
P1, sl1yo, * work 1 Autunno repeat to marker, sm (if any), repeat from * to 1 st before end, p1. Push all the sts to the other side of the needle.
CC WS:
Sl1, brp, * work 1 Autunno repeat to marker, sm (if any), repeat from * to 1 sts before end, drop CC, leaving yarn to back, sl1. Turn the work.
Work the pattern twice for a simple cowl (8×27.5” [20×70 cm]), 4 times for an infinity scarf as shown in the sample (8 x 51” [20 x130 cm]), or until the piece has reached the desired length.
Break CC yarn.
Closing the piece
With knitted cast on and MC, CO 4 sts.
Please note that an errata was added on November 2, 2017.
BO 1 st using i-cord BO, *work 3 i-cord rows (thus forming a buttonhole), then BO 13 sts using i-cord BO; repeat from *4 times, then work 3 i-cord rows, BO the last 2 sts using i-cord BO.
BO 4 i-cord sts, break MC yarn.
Sew 5 buttons along the CO edge, in correspondence with the buttonholes. If you worked the infinity version and want to wear it also as a vest, sew 4 more buttons along the long edge, perpendicularly with the previous ones, using the last button of the CO edge as the first of this row.
Finishing
Weave in ends.
Wash the piece and let it dry flat.
Autunno stitch pattern
Note: When a marker is not explicitly mentioned, always slip it with no further manipulation.
Please note that an errata was added on November 2, 2017 and an additional one on November 5, 2017. These are only for the written pattern and do not impact the charts.
Row 1: Using MC, k1, * sl1yo, brLsl1, (sl1yo, brk) x 6, sl1yo, brRsl1, sl1yo, brkyobrk, (sl1yo, brk) x 2; sm, repeat from *, sl1yo, k1 (24 sts in each repeat). Slide all the sts to the other side of the needle.
Row 2 and all RS CC Rows: Using CC, sl1, (brp, sl1yo) to 2 sts before end, brp, sl1. Turn the work.
Row 3 and all WS MC Rows: Using MC, p1, (sl1yo, brp) to 2 sts before end, sl1yo, p1. Slide all the sts to the other side of the needle.
Row 4 and all WS CC Rows: Using CC, sl1 wyif, (brk, sl1yo) to 2 sts before end, brp, sl1 wyif. Turn the work.
Row 5: Using MC, k1, *sl1yo, brLsl1, (sl1yo, brk) x 4, sl1yo, brRsl1, (sl1yo, brkyobrk) x 2, (sl1yo, brk) x 2; sm, repeat from * sl1yo, k1. Slide all the sts to the other side of the needle.
Row 9: Using MC, k1, *sl1yo, brLsl1, (sl1yo, brk) x 2, sl1yo, brRsl1, sl1yo, brk, (sl1yo, brkyobrk) x 2, (sl1yo, brk) x 3; sm, repeat from *, sl1yo, k1. Slide all the sts to the other side of the needle.
Row 13: Using MC, k1, *sl1yo, brLsl1, sl1yo, brRsl1, (sl1yo, brk) x 2, (sl1yo, brkyobrk) x 2, (sl1yo, brk) x 4; sm, repeat from *, sl1yo, k1. Slide all the sts to the other side of the needle.
Row 17: Using MC, k1, *sl1yo, brLsl1, (sl1yo, brk) x 3, (sl1yo, brkyobrk) x 2, (sl1yo, brk) x 5; sm, repeat from *, sl1yo, k1 (26 sts in each repeat). Slide all the sts to the other side of the needle.
Row 21: Using MC, k1, *sl1yo, brk, sl1yo, brLsl1, (sl1yo, brk) x 6, sl1yo, brRsl1, sl1yo, brkyobrk, sl1yo, brk; sm, repeat from *, sl1yo, k1 (24 sts in each repeat). Slide all the sts to the other side of the needle.
Row 25: Using MC, k1, *sl1yo, brk, sl1yo, brLsl, (sl1yo, brk) x 4, sl1yo, brRsl, (sl1yo, brkyobrk) x 2, sl1yo, brk; sm, repeat from *, sl1yo, k1. Slide all the sts to the other side of the needle.
Row 29: Using MC, k1, *sl1yo, brk, sl1yo, brLsl1, (sl1yo, brk) x 2, sl1yo, brRsl1, sl1yo, brk, (sl1yo, brkyobrk) x 2; sm, repeat from *,(sl1yo, brk) x 2, sl1yo, k1. Slide all the sts to the other side of the needle.
Row 33: Using MC, k1, *sl1yo, brk, sl1yo, brLsl1, sl1yo, brRsl1, (sl1yo, brk) x 2, (sl1yo, brkyobrk) x 2, (sl1yo, brk) x 3; sm, repeat from *, sl1yo, k1. Slide all the sts to the other side of the needle.
Row 37: Using MC, k1, *sl1yo, brk, sl1yo, brLsl1, (sl1yo, brk) x 3, (sl1yo, brkyobrk) x 2, (sl1yo, brk) x 4; sm, repeat from *, sl1yo, k1 (26 in sts each repeat). Slide all the sts to the other side of the needle.
Row 41: Using MC, k1, *(sl1yo, brk) x 2, sl1yo, brLsl1, (sl1yo, brk) x 6, sl1yo, brRsl1, sl1yo, brkyobrk; sm, repeat from *, sl1yo, k1 (24 sts in each repeat). Slide all the sts to the other side of the needle.
Row 45: Using MC, k1, *(sl1yo, brk) x 2, sl1yo, brLsl, (sl1yo, brk) x 4, sl1yo, brRsl, (sl1yo, brkyobrk) x 2; sm, repeat from *, sl1yo, k1. Slide all the sts to the other side of the needle.
Row 49: Using MC, k1, *(sl1yo, brk) x 2, sl1yo, brLsl1, (sl1yo, brk) x 2, sl1yo, brRsl1, sl1yo, brk, (sl1yo, brkyobrk) x 2, sl1yo, brk; sm, repeat from *, sl1yo, k1. Slide all the sts to the other side of the needle.
Row 53: Using MC, k1, *(sl1yo, brk) x 2, sl1yo, brLsl1, sl1yo, brRsl1, (sl1yo, brk) x 2, (sl1yo, brkyobrk) x 2, (sl1yo, brk) x 2; sm, repeat from *, sl1yo, k1. Slide all the sts to the other side of the needle.
Row 57: Using MC, k1, *(sl1yo, brk) x 2, sl1yo, brLsl1, (sl1yo, brk) x 3, (sl1yo, brkyobrk) x 2, (sl1yo, brk) x 3; sm, repeat from *, sl1yo, k1 (26 sts in each repeat). Slide all the sts to the other side of the needle.
Row 61: Using MC, k1, *(sl1yo, brk) x 2, sl1yo, brkyobrk, sl1yo, brLsl, (sl1yo, brk) x 6, sl1yo, brRsl; sm, repeat from *, sl1yo, k1 (24 sts in each repeat). Slide all the sts to the other side of the needle.
Row 65: Using MC, k1, *(sl1yo, brk) x 2, (sl1yo, brkyobrk) x 2, sl1yo, brLsl, (sl1yo, brk) x 4, sl1yo, brRsl; sm, repeat from *, sl1yo, k1. Slide all the sts to the other side of the needle.
Row 69: Using MC, k1, *(sl1yo, brk) x 3, (sl1yo, brkyobrk) x 2, sl1yo, brk, sl1yo, brLsl, (sl1yo, brk) x 2, sl1yo, brRsl; sm, repeat from *, sl1yo, k1. Slide all the sts to the other side of the needle.
Row 73: Using MC, k1, *(sl1yo, brk) x 4, (sl1yo, brkyobrk) x 2, (sl1yo, brk) x 2, sl1yo, brLsl, sl1yo, brRsl; sm, repeat from *, sl1yo, k1. Slide all the sts to the other side of the needle.
Row 77: Using MC, k1, *(sl1yo, brk) x 5, (sl1yo, brkyobrk) x 2, (sl1yo, brk) x 3, sl1yo, brLsl; sm, repeat from *, sl1yo, k1 (26 sts in each repeat). Slide all the sts to the other side of the needle.
Row 81: Using MC, k1, *sl1yo, brk, sl1yo, brkyobrk, sl1yo, brLsl, (sl1yo, brk) x 6, sl1yo, brRsl, sl1yo, brk; sm, repeat from *, sl1yo, k1 (24 sts in each repeat). Slide all the sts to the other side of the needle.
Row 85: Using MC, k1, *sl1yo, brk, (sl1yo, brkyobrk) x 2, sl1yo, brLsl, (sl1yo, brk) x 4, sl1yo, brRsl, sl1yo, brk; sm, repeat from *, sl1yo, k1. Slide all the sts to the other side of the needle.
Row 89: Using MC, k1, *(sl1yo, brk) x 2, (sl1yo, brkyobrk) x 2, sl1yo, brk, sl1yo, brLsl, (sl1yo, brk) x 2, sl1yo, brRsl, sl1yo, brk; sm, repeat from *, sl1yo, k1. Slide all the sts to the other side of the needle.
Row 93: Using MC, k1, *(sl1yo, brk) x 3, (sl1yo, brkyobrk) x 2, (sl1yo, brk) x 2, sl1yo, brLsl, sl1yo, brRsl, sl1yo, brk; sm, repeat from *, sl1yo, k1. Slide all the sts to the other side of the needle.
Row 97: Using MC, k1, *(sl1yo, brk) x 4, (sl1yo, brkyobrk) x 2, (sl1yo, brk) x 3, sl1yo, brLsl, sl1yo, brk; sm, repeat from *, sl1yo, k1 (26 sts in each repeat). Slide all the sts to the other side of the needle.
Row 101: Using MC, k1, *sl1yo, brkyobrk, sl1yo, brLsl, (sl1yo, brk) x 6, sl1yo, brRsl, (sl1yo, brk) x 2; sm, repeat from *, sl1yo, k1 (24 sts in each repeat). Slide all the sts to the other side of the needle.
Row 105: Using MC, k1, *(sl1yo, brkyobrk) x 2, sl1yo, brLsl, (sl1yo, brk) x 4, sl1yo, brRsl, (sl1yo, brk) x 2; sm, repeat from *, sl1yo, k1. Slide all the sts to the other side of the needle.
Row 109: Using MC, k1, *sl1yo, brk, (sl1yo, brkyobrk) x 2, sl1yo, brk, sl1yo, brLsl, (sl1yo, brk) x 2, sl1yo, brRsl, (sl1yo, brk) x 2; sm, repeat from *, sl1yo, k1. Slide all the sts to the other side of the needle.
Row 113: Using MC, k1, *(sl1yo, brk) x 2, (sl1yo, brkyobrk) x 2, (sl1yo, brk) x 2, sl1yo, brLsl, sl1yo, brRsl, (sl1yo, brk) x 2; sm, repeat from *, sl1yo, k1. Slide all the sts to the other side of the needle.
Row 117: Using MC, k1, *(sl1yo, brk) x 3, (sl1yo, brkyobrk) x 2, (sl1yo, brk) x 3, sl1yo, brLsl, (sl1yo, brk) x 2; sm, repeat from *, sl1yo, k1 (26 sts in each repeat). Slide all the sts to the other side of the needle.

About the Designer: Paola Albergamo
My name is Paola Albergamo, I’m italian and live in Rome.
As a designer/knitter, I love to experiment and I’m always trying different techniques, from short rows to cables, from lace to i-cord, from mosaic to brioche etc. I cannot say I love one technique more than another: monogamy is boring!
I love every minute I spend with yarn in my hands.
My patterns have been published in Knitty, Knotions and I Like Knitting.


Yes, the scarf is worked flat and then joined.
The sample is closed with buttons, but you can seam it if you prefer.
Thank you so much for the lovely pattern! I plan on creating the infinity scarf version, but I do not see any instructions on knitting in the round or joining the scarf. Am I correct in assuming that you just seam the two ends together?
Thanks again!
About the needles: Call me odd but I can’t stand circular needles for flat work.
Since this cowl is only 8 inches wide, I will be using DPNs.
No, not the short ones intended for socks and small diameter knits-in-the-round.
I have 16 inches long DPNs, make it easy to move the stitches from one end to the other, and makes it a whole lot easier for me to hold the needles and knit.
These needles are available from Bergere de France. When you go to their website, just make sure you select your country/language to get the correct prices.
That’s fine! Everyone has their own special way of working!
I prefer to knit socks magic loop on a single 24″ cable but I know that’s pretty atypical.
I tried sending this on 11-6-2017, but your system must have been down. So sorry to take so long to finally get a response to you.
Thank you for your response, Knotions. I would call you by name, but I do not know it, so I apologize to you.
I am answering both of your posts in this one response.
Yes, at first I tried clicking ‘enlarge’ and that’s when the grey showed up. When I opened it in a new page, I enlarged myself (“cont+++”) the grey turned into a ‘white cell field’ (as expected) and the font became crystal clear. Because the size was so increased on my monitor, I was forced to photo capture the charts in pieces and put them together in a Word doc. That worked like a charm!
No, I did not try to print the document(s) or PDF at all. I live full-time in an RV on the road traveling our beautiful nation, and do not have space for storing ‘paper’. Everything I gather is kept on my computer. I literally have only five books with me, and only print out what is necessary, legally.
My initial response was to give you a head’s up for other knitters who would run into the same problem and not know how to rectify it. There are so many knitters I meet that live the same lifestyle as I do, but are not as computer savvy… and I KNOW this one would throw them for a complete loop.
If you need some assistance with the charts, and would like some help, please feel free to contact me. I would be more than happy to help in any way I can. Albeit, Wednesday, the 8th I will be on the road, so you can expect a response on Thursday or Friday, at the latest.
In the meantime, I will keep an eye out for that ‘RUN-AWAY second asterisk’. What a bad little flea!!!
Thank you again. I appreciate you taking time out of your busy day.
Have a great day… KNITTING!
MJ, the SKEINdinavian
I would dearly love to knit this beautiful cowl/vest. However, the charts were impossible to read. The font was not sharp. The grey background with no stitch (cell) definition made it impossible for me know the important visual information charts offer.
I stood on my head spitting wooden nickels and finally was able to piece together photo captures of the charts, and without the grey background. They are finally useful.
My empathy goes out to others who do not have the photo capture software and the years of experience making poor quality photos clear and crisp as I do. Perhaps the charts are better in the PDF version. I do not know as I do not care for PDF’s.
ALSO; Is there more errata? The second asterisk is missing on row 29. (See below.)
Row 29: Using MC, k1, *sl1yo, brk, sl1yo, brLsl1, (sl1yo, brk) x 2, sl1yo, brRsl1, sl1yo, brk, (sl1yo, brkyobrk) x 2, (sl1yo, brk) x 2, sl1yo, k1. Slide all the sts to the other side of the needle.
Now that I have the charts ready to use, I am off to order yarn. This gorgeous, leafy brioche cowl/vest is too irresistible to pass up!!! Thank you for making it available to us.
Have a great day… KNITTING!
MJ, the SKEINdinavian
Oops – you are correct – it needs that second asterisk. I’ll take a look at that and add it after this.
Regarding the charts – i’m SO SORRY you’re having issues with the charts. Are you clicking to enlarge them and use them? They seem sharp to me but everyone likes their charts differently so I’m curious.
Thank you for the correction, Knotions. Now, as soon as my yarn arrives, I can get KNITTING!
These will make WONDERFUL Christmas gifts for all the girls/ladies in my life… and I KNOW they will love them!!!
Thank you again for making this available for all of us.
Happy Thanksgiving and Merry Christmas/ Happy Holidays to you and yours.
MJ, the SKEINdinavian
Oh – I wonder if you’re trying to print it in black and white. When I changed it to that, the yellow and the grey background became very similar. If that’s the case, we can (and should) change that.
Let me know.