A Practical Guide to Evaluating Patterns and Choosing Yarns
You’ve found the perfect cable pattern, but you’re not sure if it will work in your favorite yarn. Or you’re browsing patterns and can’t quite articulate why one appeals to you and another doesn’t. Or you’ve finished a cabled project and it doesn’t drape the way you hoped. Understanding cable density – how much of a pattern is devoted to cables versus plain fabric – can help you make better choices before you cast on.
Cable density profoundly affects how a finished piece behaves: its drape, its warmth, its weight, and whether it will work for your intended purpose. Learning to recognize and evaluate density helps you choose patterns that will give you the results you want, and adapt patterns successfully when you need to make changes.
What Is Cable Density?
Cable density refers to how much of a fabric’s surface is occupied by cables versus background fabric (usually reverse stockinette, stockinette, or ribbing). Think of it as a spectrum:
High density: Cables cover most or all of the fabric. These pieces are thick, warm, and structured. Think traditional Aran sweaters with allover cabling, or heavily cabled hats and mittens.
Medium density: Cables appear in distinct panels or motifs with substantial background fabric showing. The cables stand out clearly against their background. This is where many shawls, cowls, and modern sweater designs live.
Low density: Cables are scattered accents on mostly plain fabric – a cable panel up a sock leg, a single braid on a stockinette yoke, or decorative cables flanking a cardigan’s front bands.


Visual comparison of cable density levels: low density (left) with cables as accents, medium density (center) with balanced cable-to-background ratio, and high density (right) with minimal visible background fabric.
None of these is inherently better. Each serves different purposes and works with different yarns. The key is understanding what density a pattern has, and whether that matches your needs.
How Density Affects Your Finished Project
Before we look at specific examples, let’s understand what happens as density increases:
Drape and Structure
Cables pull fabric in and create thickness. The more cables you have, the less your fabric will drape and flow. High-density cabling creates fabric with body and structure – sometimes to the point of stiffness. Low-density cabling allows the base fabric to maintain its natural drape.
What this means for you: If you’re making something that needs to flow and move with you – a wrap, a drapey cardigan, a flowy tunic – look for patterns with lower to medium cable density. If you want structure – a bag that stands up, a hat that holds its shape, a sweater with architectural presence – higher density will serve you well.
Warmth and Weight
More cables mean thicker fabric, which traps more air and creates more insulation. A high-density cabled hat will be significantly warmer than a low-density one in the same yarn. But that thickness also means more weight – a high-density shawl can feel heavy on your shoulders after a few hours.
What this means for you: Consider your climate and wearing comfort. For cold weather gear (hats, mittens, warm cowls), higher density is often ideal. For transitional season pieces or things you’ll wear for extended periods, moderate density might be more comfortable.
Knitting Time and Complexity
High-density cabling takes dramatically longer to knit than low-density. Every cable crossing slows you down – you need to work stitches out of order, count carefully, and pay attention. A pattern with cables on every row takes much longer than one where cables only cross every 6 or 8 rows.
What this means for you: Be realistic about your time and patience. A high-density pattern might be stunning, but will you actually finish it? If you’re time-constrained or easily bored, look for medium to low density designs, or save the intensive cabling for small projects like hats or cowls.
Yarn Consumption
Cables eat yarn. The crossings pull stitches together, which means you need more rows to get the same length – and each row uses more yarn because of the cable’s thickness. Pattern yardage requirements reflect this, but it’s especially important if you’re substituting yarn or resizing.
What this means for you: Buy extra yarn for high-density patterns. If the pattern calls for 1200 yards and you’re increasing size or changing to a more densely cabled section, budget for 10-20% more yarn. And if you’re substituting a precious handspun or expensive yarn, consider whether a lower-density pattern might let you stretch it further.
Reading Density in Pattern Photos and Schematics
Here’s how to evaluate density before you commit to a pattern:
Look at the Pattern Photos
Examine the project photos carefully. Can you see substantial areas of plain background fabric (reverse stockinette, stockinette, ribbing) between cable motifs? Or do cables crowd close together with minimal space? Is there a regular rhythm of cable-background-cable, or is it cables all the way across?
Red flag for unexpected stiffness: If you’re looking at a garment pattern (especially a sweater body or wrap) and you can barely see any plain fabric – cables packed edge to edge – that piece will have minimal drape. This might be exactly what you want, but don’t expect it to flow gracefully.
Green flag for wearable drape: You can clearly identify distinct cable panels separated by visible sections of background. Even if the cables themselves are complex, the negative space means the fabric will maintain some flexibility.
Study the Charts or Stitch Patterns
If the pattern includes charts, count:
– How many stitches total in the chart or pattern repeat?
– How many of those are cable stitches (the ones that cross)?
– How many are background stitches?
A rough density percentage: (cable stitches ÷ total stitches) × 100
For example, a 20-stitch pattern repeat with 12 cable stitches and 8 background stitches has 60% cable density – that’s medium to medium-high.
Check Project Notes on Ravelry
See what other knitters say. Do they mention the piece being stiff, heavy, or slow? Or do they praise the drape and flow? Comments about ‘taking forever’ or ‘used way more yarn than expected’ often signal high density that wasn’t obvious from the pattern description.
Three Examples: Understanding Density in Action
Let’s look at three real patterns at different density levels to see how this plays out:
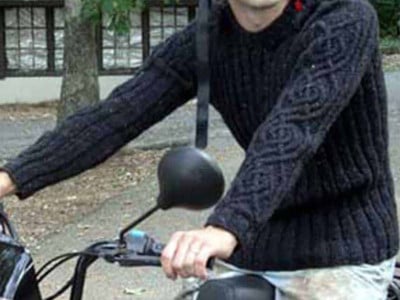
High Density in Strategic Locations: The Durrow Sweater
The Durrow pullover shows smart density placement. The body is worked in 4×2 rib – this has some texture, but it’s not true high-density cabling. It’s flexible, elastic, and comfortable to wear.
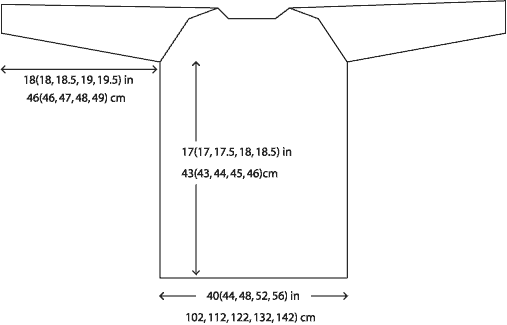
The Durrow sweater schematic shows strategic placement: the body uses simple ribbing (medium-low density) while the sleeves feature a dense spiraling cable panel. This balances visual interest with wearable comfort.
But look at the sleeves. Each sleeve features a spiraling knotwork cable panel that runs almost the entire sleeve length. This is high-density cabling, but only in this specific vertical panel. The rest of the sleeve continues the 4×2 rib.
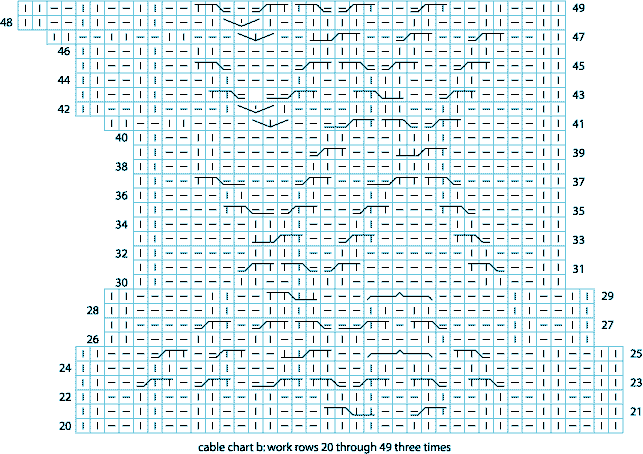
The continuous cabling creates structural reinforcement in this high-wear area while serving as a striking visual focal point.
What this tells you as a knitter: This sweater will be comfortable to wear (the body and most of the sleeves have good drape and stretch), but it will also have visual interest and durability in the high-wear sleeve area. The sleeve cables will take time – expect the sleeves to knit slowly compared to a plain sleeve. But you’re not committing to high-density cabling across the entire sweater, which would be exhausting and potentially uncomfortable.
Yarn substitution consideration: The specified yarn is a tweedy Aran with some texture. If you substitute a very drapey yarn (like a silk blend or superwash merino), those sleeve cables might not hold their definition as crisply. If you substitute a sticky, grippy yarn (like a rustic wool), the rib sections might be less comfortable. The original yarn choice balances cable definition with wearable stretch.
Medium Density Done Right: The Inishere Wrap
This wrap is 93 stitches wide with:
– Seed stitch borders on each edge (9 stitches each side = 18 total)
– Two Hugs & Kisses cable panels (8 stitches each = 16 total)
– A center Diamond cable panel (approximately 35 stitches)
– Reverse stockinette background between elements (approximately 24 stitches)
That works out to roughly 55% cables, 45% background and borders. This is classic medium density.
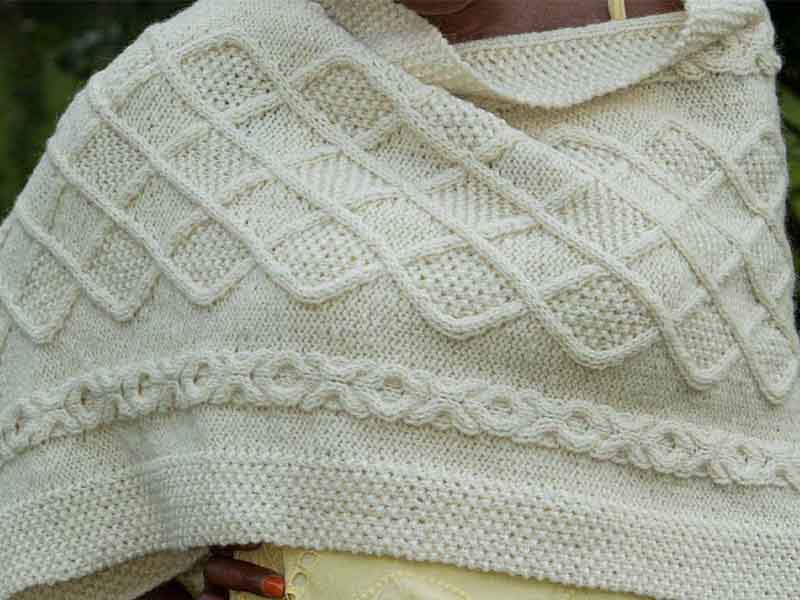
The Inishere Wrap demonstrates balanced medium density. You can clearly see distinct cable panels (the flanking Hugs & Kisses cables and center diamond panel) separated by reverse stockinette background. This creates definition while maintaining drape.
What this tells you as a knitter: This wrap will have presence and substance. You’ll definitely know you’re wearing something special, but it won’t be boardlike or stiff. The reverse stockinette and seed stitch sections let the fabric flex and drape over your shoulders. Each cable element is visually distinct because it has breathing room. The pattern will stay interesting (something different in each row), but it won’t be so intensive that you can’t knit while chatting or watching TV.
Yarn substitution consideration: The pattern calls for a 100% wool at a fairly standard gauge. This density will work with most wool or wool-blend yarns at similar weight. If you substitute a plant fiber (cotton, linen), be aware that the finished wrap will be heavier and have less loft. You might want to size down or choose a lighter-weight version of the fiber. If you use an especially drapey fiber like silk or bamboo, this moderate density will work beautifully, giving you structure without fighting the fiber’s natural flow.
The pattern notes say ‘once you can read your knitting you can put away your pattern. This is a hallmark of good medium-density design. There’s a logical, learnable rhythm.
Lower Density with Visual Impact: The Asagao Shawl
This shawl uses a striped cable arrangement – two complementary cable panels worked side by side on a reverse stockinette background. The cables don’t fill the entire width; they’re distinct panels within a field of background fabric. Seed stitch borders frame the piece.

The Asagao Shawl shows how heavier yarn weight can create visual impact with lower cable density. The cable panels are prominent but surrounded by substantial background fabric, allowing excellent drape for a wrap.
Worked in a heavier yarn (superwash merino at 16 stitches/4 inches), this represents a lower-to-medium density approach. The designer notes it’s ‘complex, but will work up quickly due to the weight.’
What this tells you as a knitter: This shawl uses yarn weight and cable complexity to create impact without packing cables densely. The heavier yarn means each cable looks bold and sculptural even with more space around it. This will drape beautifully; the lower density ensures it’s not too heavy or stiff. The project will move along relatively quickly for a cabled shawl because you’re not constantly working cable crossings. But you’re still getting substantial visual interest and texture.
Yarn substitution consideration: This design’s success depends on using a yarn with good stitch definition in this specific weight range. If you go lighter (say, fingering weight), you’d need to increase cable density or add more cable repeats to maintain impact; the current spacing would leave too much plain fabric. If you go heavier (bulky), you might actually want to simplify the cables themselves because bulky yarn can make complex crossings look crowded even at this medium-low density.
Evaluating Yarn Choices Based on Density
Now that you understand density, let’s talk about matching yarn to pattern density:
For High-Density Patterns
Best yarn choices:
– Wool or wool blends with good memory and bounce
– Moderately firm yarns (not too soft or drapey)
– Well-plied yarns that hold their structure
– Yarns with good stitch definition (smooth or semi-smooth)
Why: High-density cabling creates thick, structured fabric. You want yarn that will support this structure without becoming limp or overly heavy. Wool’s natural elasticity helps cables pop and prevents the fabric from becoming too stiff.
Yarns to avoid:
– Very soft, drapey yarns (silk blends, bamboo, Tencel): they’ll create lovely cables but the overall fabric might be too heavy
– Plant fibers without memory (100% cotton, linen): they can become limp and droopy with dense cabling
– Extremely fuzzy or textured yarns: they’ll obscure cable definition
For Medium-Density Patterns
Best yarn choices:
– Wide range works! This is the most forgiving density level
– Wool blends give good results
– Superwash merino works beautifully
– Silk blends can add lovely drape
– Even cotton blends can work if you want a cooler fabric
Why: The balance of cables and background means the fabric has enough structure from the cables but enough plain fabric to maintain drape. This gives you flexibility in yarn choice.
Consideration: Match your yarn’s characteristics to your end use. Making a warm wrap? Stick with wool. Want something for warmer weather? Try a cotton blend. Need maximum drape? Silk blends work great at this density level.
For Low-Density Patterns
Best yarn choices:
– Yarns with excellent stitch definition become crucial
– Smooth or semi-smooth yarns show cables clearly
– Consider yarns with good drape for the base fabric
– Heavier weights can give more impact to sparse cables
Why: With fewer cables, each one needs to really show up. You also want the base fabric (which dominates the piece) to have nice drape and a pleasant hand.
Yarns to avoid:
– Very fuzzy or textured yarns: your sparse cables will disappear
– Split-prone yarns: they’re frustrating when you’re working cables, and cables are the main event here
When You Need to Change Density
Sometimes you fall in love with a pattern but need to adjust its density. Here’s how to think about common scenarios:
‘This Pattern is Too Dense for My Yarn’
Situation: You have a drapey silk blend and a pattern with tightly packed cables. You’re worried it will be too heavy or limp.
Options:
1. Reduce cable crossings: If a cable crosses every 4 rows, try every 6 rows. This lightens the fabric.
2. Eliminate some cable panels: If there are three cable panels across the width, maybe use just two with more background between them.
3. Choose a different pattern: Sometimes the better answer is finding a pattern designed for your yarn’s characteristics.
‘This Pattern Feels Too Sparse’
Situation: You’re using a rustic wool perfect for cables, but the pattern has just one small cable panel and lots of plain stockinette. You want more texture.
Options:
1. Add more cable panels: Repeat the existing cable motif across more of the fabric width.
2. Widen existing cables: A 4-stitch cable could become a 6-stitch cable. This increases density without changing the pattern’s structure as drastically.
3. Increase crossing frequency: If cables cross every 8 rows, try every 6 rows to add more texture.
4. Replace plain background: Instead of stockinette, use reverse stockinette (more textured) or even seed stitch between cables.
‘I Want to Change Yarn Weight’
Situation: You want to make a worsted-weight pattern in fingering or bulky weight.
Key consideration: Density often needs to change with weight. A medium-density worsted pattern might need to become slightly higher density in fingering (to maintain visual impact with finer yarn) or slightly lower density in bulky (to prevent overwhelming stiffness).
This interacts with the topic of adapting cables across weights. Both the individual cable structure and the overall density need adjustment.
Red Flags and Warning Signs
Watch for these situations where density might cause problems:
The Stiff Drape Problem
Warning sign: You’re making a wrap, shawl, or drapey cardigan with very high cable density (60%+ of fabric is cables).
Likely outcome: The piece will be beautiful but may not drape gracefully. It might stand away from your body rather than flowing softly around you.
What to do: If you haven’t cast on yet, consider choosing a different pattern or reducing density. If you’re already knitting, be prepared for this characteristic – it might be exactly what you want, or you might need to block aggressively to encourage drape.
The Disappearing Cable Problem
Warning sign: You’re using fuzzy, halo-y, or highly textured yarn with any cable pattern, but especially low-density ones where cables need to pop.
Likely outcome: Your carefully worked cables will be barely visible. The fiber texture overwhelms the cable structure.
What to do: Swatch first! If your cables don’t show up crisply in the swatch, consider a different yarn or a different pattern. Fuzzy yarns can still work with cables, but you need significantly higher density and bolder cable crossings to make them visible.
The Heavy Shoulder Problem
Warning sign: You’re making a large shawl or wrap with high cable density in a heavy fiber (cotton, cotton blends, some superwash merinos).
Likely outcome: The finished piece will be gorgeous but potentially too heavy for comfortable all-day wear. Your shoulders and neck might tire.
What to do: Consider making a smaller size, reducing cable density, or choosing a lighter-weight fiber with better loft (wool, alpaca blends). Or embrace it as a showpiece you’ll wear for special occasions rather than daily use.
The Never-Ending Project Problem
Warning sign: You’re attempting a large project (sweater, blanket, large shawl) with very high cable density and you’ve never completed a major cabling project before.
Likely outcome: The project sits in your basket for months or years because it’s exhausting to work on.
What to do: Be honest about your knitting style. If you like quick wins or need portable projects you can work on without intense focus, high-density patterns may not be right for you, or save them for small projects like hats and cowls. Consider medium-density alternatives that give you cable interest without the grind.
Quick Reference: Choosing by Purpose
Here’s a cheat sheet for matching density to your project goals:
High density (60-80% cables) works well for:
– Hats, headbands, mitts, mittens
– Bags, baskets, pillow covers
– Boot cuffs, leg warmers
– Strategic panels (like the Durrow sleeves)
– Cold-weather accessories where maximum warmth is the goal
Medium density (40-60% cables) works well for:
– Cowls and infinity scarves
– Shawls and wraps (most versatile range)
– Sweater yokes or panels
– Cardigans with cable panels
– Blankets where you want texture with reasonable knitting time
Low density (15-40% cables) works well for:
– Sweater bodies where comfort and drape matter
– Summer-weight shawls
– Socks (cable panel on leg)
– T-shirts or tops where cables are decorative accents
– Any project where fast knitting is a priority
Putting It All Together
Understanding cable density gives you a practical tool for evaluating patterns before you invest time and money. When you’re browsing patterns, ask yourself:
– How much of this fabric is cables versus background?
– Will that density give me the drape/structure I want?
– Does my chosen yarn work well at this density level?
– Am I prepared for the time and focus this density requires?
– Will the finished piece be comfortable to wear given its density and my yarn choice?
These questions help you make informed choices. You’ll avoid the disappointment of knitting a shawl that’s too stiff to drape, or choosing a yarn that makes your cables disappear, or starting a project that’s too intensive for your available knitting time.
And when you do need to make adjustments – swapping yarns, changing size, adapting for personal preference – you now have the vocabulary and concepts to make those changes intelligently. You understand that it’s not just about individual cable crossings, but about the overall balance of texture and negative space that creates successful, wearable cabled fabric.
Whether you’re a designer creating new patterns or a knitter choosing your next project, cable density is a powerful lens for understanding why some pieces work beautifully and others don’t quite hit the mark. Use it to make better choices, and your cabled projects will consistently deliver the results you envision.

Jody Richards is the founder and lead editor of Knotions. She loves poring over stitch dictionaries and trying out new stitches.
And while she likes all things crafting (well ok, except that one thing), yarn crafts are her true love (and she has the stash to prove it).
Leave a Reply