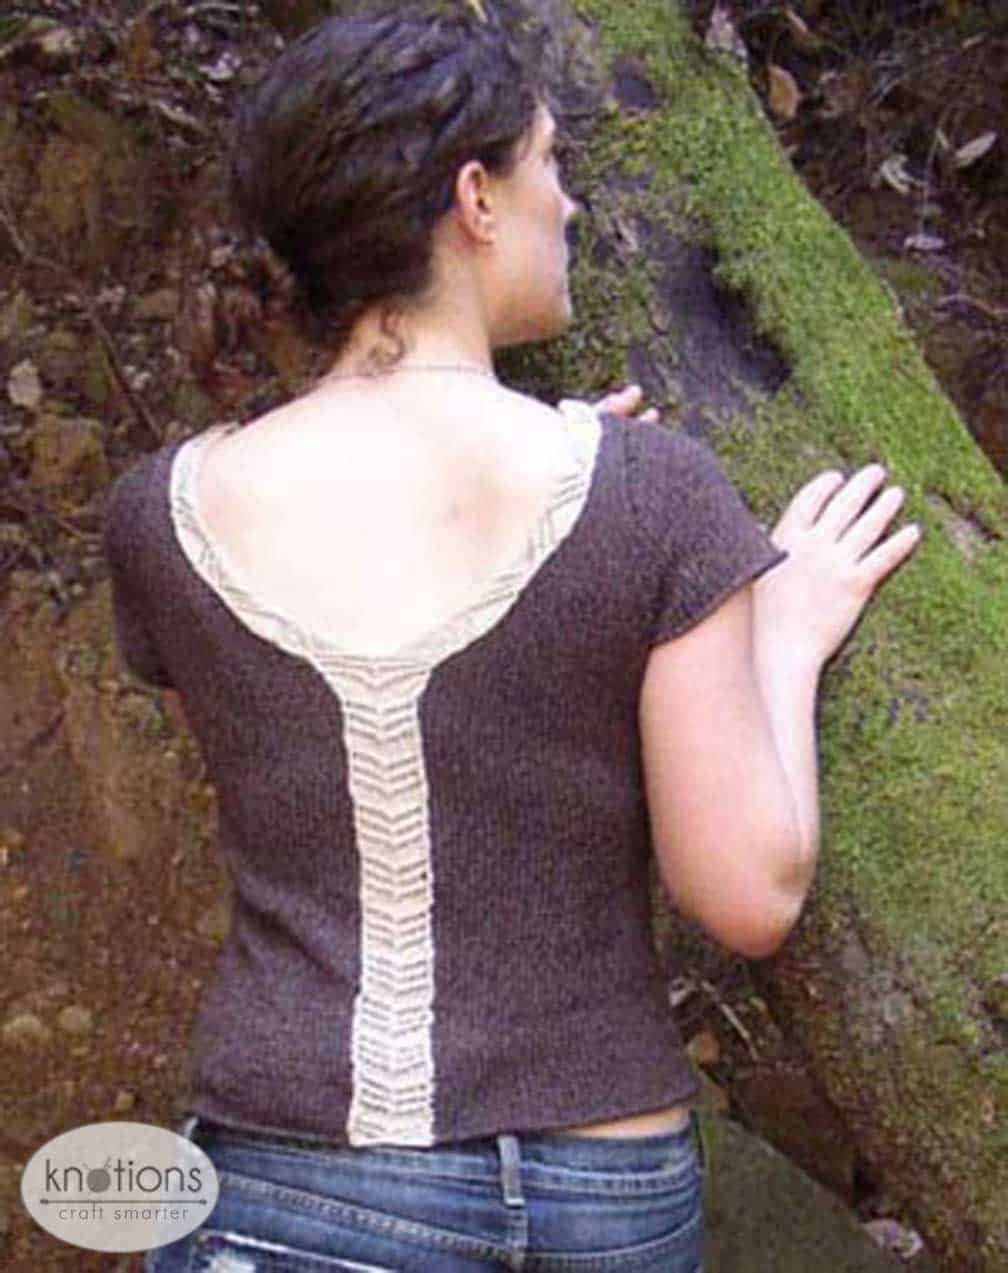
 Sweaters for September are a funny thing. In the San Francisco Bay Area, September days can be cold, foggy, and drizzling or almost unbearably sunny and hot. Often they can even be both, depending on where in the city’s microclimates you are! Honorine comes in two variations, to suit both of San Francisco’s September personalities. One version has flattering cap sleeves and is knit in a wonderful cotton blend, while the other has bracelet-length sleeves and is knit in a warm alpaca. Both versions feature a contoured lace insert in the front and back which creates a subtly sexy and immensely flattering v-shape. Zigzag lace strips along the neck edges are joined together to form a chevron pattern which allows a flash of skin (or a flash of camisole!) down the center of the body.


Sizes
Finished bust: 32 (34, 36, 38, 40, 44)” [81 (86, 91, 96, 102, 112) cm]
Length: 20 (21, 21, 22, 23, 23)” [51 (53, 53, 56, 58, 58) cm]
Yarn
Short sleeve version
RYC Luxury Cotton DK (50% cotton, 45% viscose, 5% silk; 104 yd [95m] / 50g ball): color #257 Char (MC), 5 (5, 6, 7, 9, 10) balls
Rowan 4-Ply Cotton (100% cotton; 186 yd [170m] / 50g ball): color #112 Opaque (CC), 1 ball (all sizes)
Bracelet sleeve version
I used a two-ply DK weight handspun natural dark alpaca for the main color on the sample long sleeve sweater. I suggest RYC Baby Alpaca DK in a dark gray shade called Lincoln as a suitable and readily available substitute yarn.
RYC Baby Alpaca DK (100% baby alpaca; 109 yd [100m] / 50g ball): color #209 Lincoln (MC), 9 (10, 12, 13, 14, 16) balls
Rowan Scottish Tweed 4-Ply (100% wool; 120 yd [110m] / 25g ball): color #024 Porridge (CC), 1 ball (all sizes)
Needles
US #6 (4 mm): straight needles
US #4 (3.5 mm): straight needles
Gauge
22 sts and 30 rows = 4 inches (10cm) in.MC in stockinette on larger needles
3 sts and 20 rows = 2 inches [5cm] inCC in lace pattern on smaller needles.
Notions
Tapestry needle; stitch holder; crochet hook (optional)
Chart 1

Chart 2

Chart 3

Legend

Abbreviations
Please see our standard list of abbreviations.
Right front
With MC and larger needles, CO 38 (41, 44, 47, 50, 55) sts with long tail cast on. K 1 WS row to create purl edging. Beg with a k row, work even in St st for 4.5 (5, 5.5, 6, 6, 6.5)” [11.5 (13, 14, 15, 15, 16.5)cm], ending with a WS row.
Next row: K19 (21, 22, 24, 25, 28) sts, ssk, k to end. Work 3 rows even. Repeat last 4 rows 3 more times; 34 (37, 40, 43, 46, 51) sts. Work even for 2 (2, 2.5, 2.5, 2.75, 2.75)” [5 (5, 6, 6, 7, 7)cm], ending with a WS row.
Next row: K19 (21, 22, 24, 25, 28) sts, m1, k to end. Work 3 rows even. Repeat last 4 rows 3 more times; 38 (41, 44, 47, 50, 55) sts. Work even until piece measures 11 (12, 13, 13, 13.5, 14)” [28 (30.5, 33, 33, 34, 35.5)cm], ending with a RS row.
You will now work armhole and neck shaping at the same time.
Armhole shaping: BO 5 (6, 6, 6, 6, 6) sts at beg of next row. Work 1 row even. BO 3 (4, 4, 4, 4, 4) sts at beg of next row. Dec 1 st at armhole edge of every 2nd row 3 (4, 5, 6, 6, 7) times.
AT THE SAME TIME, work neck shaping: Dec 1 st at neck edge on every row until 6 (6, 6, 8, 8, 10) sts rem.
Work even until armhole measures 8 (8.5, 9, 9.5, 10, 10)” [20 (21.5, 23, 24, 25.5, 25.5)cm]. BO all sts.
Left back
Work the same as right front.
Left front and right back
Work as for right front, reversing all shaping and replacing ssk at waist shaping with k2tog.
Short sleeve
With MC and larger needles, CO 74 (76, 80, 84, 88, 92) sts using long tail cast on. K 1 WS row to create purl edging. Beg with a k row, work even in St st for 4 rows, ending with a WS row.
Shape cap: BO 5 (6, 6, 6, 6, 6) sts at beg of next 2 rows. BO 3 (4, 4, 4, 4, 4) sts at beg of next 2 rows; 58 (56, 60, 64, 68, 72) sts. Dec 1 st at each end of every RS row 12 (13, 13, 15, 15, 15) times; 34 (30, 34, 34, 38, 42) sts. Dec 1 st at each end of every row 8 (6, 10, 10, 10, 12) times; 18 (18, 14, 14, 18, 18) sts. BO 2 sts at beg of next 4 rows; 10 (10, 6, 6, 10, 10) sts. BO rem sts.
Bracelet length sleeve
With MC and larger needles, CO 66 (68, 70, 72, 74, 76) sts using long tail cast on. K 1 WS row to create purl edging. Beg with a K row, work even in stockinette for 3″ [8cm], ending with a WS row. Inc 1 st at each end of next and every foll 7th row 3 (3, 4, 5, 6, 7) times more; 74 (76, 80, 84, 88, 92) sts. Work even until sleeve measures 11 (11.5, 12, 12.5, 13, 13.5)” [28 (29, 30.5, 32, 33, 34)cm] or desired length. Shape cap as for short sleeve.
Note: This lace pattern contains shaping on both the knit side and the purl side. Work 2 of the y-shaped inserts the same, one for front and one for back. These will be joined to the main pieces after completion and blocking. For each insert, you will start at the shoulders, work two neckline edgings with mirrored patterns, then join these two together using the join pattern and work the lower chevron pattern.
Right edging: With CC and smaller needles, CO 9 sts. All sizes: Work 2 rows in st st.
Size 32: Work chart 1 rows 13 to 24 once, then work rows 1 to 24 once, then work rows 1 to 20 once.
Size 34: Beginning at row 1, work chart 1 twice, then work rows 1 to 20 once.
Size 36: Work chart 1 rows 13 to 24 once, then work rows 1 to 24 twice, and then work rows 1 to 20 once.
Size 38: Beginning at row 1, work chart 1 3 times, and then work rows 1 to 20 once.
Size 40: Work chart 1 rows 13 to 24 once, then work rows 1 to 24 3 times, then work rows 1 to 20 once.
Size 44: Beginning at row 1, work chart 1 4 times, and then work rows 1 to 20 once.
Place all sts on stitch holder. Piece should now fit on the neckline edge of main pieces between shoulder BO and beg of neckline shaping. Remember that blocking will solve minor length discrepancies. Major length discrepancies can be corrected by following the pattern instructions for the lace edging for one of the other sizes.
Left edging: Make to mirror left edging. If your left edging started with row 13, start this one with row 1. If your left edging started with row 1, start this one with row 13. All sizes should end with row 8.
Join: Move right edging live stitches from stitch holder onto needle left edging is on. The stitches should appear in pattern as shown in chart 3. Follow chart 3 once.
Lower chevron pattern: work chart 2 until piece is long enough to fit along the center opening of main pieces. When piece is proper length, BO all stitches regardless of what row of the chart you are on.
Finishing
Block main pieces and both lace inserts to shape and size. Overlay first stitch of each side of lace inserts on top of first stitch of main pieces, and backstitch in place (like an applique, not like a seam). Sew shoulder seams. Set in sleeves and sew in place. Sew side seams. If desired, work single crochet of CC yarn along neckline edges of lace. If CO edges of sweater curl a lot, work single crochet of MC yarn along all CO edges to stabilize.
Weave in all the yarn tails and loose ends.
Schematic

About the Designer: Fathom Harvill
Emily knits and designs under the name Fathom Harvill. She is a transplanted Midwesterner living in the Southeast. When she isn’t hiking, cycling, or fixing her bikes she likes designing her own knits. Visit her blog.
Pattern and images © 2006 Fathom Harvill.


Leave a Reply