


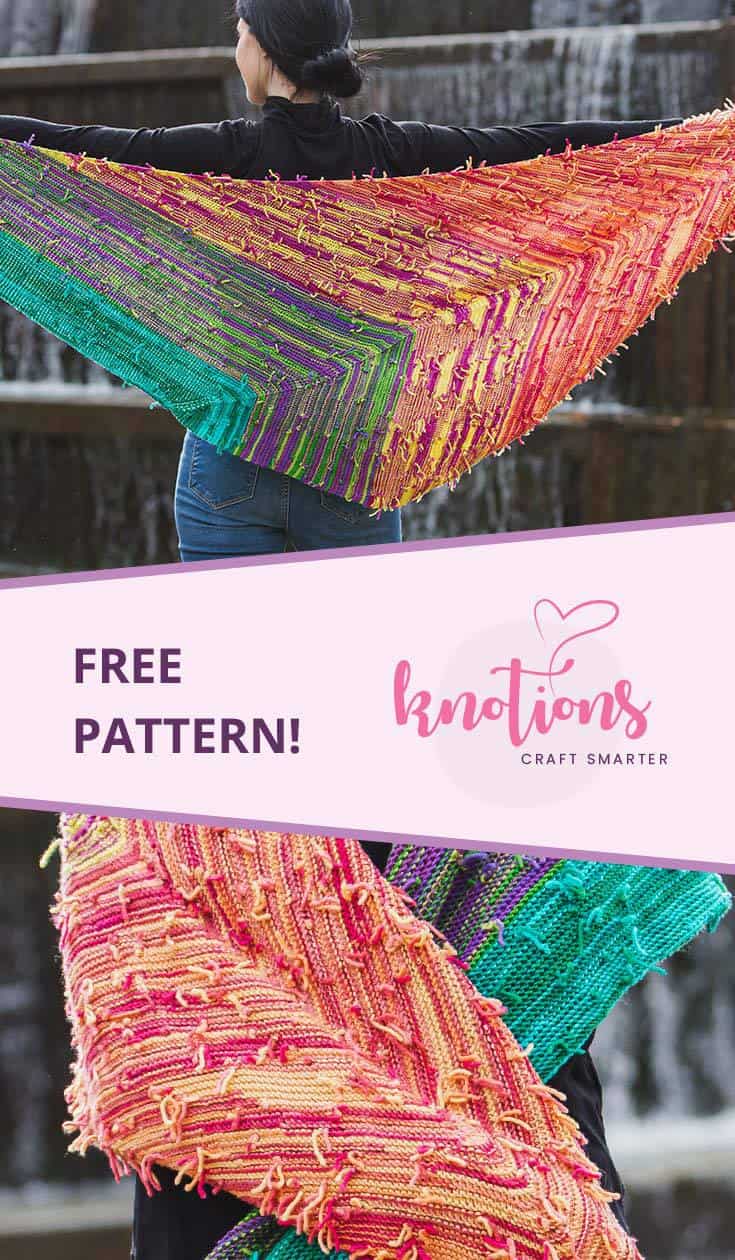
![]() Milvus Milvus is the Latin name for magnificently graceful Red Kite, a bird of prey with steeply angled wings and deeply forked tail, that soars across the skies of my home. It inspired the choice of shape for this cool kite-shaped shawl – an exciting and fun project that is easy enough for even a real beginner knitter.
Milvus Milvus is the Latin name for magnificently graceful Red Kite, a bird of prey with steeply angled wings and deeply forked tail, that soars across the skies of my home. It inspired the choice of shape for this cool kite-shaped shawl – an exciting and fun project that is easy enough for even a real beginner knitter.
What makes this shawl unique is the technique of making your own yarn by combining short lengths of other yarn into a knotted ball . Knots and ends can be left showing to give texture to the fabric, or sewn, or knitted in for a neater finish (health warning: there will be lots and lots).
Yarn
Wonderland Yarns So Fond of Rainbows Mini-skein pack, Mad Hatter sport (100% Merino superwash, 20 86yd [79m]/1oz mini-skeins, 1720 yds [1573m]/20oz total): Bright Flower-beds Collection, 1 set.
The sample used approx. 1450 yds [1326m].
Thanks to Wonderland Yarns for sponsoring the yarn and to Pam for knitting the sample!
Needle
Size US 6 (4mm) needles, straight or 24″ (60cm)
circulars
Gauge
22 sts and 36 rows = 4″ [10cm] in garter st
Gauge is not critical for this project but will affect the final size and the fabric drape.
Size
Approx. 54” [137cm] spine depth and 80” [203cm] along wide end edge

Notions
Tapestry needle, stitch markers (1 locking, 2 removable).
Abbreviations
See the standard abbreviations.
Pattern Notes
This shawl can be knit in any yarn weight and will look equally fabulous in them all. To maintain the straight edges of the shawl as you knit, use mostly yarns of the same weight or that when held together give the same gauge as the main weight of yarn you choose to base your shawl on. It should be possible to add short sections of thicker or thinner yarn without undue effect.
This project is ideal for yarn recycled from older projects or thrift shop finds as well as for using up any amount of leftover scraps. For maximum impact and an edgy look, try adding flashes of bright citruses, jewel colors or neons. For a more coherent look, take one or two complete skeins of (speckled or variegated yarn?) as your foundation, and intersperse sections of this with a multitude of other yarns.
If leaving ends hanging, simply knit knots alternately to each side of the fabric so that they are distributed evenly on both sides.
Or, knit them in as you go:

Making the yarn
- Decide if you wish to knit in your ends or allow them to show. If you wish to let them show, consider cutting the first and last few sections of yarn quite short to ensure that the pattern of textured ends show at the start and end of the shawl. If knitting them in as you go, this tutorial may be helpful.
- The basic principle of the yarn making is to cut and join short sections of yarn between 12-24” (30-60cm) long. Cut the first two sections and knot them together using an overhand knot. Trim the waste yarn to a uniform length as you go while making the yarn, or after completing the knitting (not necessary if you plan to knit or weave in your ends; in this case leave a good length at the join to allow this).
- Begin winding the first section into a ball by winding it over your fingers. Wind subsequent sections onto this ball as you add them.
There is no need to measure sections of yarn; randomness and variation are part of the charm of this piece. You may wish, for example, to add some sections of highly textured material (ribbon, raffia etc.) that are shorter. If you are using one base yarn and wish to speed the process a little, cut a few card templates of the right lengths (e.g. one of 12” and one of 20”), wind yarn around them, and cut the loops at both edges. This will give you a stack of cut lengths to intersperse with other more random lengths of other yarns.
Shawl Instructions
CO 6 using a basic cast on.
Section 1: Set up
Always knit yarnovers from the previous row through the back loop (tbl) (except in Row 3 where there aren’t enough sts for this).
Slip sts pwise wyb.
Slip markers as you come to them.
Row 1 (RS): Sl1, k1, yo, k2, yo, k2; 8 sts.
Row 2 (WS): Sl1, k1, yo, ktbl, k until 3 sts rem, ktbl, yo, k2; 10 sts.
Row 3: Sl1, k1, yo, ssk, pm, k2, pm, k2tog, yo, k2; 10 sts.
Place a safety pin or locking stitch marker to mark this (right) edge of work.
Row 4: Sl1, k1, yo, ktbl, k until 3 sts rem, ktbl, yo, k2; 12 sts.
Section 2: Increasing both sides
Row 5: Sl1, k1, yo, ktbl, k to 2 sts before m, ssk, sm, k2, sm, k2tog, k until 3 sts rem, ktbl, yo, k2.
Row 6: Sl1, k1, yo, ktbl, k until 3 sts rem, ktbl, yo, k2; 2 sts inc.
Rep Rows [5 & 6] 98 more times or just under 1/4 of the total yarn amount is used (no more than 24%); 210 sts: 2 edge sts each side, 2 center sts, 102 sts between edge and center each side.
Section 3: Increasing right side only
You will be working the same pattern but with increases on the right hand side of the shawl only on even rows (the left edge will be straight in this section). This section can be omitted if desired, or if running short of yarn.
After the first rep of Row 7, omit the final ktbl and k until 2 sts rem.
Row 7: Sl1, k1, yo, ktbl, k to 2 sts before m, ssk, sm, k2, sm, k2tog, k until 3 sts rem, ktbl, yo, k2.
Row 8: Sl1, k1, ktbl, k until 3 sts rem, ktbl, yo, k2; 1 st inc.
Rep Rows [7 & 8] 17 more times or until just under 1/3 of total yarn is used (no more than 30%); 228 sts: 120 sts between edge and center on right side, 102 sts on left side.
Section 4: Decreasing left side
Row 9: Sl1, k1, yo, ktbl, k to 2 sts before m, k2tog, sm, k2, sm, ssk, k until 2 sts rem, k2; 1 st dec.
Row 10: Sl1, k1, k until 2 sts rem, ktbl, yo, k2.
Rep Rows [9 & 10] 100 times until there are 3 sts rem on the left hand side of the shawl after the central 2 sts (1 st before the 2 edge sts).
Row 11: Sl1, k1, yo, ktbl, k to 2 sts before m, k2tog, sm, k1, slip next st and rm, return slipped st to right hand needle, ssk, k2.
Row 12 & 14: Sl1, k until 2 sts rem, ktbl, yo, k2.
Row 13: Sl1, k1, yo, ktbl, k to 2 sts before m, k2tog, sm, ssk, k2.
BO rem sts using a basic bind off.
Finishing
Wash according to yarn instructions and block to measurements, pinning into kite shape as shown by the dotted lines on the schematic. Trim yarn ends to the same length if they are left showing; snip off rem ends close to work if they are knitted in.
 About the Designer: Elizabeth Felgate
 About the Designer: Elizabeth Felgate
Elizabeth Felgate is an independent designer living in a stone cottage in the UK in rural Wiltshire with eight walnut trees in the garden.
She likes designing from first principles. Many of her patterns feature custom-designed lace patterns or unusual construction methods.
She loves aran weight jumpers and airy lace; but is not averse to chunky lace and lightweight sweaters either.
When not knitting, she is a marketing consultant and mother of two.


Leave a Reply