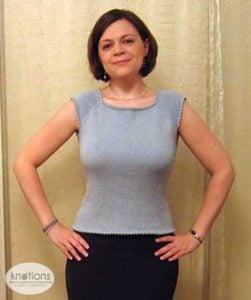
 Dress it up, or dress it down! The Picovoli t-shirt pattern lets you choose whether delicate picots surround the neckline, armholes, and/or hem, or whether the lines remain unadorned and straight. Flattering and feminine design details – ballet neckline, full-fashioned shaping, and close-fitting style – are achieved simply: the t-shirt is knit in the round, from the top down, and in one piece, so there’s no seaming. For knitters who choose straight edges, finishing is limited to weaving in ends from joining skeins. The versatile Picovoli can be your top for your next occasion, casual or dressy!

Sizes
This pattern is for a close-fitting garment – in the bust, the t-shirt is 2 inches smaller than the wearer’s actual bust measurement. The negative ease produces a streamlined silhouette while compensating for cotton’s tendency to stretch during wear. In order to assess whether this fit will work for you, select a sweater knit from a similar fabric, one which fits you the same way you’d like your Picovoli t-shirt to fit you. Measure the sweater, and compare its dimensions to the finished dimensions of the Picovoli.
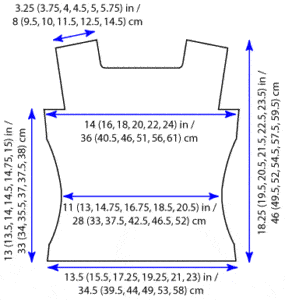
Finished bust: 28 (32, 36, 40, 44, 48) in / 71 (81, 91, 101.5, 112, 122) cm
Finished length to shoulder: 18.25 (19.5, 20.5, 21.5, 22.5, 23.5) in / 46 (49.5, 52, 54.5, 57.5, 59.5) cm
Suggested bust measurement of wearer: 30 (34, 38, 42, 46, 50) in / 76 (86.5, 96.5, 106.5, 117, 127) cm
Yarn
Debbie Bliss Cathay (50% cotton, 35% viscose microfibre, 15% silk 109 yd [ 100 m] per 50 g skein): color #8 4 (5, 5, 6, 7, 8) skeins
Yarn for this project was kindly donated by Spirit Work.
Needles
US #4 (3.5 mm): 16 in [40.5 cm] or 20 in [50 cm] circular (for the first few rounds) and 24 in [61 cm] or 29 in [80 cm] circular (for the rest of the sweater).
Gauge
22 sts and 30 rnds = 4 inches (10 cm) in circular stockinette stitch (after blocking).
Notions
Tapestry needle; markers of two different colors/styles; spare lengths of yarn
Abbreviations
Please see our standard list of abbreviations.
Pattern Notes
Before you begin: Since the t-shirt is knit from the top down, you can try it on as you go. Place the stitches on a spare length of yarn, or shuttle some of them to a second circular needle, then try on your project-in-progress. Be sure to try it on after completing a few rows of the bust section (check that the neckhole and armholes fit), towards the end of the bust section (there should be enough fabric to cover your bust), and throughout the waist-shaping portion (garment should follow your natural curves). Women with fuller busts may want to consider adding short-row shaping in the bust section.
The top is knit in the round – if you know that your gauge varies drastically between knitting flat and knitting in the round, take the time to make a circular knitting swatch. Cotton and cotton blends, which are a good choice for this top, tend to stretch or bloom when wetted. Therefore, measure gauge after washing and/or blocking your swatch.
Yoke
Note: If you leave a long tail of pattern yarn when casting on, you can use it to stitch down the picot neck edging.
Choose whether you would like a picot or a straight neck edge and start accordingly:
Picot Neck Edge
Using a provisional cast-on, CO 120 (136, 140, 140, 144, 148) sts. Join, being careful not to twist sts. This is the start of the rnd, it is at the back of the neck. Identify it with a contrasting marker. Begin st st. Work 3 rnds even.
Picot Eyelet Row: *k2tog, yo; rep from * until the end of the rnd. Work 1 rnd even. Cont with Raglan Marker Setup Rnd
Straight Neck Edge
CO 120 (136, 140, 140, 144, 148) sts. Join, being careful not to twist sts. This is the start of the rnd; it is at the back of the neck. Identify it with a contrasting marker. Begin st st. Work 1 rnd even.
Raglan Marker Setup Rnd: Work 1 rnd even while placing markers for the raglan seams as follows: k19 (21, 21, 21, 21, 22), pm, k22 (26, 28, 28, 30, 30), pm, k38 (42, 42, 42, 42, 44), pm, k22 (26, 28, 28, 30, 30), pm, k19 (21, 21, 21, 21, 22).
Increase rnd: *knit to 1 st before marker, kfb, sm, kfb; rep from * at each marker, knit to end of rnd; 8 sts increased; 128 (144, 148, 148, 152, 156) sts. Note: you are increasing 1 st on both sides of each raglan seam).
Continue making increase rnds according to finished bust size:
28 in (32 in): work increase rnd every other round, 10 (12) more times, ending with an even rnd; 208 (240) – 60 (68) sts for front and back, 44 (52) sts for the sleeves
36 in (44 in): *work 1 rnd even, work 2 inc rnds; rep from * 8 (11) times; 276 (328) sts. Work 1 rnd even, work 1 inc rnd, work 1 rnd even; 284 (336) sts – 78 (90) sts for front and back, 64 (78) sts for the sleeves.
40 in (48 in): *work 1 rnd even, work 2 inc rnds; rep from * 10 (13) times. Work 1 rnd even; 308 (364) sts – 84 (98) sts for front and back, 70 (84) sts for the sleeves.
Note: When forming the armholes by casting-on mid-row, you may want to cast on fairly tightly and/or use a smaller needle; the knitted cast-on in purl forms a nice, snug edge. Be aware that the first and last cast-on stitches tend to be loose. To remedy this, pick up an extra stitch at each edge of the knit fabric, then k2tog the extra stitch with the first and last cast-on stitches, respectively.
Bust
Divide for armholes and shape underarm. Choose whether you would like picot edging around the armholes. Knit accordingly, removing markers from the yoke section as you come to them:
Picot
K to first marker, * sl all sts between here and the next marker onto the length of yarn and hold for picot edging, CO 17 (20, 21, 26, 31, 34) *, join to front sts and k across them to next marker, repeat between *s, join to back sts, k to end of rnd; 154 (176, 198, 220, 242, 264) sts.
Straight
K to first marker, BO all sts between here and the next marker, k across the front sts to next marker, BO all sts between here and the next marker, k to end of rnd. K to armhole edge, CO 17 (20, 21, 26, 31, 34), join to front sts and k across them to armhole edge, CO 17 (20, 21, 26, 31, 34), join to back sts, k to end of rnd; 154 (176, 198, 220, 242, 264) sts.
Next rnd: k38 (44, 50, 55, 60, 66), place contrasting marker. This marks the beginning of the rnd from now on (at your right side). Knit even for 4 (4.5, 4.75, 5.25, 6.25, 7) in, approx. 30 (34, 36, 39, 47, 52) rnds, or length required to nearly cover bust while stretching lightly.
Waist decreases
Next rnd: Work 1 rnd even while placing markers for the shaping as follows: k17 (19, 22, 26, 30, 35), pm, k43 (50, 55, 58, 61, 62), pm, k34 (38, 44, 52, 60, 70), pm, k43 (50, 55, 58, 61, 62), pm, k17 (19, 22, 26, 30, 35).
While shaping, you will leave 34 (38, 44, 52, 60, 70) sts untouched at each side, and decrease/increase the number of stitches in the front and back sections.
Decrease rnd: k to first marker, *sm, ssk, knit to within 2 sts of next marker, k2tog, sm*, k to next marker, repeat between *s, k to end of rnd; 150 (172, 194, 216, 238, 260) sts.
Repeat decrease rnd every 3 (3, 3, 3, 2, 2)rd rnd 7 (7, 8, 8, 9, 9) more times; 122 (144, 162, 184, 202, 224) sts.
Knit even for 2 in (approx. 15 rnds).
Note: For a straight hem, you may want to bind off using a needle one size bigger than what you used for the rest of the pattern. This will ensure that the bound-off edge is not too tight, and the t-shirt won’t ride up your hips. If you are adding picot edging at the hem, leave a long tail after you’re done knitting, and use it to secure the picots.
Waist increases
Increase rnd: k to first marker, *sm, m1(right), knit to next marker, m1(left), sm*, k to next marker, repeat between *s, k to end of rnd; 126 (148, 166, 188, 206, 228) sts. Repeat increase rnd every 3rd rnd, 6 more times; 150 (172, 190, 212, 230, 252) sts. Knit even for 1.5 in (approx. 11 rnds).
Choose whether you would like picot edging at the hem.
Picot
*k2tog, yo; repeat from * until the end of the rnd. Work 2 rnds even. Do not bind off, place sts on a length of yarn or proceed to finishing.
Note: You may want to separate the plies of your pattern yarn and use only some of them to secure the picot edging without adding extra bulk. If you’ve added picots around the armholes, the yarn tails can be used to stitch down the picots and/or neaten up the corners of the armhole. The picot hem is sewn into place and is therefore not very elastic; since it needs to slide over your bust, do not make it too tight, and/or try on your garment before deciding where to secure the ends.
Straight
BO all sts loosely.
Finishing
For picot armholes
With RS facing, slip 44 (52, 64, 70, 78, 84) held sts to needle. Join yarn, *k2tog, yo; repeat from *, end with k2tog; turn [43 (51, 63, 69, 77, 83)]. Work 2 rows in st st. Fold edge along picot row and sew live stitches in place. Repeat for other armhole.
For picot neckline and/or hem: fold edge along picot row and sew live stitches in place.
{View illustration of attaching the picot hem}
Weave in all ends.
Schematic
About the Designer: Grumperina
 Kathy is a scientist during the day, and an avid knitter and crafter the rest of the time. She lives in the Boston area with her husband and their darling Princess Kitty. Keep up with her current projects at www.grumperina.com/knitblog.
Pattern and images © 2005-2008 grumperina.


Leave a Reply