 Siesta is a summer top that combines classic simplicity with an elegant twist. Created from Debbie Bliss Prima, the 80% bamboo content gives a smooth silky feel to the top with wonderful drape while the addition of wool give a bit more spring.
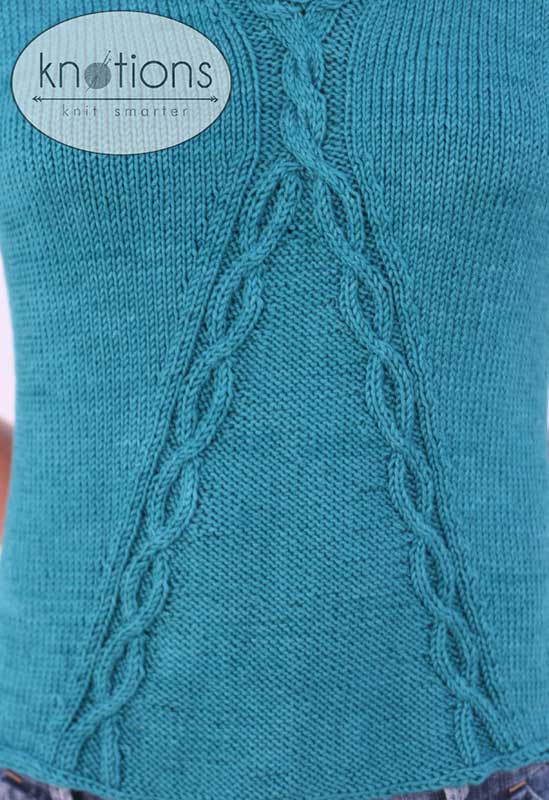
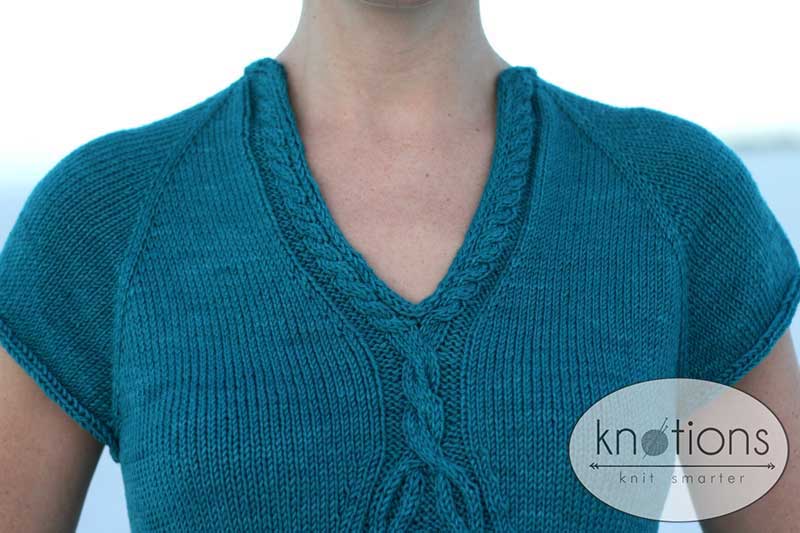
Knit from the top down with raglan shoulder shaping, there is smooth transition between cables from the neck line where they are small and delicate, a chunkier cable at the bustline leading finally to two cables slowly travelling outwards to each side until you reach the bottom of the piece.
The sides of the piece are also gently shaped at the waist to show off your curves. All edgings are finished using applied I-cord for a smooth and subtle finish.
Enjoy this fast and fun knit.
Sizes
Finished Bust Size 27 (31.25, 35.5, 39, 43, 47.25, 51.5)” to fit bust 28 (32, 36, 40, 44, 48, 52)”
1” negative ease recommended.
Shown in size 36”
Yarn
Debbie Bliss Prima (80% Bamboo / 20% Merino Wool; 109 yd/100 m per 50g skein); color: 35715 Teal; 6 (7, 8, 9, 10, 11, 13) skeins
Needles
US#6 (4 mm): 24” circular
US#7 (4.5mm): Double pointed
Gauge
23 sts and 32 rows = 4” in st st after blocking.
Notions
Tapestry needle; stitch markers
Abbreviations
C4F: Sl next 2 sts on cable needle and hold to front of work. Knit 2 sts, knit 2 sts held on cable needle.
C4B: Sl next 2 sts on cable needle and hold to back of work. Knit 2 sts, knit 2 sts held on cable needle.
C8F: Sl next 4 sts on cable needle and hold to front of work. Knit 4 sts, knit 4 sts held on cable needle.
T3B: Slip next st onto cable needle and hold to back of work, k2, p1 from cable needle.
T3F: Slip next 2 sts onto cable needle and hold to front of work, p1, k2 from cable needle.
Pinc (Purl increase): With needle pick up horizontial running thread between sts. Purl into st.
Note: When two Pinc sts are worked next to each other you can purl into front and back of running thread to create a double increase.
PFB: Purl into front and back of same st.
M1R (creates right leaning increase: Insert left needle from back to front into horizontal running thread between sts. K into front of st to twist closed.
M1L (creates a left leaning increase): Insert left needle from front to back into horizontal running thread between sts. K into back of st to twist closed.
Pattern Notes
Please note the charts were updated May 16, 2009.
Applied I-Cord
Using circular needles and with RS facing, working right to left, pick up stitches along the edge you want to apply I-cord. For bound-off sts pick up one st for each st. When all sts are picked up slide sts to other end of needle to work. Using dpns CO 3 sts.
Knit 2 stitches, ssk using the last st on the dpn and first st on the circular needle. Slide all stitches to the other end of dpn, pull snugly and repeat the above row until all picked up stitches have been worked.
Twisted Cable Charts
The cable chart starts when both 4-st neckline cables join together at the bust line.
Notes on Cable Chart
For ease of printing, this chart is presented in two parts – Chart A and Chart B. Start by working Chart A, and once completed, move on to Chart B.
When working Rnd 1 of Twisted Cable Chart B, pm as indicated by pink line. In all future rnds, the pink line indicates where the marker is; decreases are worked 3 sts bef merker. Work until you reach the marker, and then follow the chart starting with the pink marker line. The marker will move outward on every rnd that has an increase in the middle purl area. This accomplishes the widening of the central purl section between the cables.
Note that when the cable chart as shown has been worked the twisted cable shown from lines 14 to line 25 of chart Bwill continue to be worked, moving outwards one stitch every 4 rnds as established. This is done by switching to the Twisted Cable – Right Side and Twisted Cable – Left Side charts.
Twisted Cable – Right Side
Please note that this cable is worked while the stitches on each side are increased and decreased every fourth rnd so it appears to move outwards.
Worked over 8 sts in the rnd
Rnd 1: P2, C4B, p2.
Rnd 2: P2, k4, p2.
Rnd 3: P1, T3B, T3F, p1.
Rnd 4: P1, k2, p2, k2, p1.
Rnd 5: T3B, p2, T3F.
Rnd 6: K2, p4, k2.
Rnd 7: K2, p4, k2.
Rnd 8: K2, p4, k2.
Rnd 9: T3F, p2, T3B.
Rnd 10: P1, k2, p2, k2, p1.
Rnd 11: P1, T3F, T3B, p1.
Rnd 12: P2, k4, p2.
Twisted Cable – Left Side
Please note that this cable is worked while the stitches on each side are increased and decreased every fourth rnd so it appears to move outwards.
Work as for right cable replacing rnd 1 with:
Rnd 1: P2, C4F, p2.
Twisted Cable Chart

Twisted Cable Chart A

Twisted Cable Chart B


 Pattern

Yoke
Using circular needles, CO 60 (54, 64, 74, 82, 92, 102) sts.
Setup row 1 (RS): P1, k4, p3, k2 (2, 4, 6, 8, 10, 12), pm, k8 (4, 4, 4, 4, 4, 4), pm, k24 (26, 32, 38, 42, 48, 54), pm, k8 (4, 4, 4, 4, 4, 4), pm, k2 (2, 4, 6, 8, 10, 12), p3, k4, p1.
Setup row 2 (WS): K1, p4, k3, p until 8 sts rem, k3, p4, k1.
Row 1 (RS): P1, C4B, p3, *k to 1 st before marker, M1R, k1, sl marker, k1, M1L; rep from * 3 additional times, k until 8 sts rem, p3, C4F, p1 – 8 sts inc’d; 68 (62, 72, 82, 90, 100, 110) sts.
Rows 2 and 4 (WS): K1, p4, k3, p until 8 sts rem, k3, p4, k1.
Row 3 (RS): P1, k4, p3, *k to 1 st before marker, M1R, k1, sl marker, k1, M1L, rep from * 3 additional times, k until 8 sts rem, p3, k4, p1 – 8 sts inc’d; 76 (70, 80, 90, 98, 108, 118) sts.
Repeat these 4 rows an additional 8 (9, 8, 8, 8, 8, 7) times; 204 (214, 208, 218, 226, 236, 230) sts.
Neck shaping
Work rows 1 and 2 as above – 8 sts inc’d; 212 (222, 216, 226, 234, 244, 238) sts.
Row 3 (RS):P1, k4, p3, k1, M1R, *k to 1 st before marker, M1R, k1, sl marker, k1, M1L, rep from * 3 additional times, k until 9 sts rem, M1L, k1, p3, k4, p1 – 10 sts inc’d; 222 (232, 226, 236, 244, 254, 248) sts.
Work row 4 as above.
Repeat these four rows an additional 2 (3, 4, 5, 5, 6, 7) times; 258 (286, 298, 326, 334, 362, 374) sts.
Work one more row 1; 266 (294, 306, 334, 342, 370, 382) sts.
Join to work in the rnd.
Setup rnd: K2tog, k3, p3, k until 8 sts rem, pm to indicate beg of rnd, p3, , k3, k2tog – 2 sts dec’d; 264 (292, 304, 332, 340, 368, 380) sts rem.
Central front panel of 14 sts will be worked from twisted cable chart.
XS size:
Raglan increases completed, begin dividing sleeves from the body.
Sizes S (M, L, 1X, 2X):
Rnd 1: Work 14 st panel, *k to 1 st before marker, M1R, k1, sl marker, k1, M1L, rep from * 3 additional times, k to end of rnd – 8 sts inc’d; 300 (312, 340, 348, 376)sts.
Rnd 2: Work 14 st panel, knit to end of rnd.
Repeat these two rnds an additional 0 (3, 3, 7, 8) times; 300 (336, 364, 404, 440) sts.
Size 3X:
Rnd 1: Work 14 st panel, *k to 1 st before marker, M1R, k1, sl marker, k1, M1L, rep from * an additional 3 times, k to end of rnd – 8 sts inc’d; 388 sts.
Rnd 2: Work 14 st panel, knit to end of rnd.
Repeat these two rnds an additional 11 times; 476 sts.
For Sizes XS-2X, work Rows 1-21 of Twisted Cable Chart.
For Size 3X, work Rows 1-29 of Twisted Cable Chart.
Divide Sleeves from Body
Work in pattern to first marker, BO 58 (64, 70, 74, 82, 88, 94) left sleeve sts. Slip last st from right to left needle, turn to wrong side of work, using cable method CO 5 sts over gap, turn work, slip first st from left needle to right needle and pass one new st on right needle over to close gap. Place marker at center of CO sts to indicate left side seam, work to right sleeve, BO next 58 (64, 70, 74, 82, 88, 94) sts for right sleeve and CO underarm sts as for left sleeve. Place marker at center to mark new start of rnd; 156 (180, 204, 224, 248, 272, 296) sts.
Note: When Rnd 1 of Twisted Cable Chart B is worked there will be 2 sts inc at front of work; 158 (182, 206, 226, 250, 274, 298) sts.
When Rnd 3 of Twisted Cable Chart B is worked there will be 2 sts inc at front of work; 160 (184, 208, 228, 255, 276, 300) sts.
Once you have worked Rnd 25 of the panel, you will begin working the Twisted Cable Left Side and Twisted Cable Right Side in its place.
Work in pattern without shaping until piece measures 9.5 (10.5, 11.25, 12.25, 13.25, 14. 14.75) ” from top.
Waist Shaping
Place 4 markers 10 sts in from each side marker for side darts.
Dec rnd: Work to 2 sts before first front dart marker, ssk, work to 2nd front dart marker, slip marker, k2tog, knit to 2 sts before 3rd dart marker, ssk, work to last dart marker, slip marker, k2tog, work to end; 4 sts dec’d.
Repeat decrease rnd every 5 (5, 6, 6, 7, 7, 7)th rnd four more times; 144 (168, 192, 212, 236, 260, 284) sts rem.
Work in pattern without shaping for 16 rnds.
Hip shaping
Inc rnd: Work to 1st front dart marker, M1R, slip marker, work to 2nd front marker, slip marker, M1L, work to 1st back dart marker, M1R, slip marker, work to last dart marker, slip marker, M1L; 4 sts inc’d.
Repeat Inc rnd every 8 (9, 9, 9, 9, 9,9)th rnd four more times; 160 (184, 208, 228, 255, 276, 300) sts.
Work in pattern without shaping until piece measures 21.2 (22, 22.5, 23, 23.5, 24, 24.5)”, ending on a rnd 6 of the twisted cable chart. Work rnd 6 four more times. BO all sts in pattern.
Finishing
Apply I-cord to each sleeve edge starting at the underarm. Apply I-cord around the neckline, starting at the center of back of neck. Apply I-cord around the bottom of the pullover, starting at a side seam. Join the start and end of all I-cords.
Weave in all ends.
Block piece carefully to dimensions.

About the Designer: Carol Feller
Based in Ireland, Carol Feller knits, designs and blogs whenever life and her 4 sons give her the chance.
Pattern and images © 2009 Carol Feller.


Where are the instructions for the back of the sweater?
It’s worked in the round – so, both the front and back are worked at the same time.
Am I missing something though? It’s a very old pattern, but if I am, I want to make sure it’s correct.
Thanks!
I have a question about the Siesta top. On the twisted cable chart which is the combined A and B there are no “No Stitch” areas. Chart B does have “No Stitch” areas. Also, why is row 1 on chart B on the left side of the chart?
Hi!
For the “no stitch” areas, you simply skip them. Treat them like they don’t exist. They’re there to allow the chart to look correct. If you didn’t have them, the chart wouldn’t line up well. In this case, the no stitches are being used up by the pfb’s and pinc’s.
As for Chart B starting on the left side, that’s because the last row of Chart A ends on the right (a RS row). In charts, the numbers on the right side are worked as RS rows, and the numbers on the left side are wrong side rows.
We talk about this and other chart attributes in https://knotions.com/knoted/tutorial-read-knitting-chart/.
I love your tee knit patterns. Thanks for sharing.