This is an easy way to start a knitting project. It’s not often-used because it can sorta melt into the rest of the work and disappear. It doesn’t give a firm edge.
Having said this, it’s a good one for you to know how to use, and it’s great for other uses (more on that below).
How to Do It
To Start It (when you don’t have anything on the needles yet)
Step 1: Wind the yarn this way with the yarn tail UNDER the rest.

Step 2: Put the Right Needle (RN) in the middle.
Step 3: Put the loop on the RN. Hold it with either your thumb or your forefinger so it can’t twist around the needle.

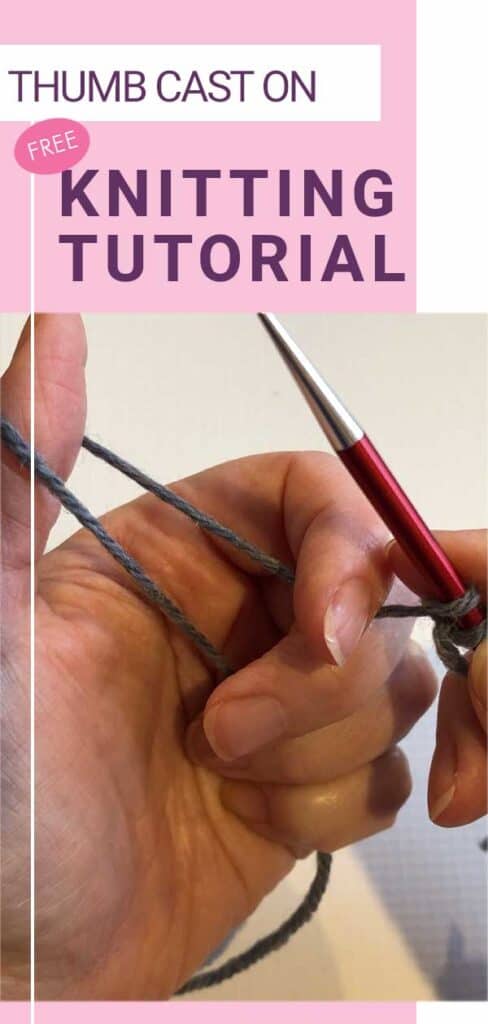
For all other stitches (after you’ve started it or if you’re adding stitches to a piece)
Step 1: Take a small section of yarn and pinch it between your thumb and forefinger.

Step 2: Twist it. Note where the needle is too!

Step 3: Put it on the RN and tighten it. You shouldn’t put ANY CO sts right next to each other because it will make that edge not stretchy. I use my forefinger to create a gap between each stitch.

Abbreviation
There is no special abbreviation for a thumb cast on. But, if you’re instructed to cast on stitches (sts) it will be abbreviated as CO.
The Pros and Cons
Easy to do
Some Cast Ons require you to hold the yarn a certain way and to wrap and turn the needle a bunch. The Thumb Cast On is a simpler way to get loops onto the needles for working that next row.
There are several other cast ons that you can do:
- Long-Tail Cast On – one of the most-used Cast Ons, but you do need to use the tail for the cast on.
- There are lots of “tricks”, and this one is a good one.
- Knitted Cast On – this is also great for both all your stitches as well as adding stitches in the middle of a row.
- Old Norwegian Cast On/Twisted German Cast On – similar to the Long Tail, but even stretchier.
- Chinese Waitress Cast On– it looks nice and it’s stretchy.
Harder to knit in it
An easy way to address this is to hold the stitch with your left thumb. This way, you stop it from winding around.
It might also become tighter and therefore, harder to get your needle into it. Make sure that your needles are close to each other so they’re not taking up the slack with the yarn that’s between the two needles.


About the Instructor: Jody Richards

Jody is the founder and lead editor of Knotions. She loves poring over stitch dictionaries and trying out new stitches. And while she likes all things crafting (well ok, except that one thing), yarn crafts are her true love (and she has the stash to prove it).
She’s a serial starter-of-projects and has a serious problem with finishing things without a deadline.
And don’t get her talking about hand-dyed yarns. You’ve been warned.
Leave a Reply