We’ve given you several ways to add beads to knitting, and we go into the pros and cons of each:
- Beading by pre-stringing
- Beading with a crochet hook
- Beading with Superfloss (this page)
We suggest that you read all 3 (they each have their benefits) and even try each of them on a swatch.
How to Bead with Superfloss
Beading with Superfloss is a pretty simple process. Here are the steps.
Load the Superfloss with Beads
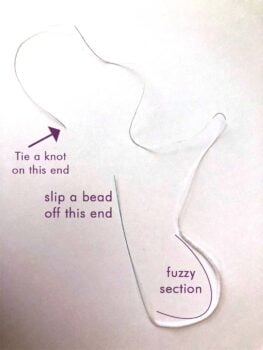
This is pretty simple. Tie a knot at the end opposite the fuzzy end. I do a loop and a knot so the beads can’t mistakenly pass by the knot.
Then, just add a bunch of beads onto the Superfloss.
Once you’re done loading your beads (I’ve only shown 3 here, but you’d likely load a lot more), you’re ready to use it whenever you come to a bead!
Steps for Beading with Superfloss
Step 1: Get ready to bead by bringing a single bead up to the fuzzy section.
Step 2: Put the end through the stitch on the left needle.
Step 3: Fold the floss back and bring the bead down so both ends of the floss are inside the bead’s hole.
Step 4: Take the stitch off the needle, slide the bead down onto the stitch…
and put it back on the left needle (or the right needle if your instructions just have you adding a bead).
Step 4b: (If your instructions say to both bead and knit, knit that stitch with the bead.
Step 5: The stitch with the bead is on the right needle.
Pros and Cons
Pros of Beading with Superfloss
- You can load a ton of beads onto the Superfloss all at once.
- You can add more beads to the Superfloss at any time. It doesn’t just need to be done that one time.
- Given #1 above, it’s a good method for traveling.
- It works with the sometimes-imperfect nature of holes in beads.
- You don’t need to worry about the size of the tool you have and if it will fit the hole in the bead
Cons of Beading with Superfloss
- You do need to take time at the beginning of your beading to load up the Superfloss. This is similar to pre-stringing.
- It can be more of a challenge to turn the floss in order add the bead to your knitting.
- If you want a particular bead at a particular place, it’s probably easier to load 2 separate Superflosses. Otherwise, you’ll need to plan your loading very carefully.
Practice makes perfect
As always, I suggest trying this first on a small swatch. This will give you the chance to familiarize yourself and get comfortable with handling the Superfloss.
My personal preferred method of knitting with beads
Given all the pros and cons, I still prefer using a crochet hook to add beads. But, if a lot of my beads were more organic (read – funky-shaped holes), I’d go to the Superfloss method.
About the Instructor: Jody Richards

Jody is the founder and lead editor of Knotions. She loves poring over stitch dictionaries and trying out new stitches. And while she likes all things crafting (well ok, except that one thing), yarn crafts are her true love (and she has the stash to prove it).
She’s a serial starter-of-projects and has a serious problem with finishing things without a deadline.
And don’t get her talking about hand-dyed yarns. You’ve been warned.


Could you please provide the beading with superfloss as a pdf file?
Thank you
you should be able to save any web page as a PDF. and we also have that button at the top of every tutorial as well. we did that just to make it easier for readers.
Hi,
I use Wire Loop Needle threaders (for sewing) when knitting with beading.
Take a needle out from Needle threader=part of handling side (Be carefull when you do).
This needle is curvable (be flexible).
I don’t use SUPERFLOSS (but use regular one) and Needle threaders are super cheap!
Try this if you’ve never done or having an interesting !
i haven’t tried that method! but, now i need to 🙂