
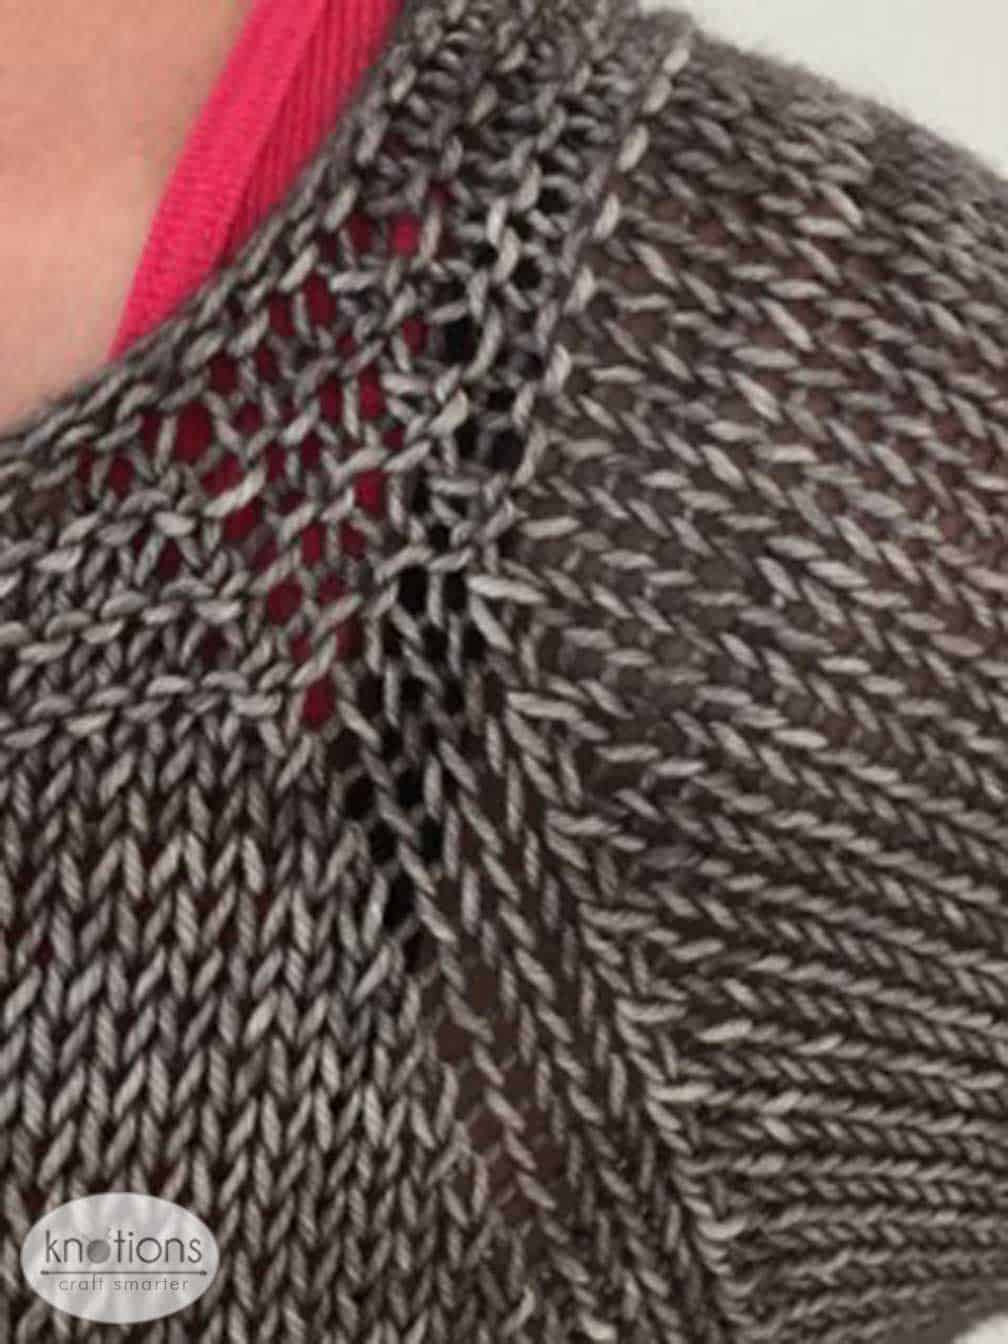
Center Street is a worsted weight, oversized boatneck pullover. It is knit in the round, bottom up with raglan shaping and a simple, intuitive lace panel up the center back.


Needles
we’ve updated the metric size of the needles because it wasn’t correct.
size 8 (5 mm) circular needles at least 32 inches long and DPNs (or size needed to obtain gauge)
Yarn
Western Sky Knits Magnolia Worsted (80-10-10 SW Merino, Cashmere, Nylon) in the barn wood colorway, or similar worsted weight yarn. 800- 1200 yards needed.
Notions
stitch markers
stitch holder or waste yarn
tapestry needle to weave in ends
Gauge (after blocking)
17 stitches x 22 rows per 4 inches on size 8 needles
Measurements
Finished Chest Measurement: 35 (38, 42, 46, 50, 54)
*Note: sweater is designed to be worn with several inches of positive ease, so knitter should work size 3-4 inches larger than actual bust measurement.

Abbreviations
Please see our standard abbreviations.
Charts
First Repeat

Remaining Repeats

Pattern
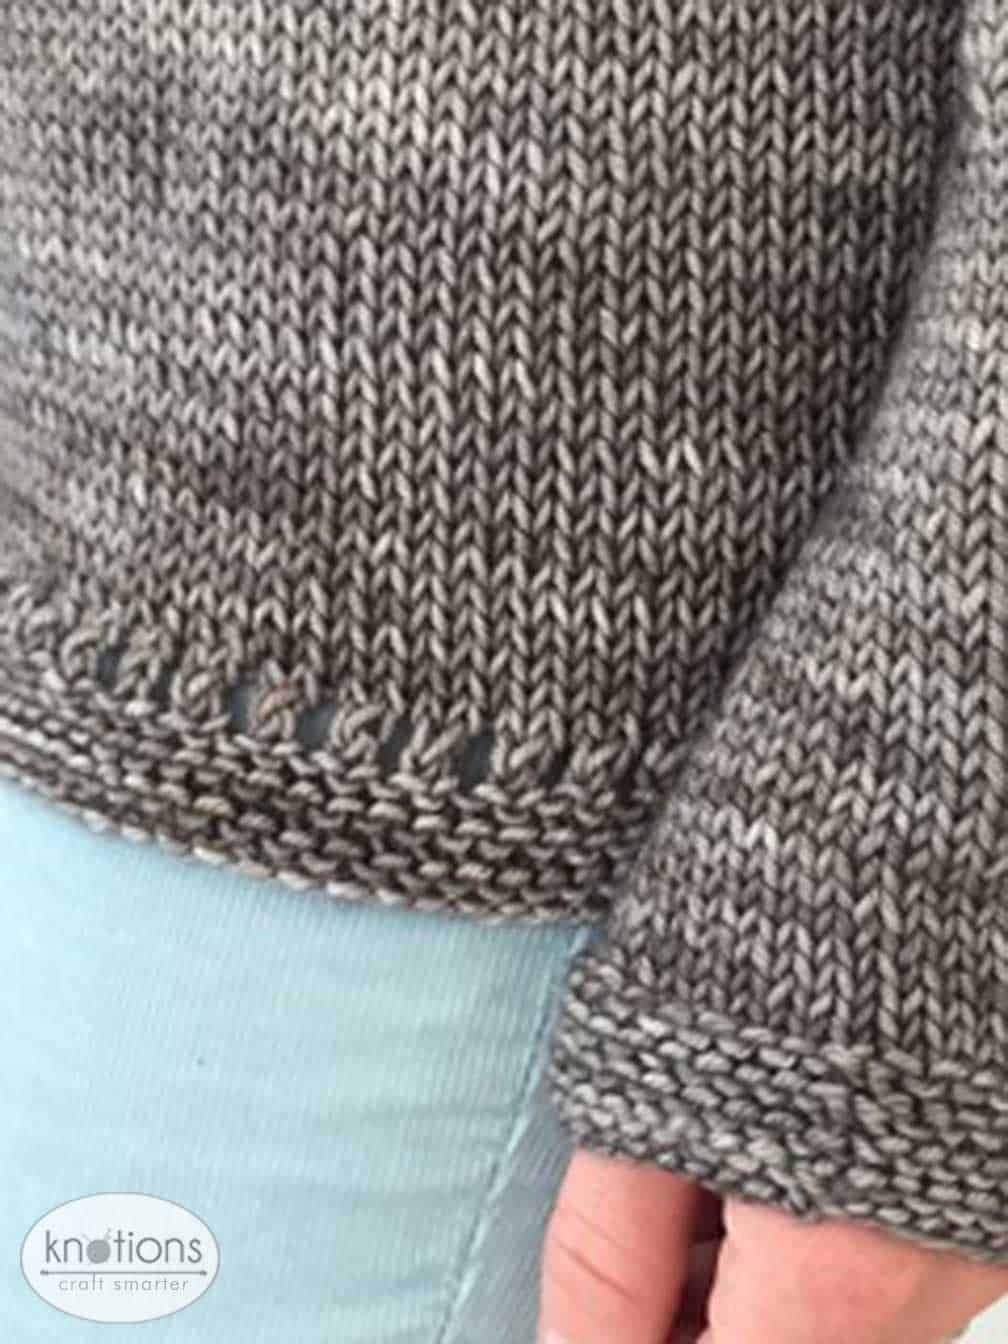
Body
CO 74 (80, 88, 98, 106, 114) sts for front.
Row 1(WS): Knit to end.
Row 2 (RS): Knit to end.
Repeat Rows 1 and 2, three more times for a total of 4 garter ridges
Row 7: K1, *(yo, k2tog), repeat from * to 1 st rem, k1.
Row 8: Purl to end.
Break yarn and set aside.
CO 74 (80, 88, 98, 106, 114) sts for sweater back.
Row 1(WS): Knit to end.
Row 2 (RS): Knit to end.
Repeat Rows 1 and 2, four more times for a total of 5 garter ridges
Row 7: K1, *(yo, k2tog), repeat from * 1 st rem, k1.
Row 8: Purl to end.
Join Front to Back
Rnd 9: K16 (19, 23, 28, 32, 36), PM, work Row 1 of First Repeat Chart, PM, k16 (19, 23, 28, 32, 36) to end, PM (to indicate side), knit across front body sts (so the front and back are joined), PM (to indicate beginning of round), joining two sections in the round.
Continue working body of sweater and switch to Remaining Repeats Chart after the first chart is completed. Work until the body measures 15 (15, 16, 16, 17, 17) inches, or the distance from your underarm to desired length. On the next row, knit in pattern to 3 sts before side marker, BO 6 sts, knit to 3 sts bef BORM, BO 6 sts removing markers as you come to them. Leave yarn attached and sweater on needles, set aside.
Sleeves
CO 36 (40, 44, 50, 56, 64) sts. PM (to indicate beginning of round) and join in the round
Rnd 1: Purl to end
Rnd 2: Knit to end
Repeat rows 1 and 2, four more times for a total of 5 garter ridges. Note that garter stitch in the round is one round of knits followed by one round of purls.
Knit all stitches until sleeve is 4 inches from CO edge then work increase row.
Increase Row: Knit 1, M1, knit to 2 sts from end, M1, K1
Repeat Increase Row every 10th row 5 additional times, resulting in 48 (52, 56, 62, 68, 76) sleeve stitches. Then knit until sleeve measures 17 (17, 17.5, 18, 18.5, 18.5) inches. Cut yarn, put stitches on holder and set aside.
Repeat for second sleeve.
The sleeves are written to be slightly wider at the cuff than a traditional tapered sleeve. If you prefer a more tapered look, you can easily alter the pattern by casting on fewer stitches and starting the sleeve increase rows sooner to finish sleeve with the same number of stitches as the pattern instructions.
Attaching Sleeves to Body
Explanation added on December 24, 2017
SM, knit across 42 (46, 50, 56, 62, 70) sleeve stitches with needles attached to the sweater body (place the remaining 6 sleeve sts on a holder for the underarm – these correspond with the 6 sts you held for the front and back), PM, knit 68 (74, 82, 92, 100, 108) back stitches in pattern, PM, knit 42 (46, 50, 56, 62, 70) second sleeve stitches (place the remaining 6 sleeve sts on a holder for the underarm – these correspond with the 6 sts you held for the front and back), PM, knit 68 (74, 82, 92, 100, 108) front stitches to BORM. This should result in 220 (240, 264, 296, 324, 356) sts on the needle.
It is helpful to use a different color or style of stitch marker for the raglan decreases than you have used to mark the lace panel.
Knit Plain
Knit even in pattern for 1 inch, slipping markers as you come to them.
Raglan Decreases
Rnd 1: SM, k1, k2tog, *(knit to 3 sts bef m, ssk, k1, SM, k1, k2tog), repeat from * 2 more times, then knit to 3 sts bef m, ssk, k1; 8 sts dec’d.
Rnd 2: Knit in established pattern to end.
Repeat rnds 1 & 2, an additional 13 (14, 16, 18, 20, 22) times; 108 (120, 128, 144, 156, 172) sts rem. On the final round, remove markers on either side of back lace panel.
It does not matter which row of the chart you finish on.
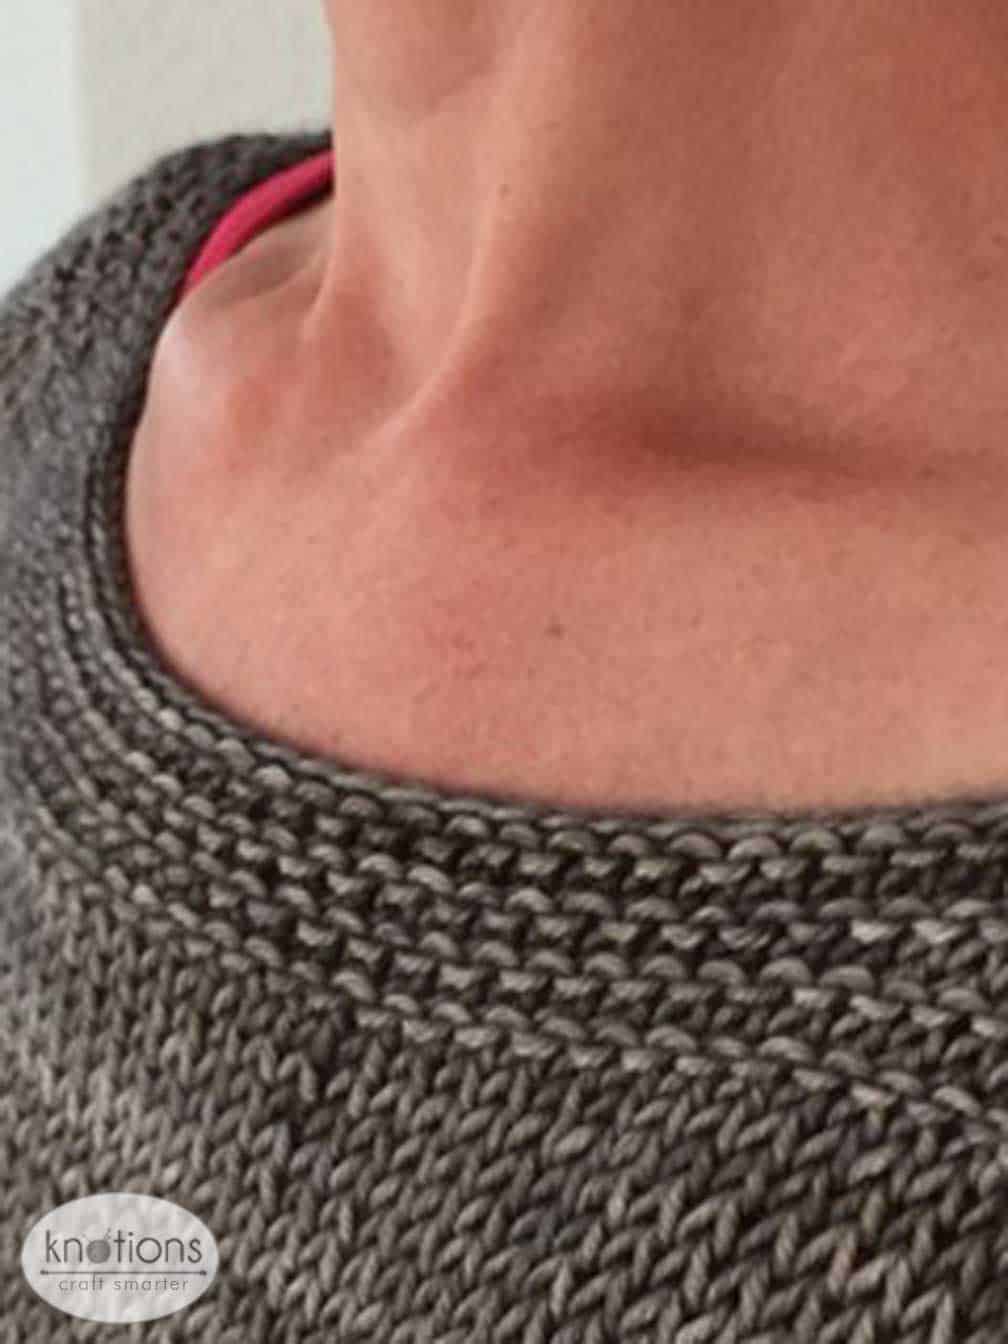
Collar
Rnd 1: Purl all stitches slipping markers as you come to them.
Rnd 2: SM, k1, k2tog, (*knit to 3 sts bef m, ssk, k1, SM, k1, k2tog), repeat from * 2 more times, then knit to 3 sts bef m, ssk, k1; 8 sts dec’d.
Repeat Rnds 1&2, twice more; 84 (96, 104, 120, 132, 148) sts rem. Stop knitting the last rnd, one stitch before BORM, wrap that stitch and turn your work.
Knit across back collar to 1 stitch bef first raglan m, W&T.
Row 9: Purl all sts to BORM, turn.
Row 10: Bind off all stitches knitwise.
Finishing
Soak and block sweater. Seam underarm stitches, and weave in all ends, then wear and enjoy!
 About the Designer: Candon Leopold
 About the Designer: Candon Leopold
Candon Leopold is a mother, gardener, raiser of chickens, runner, and, of course, a knitter, spinner, weaver, and general lover of all things fibery.


Increase Row: Knit 1, M1, knit to 2 sts from end, M1, K1.
If I knit to two stitches from end, shouldn’t it read M1, K2?
Yes you’re right. So they’re symmetrical, I’d do it to 1 st rem. I’ll change it to that (as an errata) once I’m not on my phone.
Thanks for this!
Candon,
I am sort of new to knitting and this may seem very elementary, but I am not understanding what you mean ” ….break off and set aside….”. You stated this in the instructions at the very beginning of the pattern, and I feel rather uneducated asking this question. I understand what breaking the yarn means, I know that you can do that with scissors you don’t necessarily have to break the yarn literally with your hands but what I am having trouble with is the setting aside part, do I put those on dpn’s? Do I push it further down the circular needles? I’m a little confused it would be awesome if you can help out
In this case, you should cut the yarn but keep the stitches live on another holder (could be a yarn holder, a scrap piece of yarn and could even be just separate but on the same needle) until you join the front and back. You do it this way so you can do a split so the front and back aren’t attached together from the very start.
Hi there,
Is there a link to a chart for the revised back?
Picture back.
Thank you
Just added it! Thanks 🙂
Thanks for your quick response. I’ll pay very close attention to the centre double decrease when I get there. In the picture of the lady’s back at the very top of the web page I’m just not seeing the p, k2tog, yo pattern on the back right bottom of the sweater just over her hip. It seems to start at about row 33. Below that I see stockinette until the lace starts about in the middle of the chart. Maybe it’s just the picture??
you’re right! and i didn’t see it when i edited the pattern. Eagle Eye 😉
give me a bit of time – i want to check with Candon first to make sure.
can you wait until later today?
ok i checked with Candon (the designer) and she let me know she changed the pattern after she made the sweater because she thought it looked better.
but you’re right – it doesn’t exactly match the pics so i’m going to add that note now.
thanks for pointing this out!
Ok great! Thanks is so much
I’ve started this a few times and the pattern does not look the same as the picture. I think I might be doing the double centre decrease wrong. Also I don’t understand how in the picture, the edge of the pattern does not go all the way to the bottom garter edge, it starts a few inches up the back. I’ll keep trying because I really think it will be beautiful in the end.
i’m so sorry you’re having trouble!
here’s what the abbreviations say for how to do the center double decrease:
slip 2 as if to knit 2 together, knit 1, pass slipped stitches over
does that help?
and i think i’m not following your question about the patterning because it does start right after the garter edge and i just checked – that’s what i see in the pic. but i suspect i’m not understanding your question so maybe you can ask it a different way?
Do you hold the stitches on a stitch holder or bind them off?
on a holder so they’re still live when you sew them with the front/back sts.
I’m a little confused. I’m working on the sleeves for the Size 42. You cast on 44 stitches and end with 56 stitches on a holder. But when it’s time to attached the sleeves to the body, the instructions for Size 42 say 50 stitches, not 56. So all the numbers thereafter are incorrect. Am I missing something?
Thanks for asking!
The number is correct, but it should say to hold 6 sts from the sleeve. It’s the same number that you hold on the front/back. These are the sts that you sew together for the underarm sts.
Does that make sense?
I apologize for this confusion. I’m adding a note now.
I have a question about the bottom of the sweater. Is the back meant to be two rows longer than the front? And should bottom be seamed together as part of the finishing or is the front and back meant to stay split?
HI Tamara!
The back is a little long than the front and it is intended to be a split hem, so you do not seam it in the end.
Thanks for asking!
Hope you enjoy the pattern!
Candon
this is so wonderful. i have always been a chicken to do sweaters and cardis. this pattern just changed my mind. thank you for a lovely design.
that’s awesome!
i’m so glad that Center Street is encouraging you to try an adult garment! it’s not that hard and we’ll be here if you need any help.
THats great! I love that. I hope you enoy it!
Candon