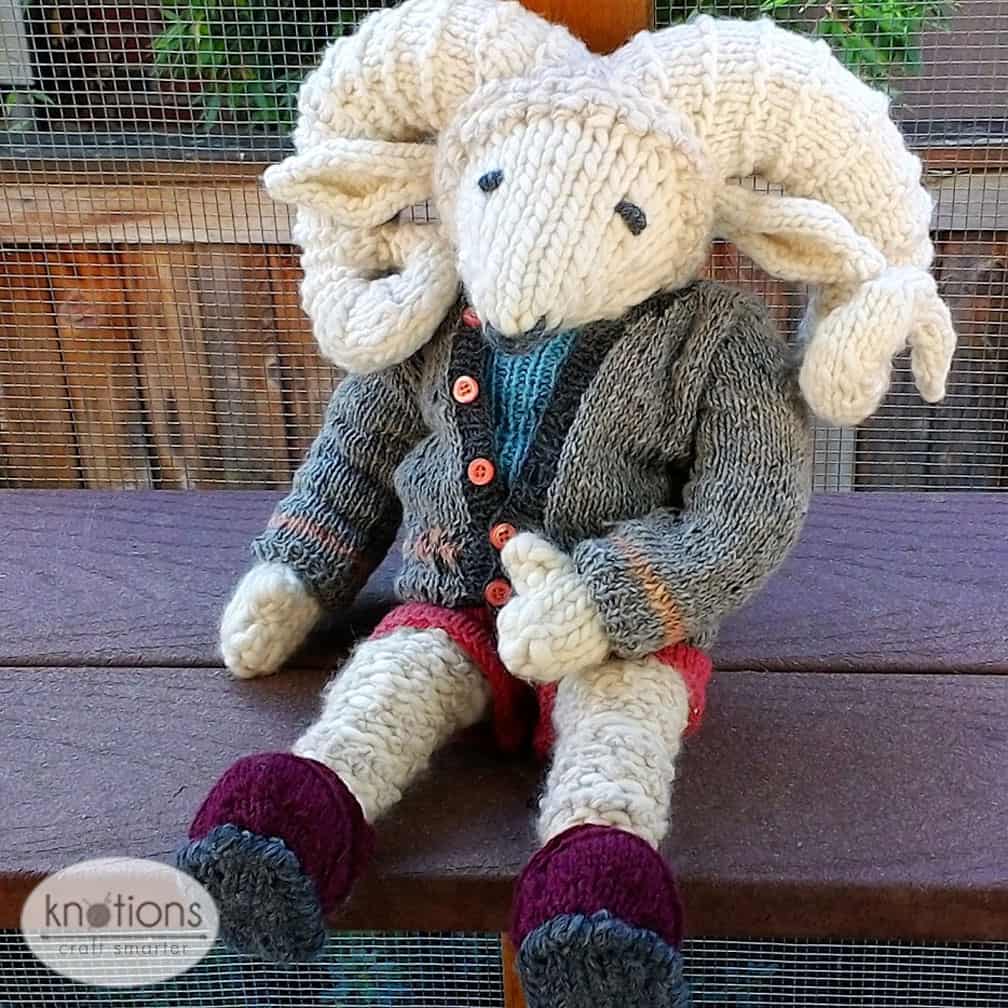
 Eunice Ewe is sturdy enough to sit alone, and she’s so very cuddly – but that’s not all. She has the same dimensions of a very popular 18” doll (which has more than 8,000 clothing knitting patterns on Ravelry). You can select your favorites to make Eunice the best-dressed Ewe around.
This pattern assumes knowledge of basic knitting. You will need to know knit and purl stitches, how to cast on and bind off, and how to increase and decrease. In addition, some intermediate techniques are used: I-cord, short rows (see our tutorial), knitting in the round, the seaming of flat pieces, Magic Loop, and simple embroidery. Experience in knitting toys would be very helpful in making this pattern, but the detailed directions and photos I’ve supplied throughout the pattern should help if you’ve never made a stuffed animal before.
If you prefer videos, I recommend the site knittinghelp.com for instructional videos for all of the techniques mentioned above.
Happy Knitting!
Yarns
All these yarns are readily available in yarn shops or internet sites.
Yarn A: Cascade Yarns “Magnum”. Color 0010, White. One skein.
Yarn B: Plymouth Yarns “Arequipa Aventura”. Color 01, Ecru, two skeins; or Henry’s Attic “Mikado lll”, Natural. One Skein.
Yarn C: Brown Sheep Lanaloft Bulky Weight 100% wool, Color 01, Cottage White. One skein.
2 yards of scrap yarn, black bulky, for embroidering the face.
A strong worsted weight scrap yarn of a similar color as Yarns A and B for seaming, if necessary.
Needles
Size 11 circular needles, 24 inch
Size 9 needles, straight or circular
Size 7 double pointed needles
Size 7 needles, straight or circular
Gauge
9 ½ stitches and 15 rows = 4”/10cm, with a swatch made with Yarns A and B held together.
Notions
Tapestry needle
Row/Stitch markers
20 oz. bag of polyester fiberfill for stuffing
Although it is not strictly necessary to do a gauge swatch since this is not a garment, getting gauge will ensure that your animal is made with a nice tight fabric which will not show stuffing through the stitches. Better yet, if you meet the gauge, your animal will be the correct size to borrow knitting patterns from 18-inch dolls.
Abbreviations
Please see our standard abbreviations.
Sewing Hints
When using yarn that threatens to pull apart, add strength by twisting it. If the yarn still proves too delicate, use a stronger, similar-colored yarn from a different project.
When seaming flat pieces, I bend the edges in and hold them together with my left hand while I stitch with my right hand – this puts less pressure on the sewing yarn. Since the pieces are knit in reverse stockinette stitch, I pass the needle through purl stitches offset from each other on either side, like a zipper. The sewing yarn should not be visible.


Pattern Instructions
Head
The back of the head is worked in reverse stockinette stitch (purl stitches are facing). The sheep’s face is worked on smaller needles with Yarn A only, in regular stockinette stitch.
Starting at the back of the head, with size 11 needles, CO 8 sts with yarns A and B held together. Knit first seven rows fairly loosely.
Row 1 (RS): Purl
Row 2: k1, (k1, m1) 6 times, k1; 14 sts
Row 3: Purl
Row 4: (K2, m1), 6 times, K2; 20 sts
Row 5: Purl
Row 6: k1, (m1, K3) 6 times, k1; 27 sts
Row 7: Purl
Row 8: Knit
Rows 9-14: Rep rows 7 and 8
Cut Yarn B and work with Yarn A only. You will now be working stockinette stitch instead of reverse stockinette stitch. Change to size 9 needles.
Row 15: Knit
Row 16: Purl
Rows 17-20: Rep Rows 15 and 16
Row 21: SSK, k2, ssk, k2, ssk, k7, k2tog, k2, k2tog, k2, k2tog; 21 sts
Row 22: Purl
Row 23: SSK, k2, ssk, k9, k2tog, k2, k2tog; 17 sts
Row 24: Purl
Row 25: SSK, ssk, k9, k2tog, k2tog; 13 sts
Row 26: Purl
Row 27: SSK, ssk, k5, k2tog, k2tog; 9 sts
Row 28: Purl
Row 29: SSK, k5, k2tog; 7 sts
Row 30: Purl
Cut yarn, leaving a nine-inch length to seam with. Draw yarn through all stitches two times to form the nose. (See photo) Pull tight, being careful not to break the yarn. If Yarn A is too delicate, try using Yarn C.


Sew the seam under the chin. Knot and cut sewing yarn, hide ends. Stuff the face and head with polyfill. Tie a new piece of yarn at the back of the head (on the wrong side) and sew through each of the original cast-on stitches. Pull together gently. Make two stitches to close it into a tight circle, then continue stitching the seam until the head is closed. Sew as neatly as you can and try to hide the stitches if possible. Knot the yarn and hide the end inside the head. I call this the “Ice Cream Cone Stage”.
Horns
Use Yarn C (Lanaloft), and size 7 double pointed needles.
Tips for horn making: Because of all the wraps, I find it almost impossible to locate my place in the pattern if I get lost (and I sometimes do). To combat this, I recommend keeping close track of which row you are on. I write down each row as I start it on a piece of scratch paper, and then cross it out when I’ve finished the row. I also count the stitches on my needles at almost every row.
Important: to aid in the curling of the horn, for the first 35 rows of each horn, knit tightly on the inside of the horn where the purl ridges are, and loosely on the outside at the curvy part of the circle on the far side of the ridges. After these 35 rows, do the exact opposite.
The horns will look slightly different from each other; this is by design. It gives your sheep character.

Left Horn (with the head facing you)
Starting at horn tip. The purl ridges will be the front side of the horn. To begin, knit two rows of a 3-stitch I-cord on size 7 double pointed needles.
Row 3 (Still working as an I-cord): k1, m1, k1, m1, k1; 5 sts
Row 4 (Still working as an I-cord): K3, m1, k2; 6 sts
At this point arrange stitches on three DPNs, two to a needle, with a row marker to the left of the working yarn.
Row 5: K
Row 6: P1, K4, w&t, p3, w&t, K4
Row 7: K5, w&t, p4, w&t, K5
Row 8: P2, k1, m1, k3; 7sts
Row 9: K3, m1, k4; 8 sts
Row 10: P2, k5, m1, w&t, p6, w&t, k7; 9 sts
Row 11: K8, w&t, p6, w&t, k7
Row 12: P3, k5, w&t, p6, w&t, k3, m1, k4; 10 sts
Row 13: K7, w&t, p5, w&t, k8
At this point put a small amount of stuffing into the horn tip, as this will be very difficult to do later. Continue to add bits of stuffing as you progress, bending the horn gently counter-clockwise.
Row 14: K7, m1, k1, w&t, p7, w&t, k8; 11 sts
Row 15: P4, k1, m1, K3, w&t, p6, w&t, k9; 12 sts
Row 16: K7, w&t, p5, w&t, k6, m1, k4; 13 sts
Row 17: P6, K4, w&t, p6, w&t, k9
Row 18: K5, m1, k8; 14 sts
Row 19: k14
Row 20: P7, k7
Row 21: K14
Row 22: K14
Row 23: P8, m1, K3, w&t, p5, w&t, k8; 15 sts
Row 24: K9, m1, K6 (16 sts
Row 25: K12, w&t, p5, w&t, k4, m1, k5; 17 sts
Row 26: P8, k9
Row 27: K9, m1, k4, w&t, p7, w&t, k11; 18 sts
Row 28: K18
Row 29: K18
Row 30: P9, k9
Row 31: K18
Row 32: K15, w&t, p7, w&t, k11
Row 33: P10, k3, m1, k5; 19 sts
Row 34: K15, w&t, p8, w&t, k12
Row 35: K19
Remember: You’ll be swapping which side you’re knitting tightly on and which side you’re knitting loosely on, to aid in the curling of the horn. Starting at this point, knit loosely on the inside of the horn where the purl ridges are, and tightly on the outside at the curvy part of the circle on the far side of the ridges.
Row 36: P 10, k9
Row 37: K19
Row 38: K19
Row 39: K11, w&t, p8, w&t, k16
Row 40: P10, k4, w&t, p9, w&t, k15
Row 41: K9, m1, k6, w&t, p8, w&t, k11; 20 sts
Row 42: K20
Row 43: P10, k10
Row 44: K20
Row 45: K16, w&t, p11, w&t, k11, m1, K3; 21 sts
Row 46: P10, k7, w&t, p11, w&t, k15
Row 47: K15, w&t, p10, w&t, k16
Row 48: P11, k4, m1, k2, w&t, p11, w&t, k17; 22 sts
Row 49: K22
Row 50: K22
Row 51: P12, k10
Row 52: K13, w&t, p8, w&t, k17
Row 53: K22
Row 54: P11, k11
Row 55: K15, w&t, p10, w&t, k17
Begin shaping the opening of the horn
Row 56: Remove row marker. BO3, k18. Turn work; 19 sts
Row 57: BO3, p15; 16 sts
Row 58: BO2, p6, k5, w&t, p8, w&t, k11; 14 sts
Arrange all stitches on two needles.
Row 59: BO2, P11; 12 sts
Row 60: BO2, P5, K2, w&t, P6, w&t, K8; 10 sts
Row 61: BO2, P7; 8 sts
Row 62: Bind off remaining 8 sts.
Right Horn
Starting at tip; the purl ridges will be the front of the horn. Knit two rows of a 3-stitch I-cord on size 7 double pointed needles.
Row 3: (Still working as an I-cord): k1, m1, k1, m1, k1; 5 sts
Row 4: (Still working as an I-cord): K3, m1, k2; 6 sts
At this point arrange stitches on three DPNs, two to a needle, with a row marker to the left of the working yarn.
Row 5: K
Row 6: K4, w&t, p3, w&t, k4, p1
Row 7: K5, w&t, p4, w&t, k5
Row 8: K3, m1, k1, p2; 7sts
Row 9: K3, m1, k4; 8 sts
Row 10: K5, m1, k1, w&t, p5, w&t, k4, p3 ; 9 sts
Row 11: K4, w&t, p3, w&t, k7
Row 12: K5, m1, k3, w&t, p6, w&t, k4, p3 ; 10 sts
Row 13: K7, w&t, p5, w&t, k4, p3
At this point put a small amount of stuffing into the horn tip, as this will be very difficult to do later. Continue to add bits of stuffing as you progress, bending the horn gently clockwise.
Row 14: K3, m1, k3, w&t, p5, w&t, k9; 11 sts
Row 15: K4, m1, k2, w&t, p5, w&t, k10; 12 sts
Row 16: K7, w&t, p5, w&t, k5, m1, k1, p4; 13 sts
Row 17: K8, w&t, p6, w&t, k11
Row 18: K4, m1, k9; 14 sts
Row 19: K7, p6
Row 20: K14
Row 21: K6, m1, K2, w&t, p7, w&t, k6, p7; 15 sts
Row 22: K7, m1, K8; 16 sts
Row 23: K4, m1, K4, w&t, P7, w&t, k15; 17 sts
Row 24: K9, p8
Row 25: K6, m1, K2, w&t, P7, w&t, k16 (18 sts
Row 26: K18
Row 27: K18
Row 28: K9, P9
Row 29: K12, w&t, p9, w&t, k15
Row 30: K8, m1, k10; 19 sts
Row 31: K12, w&t, p9, w&t, k7, p10
Row 32: K11, w&t, p9, w&t, k16
Row 33: K19
Row 34: K8, p11
Row 35: K19
Remember: You’ll be swapping which side you’re knitting tightly on and which side you’re knitting loosely on, to aid in the curling of the horn. Starting at this point, knit loosely on the inside of the horn where the purl ridges are, and tightly on the outside at the curvy part of the circle on the far side of the ridges.
Row 36: K15, w&t, p8, w&t, k12
Row 37: K4, m1, k3, p12; 20 sts
Row 38: k16, w&t, p9, w&t, k13
Row 39: K20
Row 40: K7, p13
Row 41: K20
Row 42: K16, w&t, p9, w&t, k13
Row 43: K4, m1, k12 w&t, p9, w&t, p13; 21 sts
Row 44: K17, w&t, p11, w&t, k16
Row 45: K6, m1, k11, w&t, p11, w&t, k15; 22 sts
Row 46: K9, p13
Row 47: K22
Row 48: K22
Row 49: k17, w&t, p10, w&t, k15
Row 50: K9, p13
Row 51: K22
Row 52: K15, w&t, p11, w&t, k18
Row 53: K22
Begin shaping the opening of the horn:
Row 54: Remove row marker. BO3, k4, p14. Turn work.;19 sts
Row 55: BO3, p15; 16 sts
Row 56: BO2, k10, w&t, p8, w&t, k11; 14 sts
Arrange all stitches on two needles.
Row 57: BO2, p11; 12 sts
Row 58: BO2, p7, w&t, p6, w&t, k8; 10 sts
Row 59: BO2, P7; 8 sts
Row 60: Bind off remaining 8 sts.
Ears
The ears are worked with one strand of Yarn C and size 7 needles. You can make two at once.
CO 11 sts, with a 12” tail for sewing with later.
Row 1: Purl – this will be the inside of the ear
Row 2: Knit
Row 3: Purl
Row 4: Knit
Row 5: Purl
Row 6: K5, m1, k1, m1, k5; 13 sts
Row 7: Purl
Row 8: K6, m1, k1, m1, k6; 15 sts
Row 9: Purl
Row 10: K7, m1, k1, m1, K7; 17 sts
Row 11: Purl
Row 12: K2, ssk, k9, k2tog, k2; 15 sts
Row 13: Purl
Row 14: K2, ssk, k7, k2tog, k2; 13 sts
Row 15: Purl
Row 16: K2, ssk, k5, k2tog, k2; 11 sts
Row 17: Purl
Row 18: K2, ssk, k3, k2tog, k2; 9 sts
Row 19: Purl
Row 20: K2, ssk, k1, k2tog, K2 ;7 sts
Row 21: Purl
Row 22: K1, ssk, k1, k2tog, k1; 5 sts
Row 23: Purl
Cut yarn, leaving a seven-inch tail. Thread tail through stitches and pull tight. Make a stitch at tip where the edge rolls in and meets. Make a small knot, hide yarn, and cut end. I do this by threading the yarn through a few of the knit stitches that have rolled over at the edge. (See photos)


Head Assembly
Attaching the horns
Locate the central line of stitches running up the nose. (See photo.) You want to sew the horns two purl rows up from the forehead, on either side of the central line, with the central stitch separating them (see photo). Make sure the horn is firmly stuffed near the opening, and that the horn is nice and rounded where it meets the head so that it will stand off the head a bit. Also, make sure you are sewing the correct horn on the correct side – the purl ridges should face the front of the head.


Begin sewing the horn onto the head with Yarn C, curling the edge of the horn underneath so that it is hidden from view. Do this by catching a stitch from above the edge. (See photo.)

Attaching the ears
The ears should have about a half-inch of rolled edges at the bottom. Using the long tail, stitch the rolled edges together with a few small stitches. Sew the ears, rolled sides toward the front, at the location marked with the blue string in the above photo.
Embroidering the face
Eyes: Using a length of dark gray scrap yarn (I use Lanaloft), count four rows down from the forehead and three stitches to the right and left of the central line of stitches. (See photo). Pull yarn through from a spot near the chin and out at the marked eye location. Make a stitch that is one and a half stitches wide but before pulling it through, wrap the working yarn five times around the needle to make a bullion embroidery stitch. Put the needle back into the same place and bring it out on the other side of the head, ready to begin eye number two. (See photo) Trim yarn ends.


Nose: The aim is to make a tidy embroidered satin stitch triangular nose over the final seven stitches of the head. Using the same yarn, make four neatly stacked, tightly packed stitches. The last tiny stitch will begin the mouth. (See photo).
Mouth: Make two stitches for the mouth, anchoring them below the nose. Trim all yarn ends.


Torso
Use yarns A and B held together. Starting at the neck and finishing at the bottom, CO 12 sts using size 11 needles.
Row 1 (RS): Purl
Row 2: K2, (m1, k2) 5 times; 17 sts
Row 3: Purl
Row 4: K2, (m1, k3) 5 times; 22 sts
Row 5: Purl
Row 6: K2, (m1, k4) 5 times; 27 sts
Row 7: Purl
Row 8: Knit
Row 9: Purl
Row 10 (waist decreases): K6, ssk, K4, ssk, K5, k2tog, K6; 24 sts
Row 11: Purl
Row 12: K7, ssk, K6, k2tog, K7; 22 sts
Row 13: Purl
Row 14: (hip increases) K2, (m1, K4) 5 times; 27 sts
Both ends of Row 15 have several short rows to start rounding out the bottom
Row 15: P8, w&t, k8, turn, p7, w&t, k7, turn, p to end of row – picking up all wraps, turn, k8, w&t, p8, turn, k7, w&t, p7; 27 sts
Work hip joints
For next section work stitches 1 – 7 only.
Row 1: K7. Turn work.
Row 2: BO 2 sts, p4; 5 sts
Row 3: Knit
Row 4: BO 2 sts, p2; 3 sts
Row 5: Knit
Row 6: BO 1, p1; 2 sts
Row 7: BO remaining sts. Half of left hip joint made.
For this section work next 13 middle stitches only.
Join new yarn
Row 1: K13. Turn work.
Row 2: BO 2 sts, p10; 11 sts
Row 3: BO 2 sts, k8; 9 sts
Row 4: BO 2 sts, p6; 7 sts
Row 5: BO 2 sts, k4; 5 sts
Row 6: BO 2 sts, p2; 3 sts
Row 7: BO 1 st, k1; 2 sts
Row 8: BO remaining 2 sts.
For last section work the last 7 stitches.
Join new yarn
Row 1: BO 2, k4; 5 sts
Row 2: P
Row 3: BO 2, k2; 3 sts
Row 4: P
Row 5: BO 1, k1; 2 sts
Row 6: BO remaining two sts.
Weave in all ends.
Legs
Left Leg
Note: It’s the left leg as the body is facing you.
Starting at the foot, CO 18 sts in Yarn A on size 11 needles, leaving a 12” tail for seaming with later. Right and Left legs are the same through row 17.
(Rows 1 – 6 are the foot)
Row 1 (RS): K
Row 2: P5, BO 8, p4 (you will have 5 sts, a gap of 8 bound-off sts, 5 sts on your needle)
Row 3: K5, skip the 8 bound-off sts, k5. Make sure to pull stitch tight between sections; 10 sts – note that there is no gap between the first 5 and last 5 sts.
Row 4: P10
Add Yarn B, work with both yarns held together from this point.
Row 5: P10
Row 6: Knit
Row 7: Purl
Rows 8-11: Work Rows 6 and 7 above
Row 12: Knit
Row 13 (Short rows for knee): P8, w&t, k6, w&t, p5, w&t, k4, w&t, p6 (to end of row)
Row 14: K1, m1, k8, m1, k1; 12 sts
Row 15: Purl
Row 16: Knit
Row 17: P1, m1, p10, m1, p1; 14 sts
Row 18: Knit
Now follow the below directions for the correct foot.
Upper Left Leg
Row 19: BO5, p9; 10 sts
Row 20: BO1, k8; 9 sts
Row 21: BO1, p7; 8 sts
Row 22: BO1, k6; 7 sts
Row 23: BO1, p5; 6 sts
Row 24: BO1, k4; 5 sts
Row 25: BO1, p3; 4 sts
Row 26: BO1, k2; 3 sts
Row 27: BO all 3 sts.
Upper Right Leg
This section starts with 14 sts from the foot/knee section.
Row 18: BO1, p12; 13 sts
Row 19: BO5, k8; 9 sts
Row 20: BO1, p7; 8 sts
Row 21: BO1, k6; 7 sts
Row 22: BO1, p5; 6 sts
Row 23: BO1, k4; 5 sts
Row 24: BO1, p3; 4 sts
Row 25: BO1, k2; 3 sts
Row 26: BO all 3 sts
Foot Soles, Right and Left
Using Yarn A and size 11 needles. CO 3 sts.
Row 1: K2, m1, k1; 4 sts
Row 2: P
Row 3: (K1, m1) 3 times, k1; 7 sts
Row 4: Purl
Row 5: Knit
Row 6: Purl
Row 7: SSK, k3, k2tog; 5 sts
Row 8: Purl
Row 9: SSK, k1, k2tog; 3 sts
Row 10: BO 3 sts, leaving a 9-inch tail to sew with.
Assembling the Feet and Legs: With the length of yarn A left from casting on, sew the heel of the foot shut. (See photo) Sew sole to the foot, making sure that the knit rows line up front to back. (See photo) Stuff foot. Make eight wide stitches across the top of the foot (See photo) and then make three small stitches along the left edge to imitate the bind off stitches on the right side.
Sew seam up the back of the leg, adding stuffing as you go and making the seam one and a half stitches in on both sides to make the limb firm. Stop at the first row of bind-offs. Do the same with the other leg. Trim all ends.


Arms
Both arms are the same until row 22.
The arm starts at the “mitten” hand. I find that doing the magic loop technique using size 11 circular needles is the easiest method for the start of the hand, but you can use DPNs if you prefer. Be sure to keep your knitting loose during the first few rounds, it will make it easier to do the increases.
Using Yarn A, CO 4 loose sts. (For the arms, I cast on using both needles to form extra-wide loops) Work in the round, as if you were starting an I-cord. Slide your cast-on sts to the other end of the circular needles.
Row 1: Kfb each stitch; 8 sts – this step sometimes takes me two or three tries to get it right, but the results are worth it.
You’ll switch to Magic Loop to work in the round at this point. Slide work to center of circular needles and pull the circular needle cord through between stitches 4 and 5.
Rnd 2: K1, place marker, K8; 8 sts
Rnd 3: K2, m1, k4, m1, k2; 10 sts
Rnd 5: Knit
Rnd 6: K4, kfb, k5; 11 sts
You’ll now separate for the thumb
Rnd 7: K4
Working only on stitches 5 and 6
Thumb row 1: K2, turn
Thumb row 2: P2, turn
Thumb rows 3-6: repeat above 2 times
Thumb row 7: K2 (do not turn)
Row 7 continued from above: fold thumb in half, K5, making sure to keep connecting stitches tight; 11 sts
Rnd 8: K4, k2 thumb stitches (keeping tight), k5
Rnd 9: K4, ssk (the two under-thumb sts, k5; 10 sts
After this point the work will switch from working in the round to flat. The opening will be under the thumb. You will need to continue to use Magic Loop (or DPNs) for several rows.
Add Yarn B. Hold both yarns together.
Row 10: (This row involves some back-and-forth): Purl 4. Turn work. K4. Remove row marker. K6. Turn work. You are now set up to work flat.
Row 11: Purl. (Continue to turn after each row.)
Row 12: Knit
Row 13: Purl
Rows 14-16: Rep Rows 11 and 12
Somewhere around Row 15, you can stop working magic loop (or stop using DPNs) and work back and forth in the usual manner.
Row 17 (Short rows for elbow): P8, w&t, k6, w&t, p5, w&t, k4, w&t, p7
Row 18: K2, m1, K8; 11 sts
Row 19: Purl
Row 20: K9, m1, K2; 12 sts
Put a marker of some sort on the thumb of the left hand to help you remember which arm it is.
Upper Left Arm (with the animal facing you)
Row 21: BO1, P10; 11 sts
Row 22: BO3, K7; 8 sts
Row 23: BO1, P6; 7 sts
Row 24 (short row to shape the shoulder): BO1, k3, w&t, p3, w&t, K5; 6 sts
Row 25 (short row): BO1, p2, w&t, k2, w&t, p4; 5 sts
Row 26 (short row): BO1, k1, w&t, P1, w&t, k3; 4 sts
Row 27: BO all sts
Upper Right Arm
You will already have worked rows 1-20 from above. You will start this section with 12 sts.
Row 21: BO3, P8; 9 sts
Row 22: BO1, K7; 8 sts
Row 23 (short rows to shape shoulder): BO1, p4, w&t, k3, w&t, p5; 7 sts
Row 24 (short row): BO1, k3, w&t, p2, w&t, k4; 6 sts
Row 25 (short row): BO1, p3, w&t, k3, w&t, p4; 5 sts
Row 26: BO1, k3; 4 sts
Row 27: BO remaining stitches
With a tapestry needle and Yarn A, hand-stitch 4 stitches to close both sides of thumbs. Stuff hands lightly. With same yarn or new yarn, close up arm seams, stuffing arms very lightly as you go. Put extra stuffing at the shoulders to make them rounded. Sew arms onto body, making sure that the thumbs are on the inside.


Assembling the Body
Torso: Fold sides in toward center, making sure that the purl side is out. (See Photo) Form the crotch by stitching together the two back pieces, then sewing them to the front. Continue this seam to ¾ up the back, folding two edge stitches on both sides inward as you go. Extra stitches have been allowed in the pattern for this. (See photo) The fabric should be stiff enough to more or less stand on its own.


Hips: Making sure the correct leg is in the correct hip socket (foot facing forward, torso seam at back), fit leg in torso and sew in place, twisting the yarn to make the joint stronger if necessary. (See photo) Leave the hip joint unstuffed, so that your sheep will sit nicely.


Stuffing the Torso: Pull out any stuffing that is still in the hip joint. Fill torso with stuffing. Pad the bottom area with extra stuffing. Train your animal to sit by bending the hip joints and sitting it on the edge of a table and bearing down gently on the torso.
Finish the torso seam along the spine, pulling in the edges about an inch on each side; the extra bulk of the seaming will add strength to the pose. I usually make the seam about three stitches out from both edges, especially in the small of the back. (See photo)
At the top of the back, sew through each of the original neck cast-on stitches and pull them together. Knot the sewing yarn and hide the end.


Hands and Arms: Draw the length of yarn left from casting on through the hand and out at the base of the thumb. Make two or three tidy stitches on each side of the thumb. (See photo) Push a small amount of stuffing into the hand. Continue stitching up the arm in the same manner the leg was stitched up. (See photo) Stop at the first row of bind-offs. Do the same with the other arm. Trim all ends.
Attaching the arms: Put a small amount of stuffing in the short rows of the top of the arm to round out the shoulder; add more as necessary as the arm is sewn onto the body. Making sure the correct arm is in the correct position (thumb toward the inside), position the arms so that they are along the center line and about an inch from the center of the neck. (See photo; looking down on the torso from above) Fold edge of arm under as you sew and pick up the stitch one away from the edge.
Stitch head to torso. Go around twice to give added strength.


You are finished!
Now, go find some of the eight thousand beautiful patterns for 18-inch dolls on Ravelry and dress your new friend. Look for patterns that have button closures.
Thank you! I hope you enjoyed this pattern.
 About the Designer: Evelyn Arvey
 About the Designer: Evelyn Arvey
My love affair with knitting began when I was only five years old. The ancient Italian lady next door invited me over for tea, Jordan almonds, and knitting lessons – all while playing Enrique Caruso on her turntable at a volume that made it impossible to hear her instructions. Not that it mattered, because she barely spoke English. She taught me well, and years later I came to learn that her knitting style – and mine – was a very speedy type of Eastern Continental. I have recently started designing my own patterns, and sometimes I think of her, my first teacher, and wish I could show them to her.
I live in Seattle with my husband who thinks I have altogether too much yarn and five demanding cats who love my yarn as much as I do.
You can find me online at evelynarvey.com and on Ravelry as Evelynny.


Oh my gosh, what a BEAUTIFUL creation !!!!! I am not the best knitter, but have to save this gorgeous pattern for “some day”. Having it the same size as the dolls is a huge bonus. I am 58, and I will be making one of these just for ME. LOVE IT !!!
I have never made a toy before. I have just had a grandson born 3 months to early. I want to make this and a blanket to have when he arrives home.
Thank you.