
Tutorial · Crochet · Finishing
Two are sewn with a needle. Three are worked with your hook. Pick the one that suits the project in front of you, then follow it step by step.
Which join do you want?
Start here. Most people arrive with one project and one question, and the wrong join is a lot of work to undo.
| Technique | Method | Best for | Seam it leaves | Worth knowing |
|---|---|---|---|---|
| Join as you goJAYG | Hook | Granny squares, motif shawls, anything you want finished as you make it | Flat, decorative, visible on both sides | Worked into the final round, so there is no assembly day at the end |
| Mattress stitch | Needle | Circles and odd motifs that will not line up stitch for stitch | Invisible, no ridge at all | The only one that joins two edges that do not match |
| Pull loop throughPLT | Hook | Granny panels, scarf ends, joining in the final round | A soft twisted line | No sewing, no extra yarn to cut, no ridge |
| Single crochet through both layers | Hook | Blankets and garments assembled in strips | A raised ridge, front or back, your choice | Fast, but you commit to long runs of squares at a time |
| Whipstitch | Needle | Granny squares, garment seams, sewing up in front of the television | Nearly flat, seam on the wrong side | The easiest one to learn and the hardest one to do badly |
There are more ways to join crochet pieces than anyone needs, and every one of them can be bent to suit the project in front of you. These five are the ones worth learning first. The samples all show granny squares because squares are where most people meet this problem, but nothing here is limited to squares.
Every sample here is a granny square worked in granny stitch. If you need to make the pieces before you can join them, start with the square or the stitch.
Join as you go
Work as normal in your current square, single crochet from behind into the square next to it, then back to your own, and keep alternating. It happens in the last round, so the blanket is finished the moment the last square is.
- Method
- Worked with the hook, in the final round
- Best for
- Granny squares, motif shawls, anything made of repeating pieces
- Seam
- Flat and decorative, visible from both sides
- Extra yarn
- None
- Length
- 12 steps, 18 photos
This is the most common join you will meet in granny square patterns, and the one most often used for shawls built out of motifs.
The sample is worked in single crochet, but depending on your project you may prefer a slip stitch where the single crochet goes. You will know by looking: if there is too much space in the loopy area between the squares, swap to a slip stitch and it will tighten up.
Work the first cluster of the round first, then start joining at the outside corner. Starting there keeps the join consistent and it is the easiest corner to reach.
The square you are joining to has three rounds and your current square has two. That is correct. The join happens in the last round, so your square catches up as you work it. Begin with chain 2, then work 2 double crochet into this space.

Normally a corner takes a chain 3. Not when you are joining. Chain 1.

Insert the hook into the corresponding corner space of the other square, working from behind, on the wrong side. The wrong sides of the two squares should be lying on top of each other, or as close to it as you can manage.

Complete a single crochet over that corner space. Think of it as the second chain of your usual chain 3.

Chain 1. Think of it as the third chain of your usual chain 3.

Back in your current square, work 3 double crochet into the same chain space to finish the corner.

Ordinarily you would chain 1 and move to the next cluster. When you are joining, you do not chain. Instead, insert the hook into the other square’s next chain space, again from behind.

Complete a single crochet over that chain space.

Working back into your current square as normal, put 3 double crochet into the next chain space.

From behind, single crochet into the other square’s next chain space. Then, in your current square, work 3 double crochet into the last corner chain space, and chain 1.


From behind, single crochet into the other square’s corner chain space, then chain 1. Continue the rest of the round into your current square as normal.
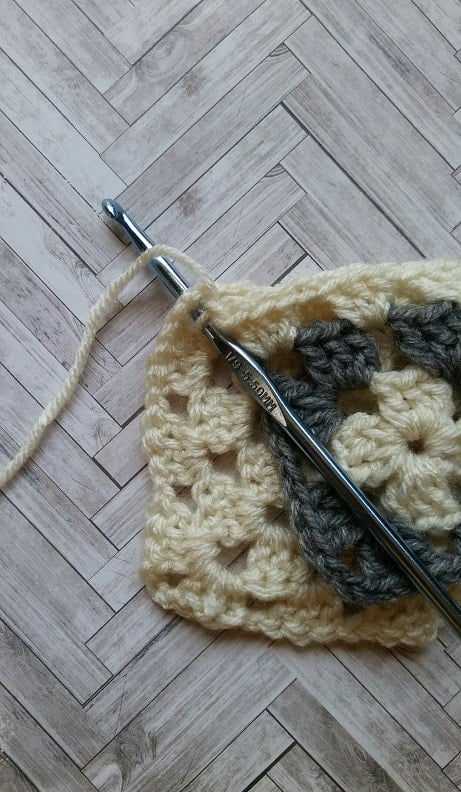


When you reach a square that is already joined on that side, work your joining single crochet into the join itself rather than into the chain space. It keeps the center where four squares meet clean and even.


Four squares joined


If the join looks loose and gappy, replace every joining single crochet with a slip stitch. It closes the space between the squares and gives you a tighter seam. Keep the tension loose when you do, because slip stitches draw in more than single crochet does.
Mattress stitch
Not the most enjoyable one to work, but the most useful join there is for odd motifs that nothing else will handle. Circles sewn together only where they touch come out completely seamless.
- Method
- Sewn with a tapestry needle after the pieces are finished
- Best for
- Circles and odd motifs, garment seams, anything that will not line up stitch for stitch
- Seam
- Invisible, no ridge
- Extra yarn
- A cut length, matched to your project color
- Length
- 6 steps, 7 photos
It suits smaller jobs best, because you have to cut a length of yarn to thread onto the needle. That said, plenty of makers sew whole afghans this way, and it is standard in garment making.
The samples here use a contrasting yarn so you can see the stitching. On your own work, use the same color as your project, or the same color as one of the two squares if they differ.
Work into the back loop only. You will see this method worked into both loops, but the back loop alone is easier to pull closed and it hides better.
Cut a length of yarn suited to the area you are joining and thread one end onto a needle. A number 18 tapestry needle is right for worsted weight. Lay both squares down with the right side facing you, then insert the needle from the wrong side through the back loop only of the first stitch, leaving a tail long enough to pull on later and weave in.

Insert the needle from the wrong side through the back loop only of the first stitch of the second square. A little slack between the squares is fine.

Back to the first square. Needle from the wrong side, back loop only, next stitch along.

And back across. Needle from the wrong side, back loop only, next stitch of the second square. That is the whole rhythm: one square, then the other, always the back loop, always from the wrong side.

Once you have several stitches worked, about five is comfortable, hold the bottom tail in one hand and the working tail in the other and pull to tighten. The rungs disappear and the two edges close up against each other.


Carry on from one square into the matching stitch of the other, tightening as you go, until you reach the end. Fasten off and weave in both tails.

Pull loop through
The most underused join on this page. Nothing to sew, nothing extra to cut, and the soft twisted line it leaves along the seam is worth having for its own sake.
- Method
- Worked with the hook, in the final row or round
- Best for
- Granny squares and similar motifs, panels, joining the ends of a scarf
- Seam
- A soft twisted line, no ridge
- Extra yarn
- None
- Length
- 10 steps, 10 photos
This is a join as you go method worked in a final row or round. It is at its best with basic granny squares and similar motifs, but it will join the ends of a scarf, and it combines well with a continuous join.
The sample joins the tops of two granny stitch panels. It works just as well joined to a foundation chain.
You can use it in any stitch pattern. Work your pattern as normal and put the pull loop through where the join falls. In single crochet, for instance, you would work a single crochet into your first stitch, then the PLT, then carry on in single crochet.
Chain 2 to begin.

Pull the loop up tall so the stitch cannot fall out, then slide your hook out of it.

Insert the hook from the right side into the matching stitch of the other panel.

Catch the loop you set down, and tighten it onto the hook the way you normally would.

Pull the loop through. That is the pull loop through, done.

Double crochet into the next stitch of your own panel, which here is a chain space.

Pull the loop up again, and slide the hook out.

Insert the hook from the right side into the next stitch of the other panel.

Catch the loop, tighten, and pull through.

Carry on in pattern, putting a pull loop through in between each stitch of your own panel.

Single crochet through both layers
The join most people learn first, and it will carry a whole blanket on its own. The catch is scale: you commit to an entire strip of squares in one sitting.
- Method
- Worked with the hook, after the pieces are finished
- Best for
- Blankets and garments assembled in strips
- Seam
- A raised ridge, on whichever side you choose to work from
- Extra yarn
- A working ball, joined at the corner
- Length
- 8 steps, 11 photos
For a blanket, lay your squares out in the order you want them, then take two rows at a time and lay them on top of one another with the wrong sides facing the same way they will face in the finished piece. Single crochet all the way across. Then rotate the whole thing and work across the other way.
This join leaves a visible ridge along the top. That can be a lovely decorative feature if you want one. If you do not, work from the wrong side instead. There will still be a ridge, but it will be on the back. For a smaller ridge, use a slip stitch in place of the single crochet. Working from the wrong side is a good choice for garments if the ridge does not bother you.
Lay your squares out, or hold them, exactly as they will be joined. You are joining at the center of two rows at a time, so the top edge of the bottom square meets the bottom edge of the top square. Working through both layers, join your yarn at the right-hand corner chain space, chain 1, and complete a single crochet.

Insert the hook into the next stitch, through both layers, and complete the single crochet.
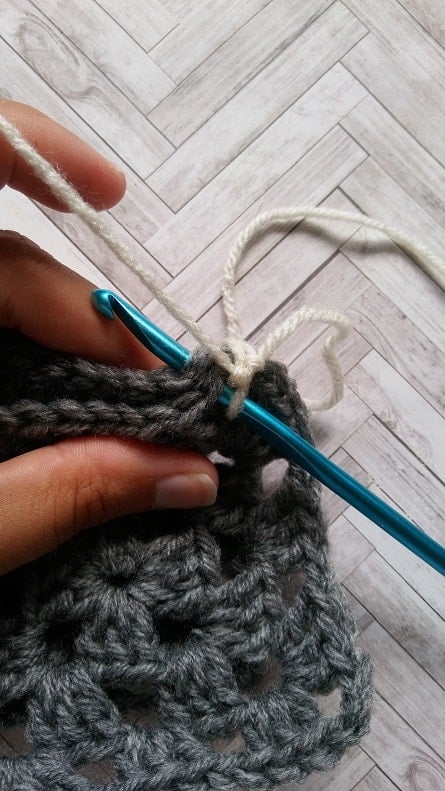
Carry on the same way across the whole edge and into the next corner chain space.

To carry on into the next pair of squares, work a single crochet two together over the last corner chain space of the square you just finished and the corner chain space of the next pair. That one decrease stops the join bunching where four corners meet.

Continue across the same way as before. Once you reach the end, fasten off.


Once the strips are done in one direction, rotate the piece and work the squares down going the other way. Begin as before and work over to the second corner chain space.

You are now at the point where the previous direction’s decrease sits. Do not decrease again here. Chain 1, then single crochet into the corner chain space of the next set of squares.

Work to the end as before.

How it looks finished


Same technique, smaller ridge. If you like how this join works but not how much it shows, work a slip stitch in place of each single crochet. Go up a hook size for the seam, because slip stitches pull in more than single crochet does and a tight seam will finish shorter than the squares it joins.
Whipstitch
The easiest one here, and the most companionable. It is hand sewing, nothing more, and it is very hard to do badly.
- Method
- Sewn with a tapestry needle after the pieces are finished
- Best for
- Granny squares and garment seams
- Seam
- Nearly flat, sits on the wrong side
- Extra yarn
- A cut length, matched to your project color
- Length
- 6 steps, 8 photos
The sample whipstitches two granny squares together as they lie on top of each other, right sides facing each other and the wrong side facing up. You can also work it from the right side with both squares flat on a surface, and it is often worked into the back loops only of both squares. Which one you choose is personal preference and project type. The version shown here is the one used most.
The samples join granny squares, but this is an excellent technique for assembling garments. As with the mattress stitch, the contrasting yarn is only there so you can see it. Use your project color.
Lay the squares together with the right sides facing each other. Cut a length of yarn suited to the area, thread one end onto a needle and secure it near the right-hand corner. If you have not fastened off yet and you are already at this point, just cut a long tail, thread it and start.

The tail of your yarn should come out of the top square.

Insert the needle from the wrong side of the bottom square, through both layers, into the mirrored stitches of the two squares.

You will see one loop here.

Insert the needle from the wrong side of the bottom square into the same stitch as before, and then diagonally through the next stitch to the left of the top square.

Now you see two loops together. Carry on the same way all along the edge: into the next set of mirrored stitches, then diagonally.

How it looks finished


And there you have it. Five techniques for joining and seaming, with a few modifications to each.
Original instructions and step photography by Alexandra Richards. Revised and expanded for Knotions.
Thanks for this tutorial. So useful, and all the photos make it very easy to follow. Thanks for joining in my party for August too.
Great tutorial! Love these detailed instructions… a diyer’s dream! 😉 (We don’t want to make mistakes!) So blessed to have you at Tuesday Turn About!
The Whipstitch and Mattress stitches look good to me, but what do I know? I’m still waiting to try my first granny square.
Excellent information in this post! I’ve tried most of the joining techniques but never the ridged one. Pinned to my knit|crochet board. Thanks for sharing your tutorial with us at the Talk Of The Town party!
Excellent information! Pinning.