updated October 27, 2022
The magic knot is a great way to join yarn. It’s secure and it’s another way to avoid having to weave in ends.

Some things to consider about the magic knot:
- it’s NOT for precise changes in color
- it’s great for yarn that can take a little pulling
- if your yarn can’t withstand a lot of pulling, you can still use this join but you have to be more careful when pulling at the knot (Step 5)
- it can work well for socks but I do suggest you avoid placing the knot under your foot. I made that mistake once and I could feel a tiny pebble in my sock.
Video
If you prefer watching a video, we have one here for you as well!
Materials
- new yarn
- scissors
Note what I’m not saying – a darning needle. You don’t need one for this method!
Ok – lets get started.


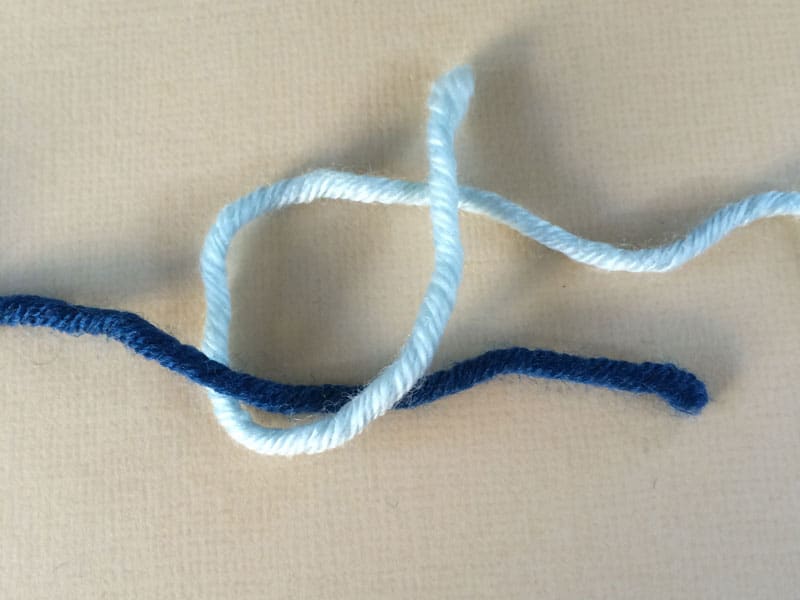
After step 3, knot it just using the light blue yarn.
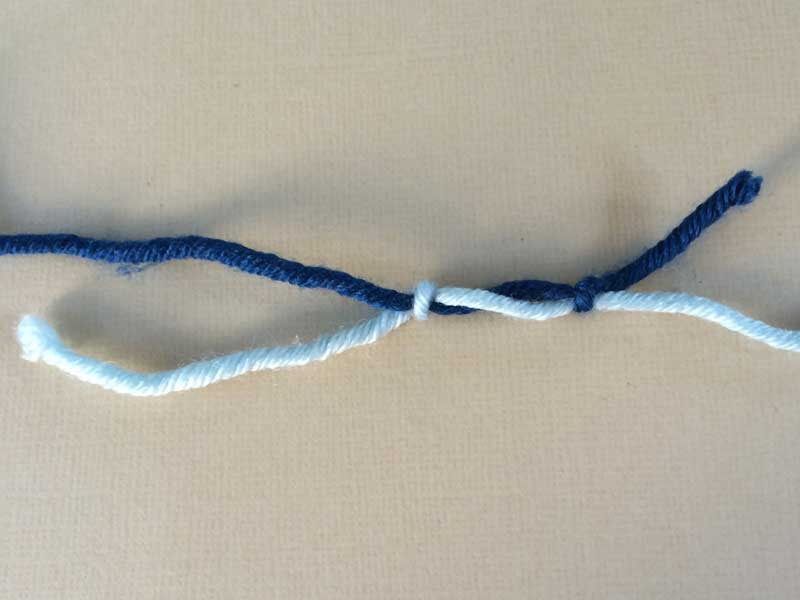
Repeat steps 2 and 3 with the other tail and also knot it (this time with the darker blue yarn).
When you’re done you’ll have this.
Now comes the fun part
Step 4: Grab each yarn from the part coming from the ball and slide the knots together.

Step 5: Test the knot by pulling tightly at it. It shouldn’t fail. If it does, something wasn’t done right with your knots. Do it again.
Step 6: Once it’s passed the pull test, trim the tails very close to the knot.
When you’re done, pull again to make sure you didn’t mistakenly cut the knot itself. Now you’re ready to work with your newly joined yarn.
One suggestion – I would try to place the knot at the back of your work and avoid any section that people will be drawn to. Whenever possible, the knot should go in between two stitches when working it. You may need to slightly adjust your tension to make this happen.
While this isn’t required, I find it looks more polished when the knot is at the back of your work.
What it looks like
Here’s a look after a few rows have been knit.

Don’t let all the steps discourage you. I gave you a lot of details but this join goes quickly once you get the hang of it and remember – no ends to weave in. Once it’s done, it’s done and you’ll be hard-pressed to find it if you’re joining another ball of the same color.
Want to learn a new technique every month?
Year of Color 2026 is a free craft-along where we release a new knit and crochet pattern each month, each one built around a technique you might not have tried yet. Free forever, one square a month.
What is the best joining for 100% acrylic yarn? I’ve used so many different ways, but because acrylic is just thin strands of plastic, it seems to loosen, no matter what I use. (I make hats for our food pantry’s annual coat drive and since people can be allergic to natural fibers-and more expensive-I use acrylic because people aren’t allergic to plastic)
Any suggestions?
Thank you!
I’d do the traditional join of weaving in yarn.
Be sure to make the woven-in tails long enough and I’d make them go in a few different directions.
I’d even split the yarn (with the needle) to weave in the ends (it’ll anchor it a bit more). As long as you don’t see things on the public side, you’re good.
I never thought I would catch on without instructions, but I did! Thank you for the visuals.
You’re welcome!
I’m so glad it worked for you. It’s a great way to join in a new skein.
Thanks so much for the tutorial! I’m excited to give the Magic Knot a try!!
You really need a video, confusing.
Thanks for your comment!
I’m a big believer that people learn in different ways.
Personally, I prefer stills and avoid video tutorials at all costs. Given that, I haven’t invested any time in learning video editing (something I now regret).
But it’s funny you left this comment just yesterday, because earlier this week I recorded my first video tutorial and it was on the Magic Knot! I still have a ways to go before making it live on the site, but it’s very encouraging to get your comment because it’s making all this effort really worth it!
I definitely want the video to be of good quality, so it might take me a bit of time before I make it live, but I will do it. And then, depending on the comments I get and how much I learn, I might do more as well.
So, I truly thank you for your comment! Learning video editing has been a real effort (it’s so different from editing images), so this really encouraged me to keep going 🙂
Your still shots are first class – The clearest possible and I’m happy I caught your explanation.
Oh thank you 🙂 you’re so very welcome!
Magic Knot until your heart’s content 🙂
I am now a magic knot convert, your stills were easy to follow, managed it in one go. I now am well on to rolling my first magic ball of wool. Many thanks.
I’m with Debby – I am a big “spit splice” fan as well, most often because I’m too lazy to look for even a pair of scissors! LOL!! But honestly, the main reason is that there is absolutely NO waste with a spit splice….. none. Even superwash will spit splice if you’re aggressive enough with it when scrubbing it together. I truly do prefer it to all other methods if the yarn is natural/animal. No waste, no bulky spot, and no tools needed at all – other than a little spit and elbow grease 🙂
You both make great points. I didn’t include it with the join tutorials but maybe I should…
This is the joining method I use the most… I really like it!!
Thanks for all the tutorials and ideas!
You’re welcome!
Do you have any suggestions I didn’t mention?
I also use split splicing when using natural fibers.
Cool! I’ve used that one but tbh I use Magic Knot now for natural fibers.
When do you use splicing?
I’ve used it with alpaca fuzzy kind of yarns, or with a lace weight yarn that would show the knot if I used the magic knot. I like how it felts the yarn together, but doesn’t leave the thickness that the Russian join leaves.