 Lake Baikal (in Russia) has always been fascinating to me. When I was little, I thought the name was interesting because ‘bajka’ means story or fable, and I imagined that the lake is the home of fairies and magical creatures. Later in school I learned that the lake is even more unique than that – it is the world’s deepest and clearest lake, it holds the largest amount of fresh water, and at 25 million years old it’s also the oldest lake. Baikal is home to numerous unique life forms, and since its depths are largely unexplored, who knows what new magical creatures are still waiting to be discovered.
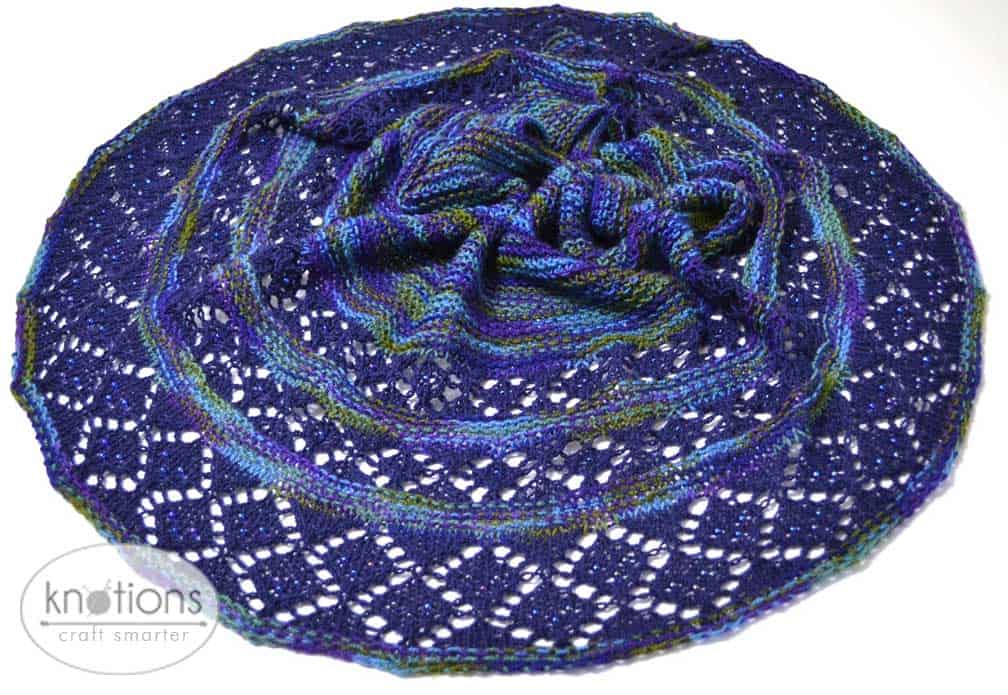
The lake is shaped as a crescent and the shawl is a crescent as well to reflect the inspiration. The shawl is worked from the top down and shaped with an easy set of garter stitch short rows. To keep things simple, the short row wraps can be left unworked, hidden within the garter stitch texture. Garter stitch sections worked in a beautiful hand-painted yarn flow between bands of simple lace worked in a matching solid color. I added a few beads to the lace to reflect the shimmering surface of water, but the beads are optional and the shawl can be worked without them.
SIZE
One Size – 54” x 20” (137 cm x 51 cm)
Note: Measurements taken after blocking.

Blocking Dimensions
A: wingspan (length) 54” / 137 cm
B: short side (front) 13” / 33 cm
C: center depth (width) 20” / 51 cm

YARN
MC: 2 skeins Cloudborn Highland Superwash Sock Twist Hand Paints [Aurora Borealis] 178 yds / 163 m per 50 g skein; 80% Superwash Wool, 20% Polyamide
CC: 1 skein Cloudborn Highland Superwash Sock Twist [Navy] 178 yds / 163 m per 50 g skein; 80% Superwash Wool, 20% Polyamide
NEEDLES
Size US 6 / 4.00 mm circular needle, 32” / 80 cm long or longer
Size US 8 / 5.00 mm circular needle, 32” / 80 cm long or longer
Size US 9 / 5.50 mm needle (for bind off only)


Notions
Beads 195 6/0 4.00 mm or 5/0 4.50 mm seed beads (optional)
Crochet hook size 0.75mm or 0.60mm (small enough to fit through holes of beads, optional)
Stitch markers
Yarn needle
Blocking pins
GAUGE
20 sts and 28 rows = 4″ / 10 cm in garter st on US 8 / 5.00 mm needles, blocked
Note: Correct gauge is not critical for this project, but your final measurements and yardage requirements may vary if your gauge is different.
Notes
Circular needle is used to accommodate large number of sts. Do not join; work back and forth in rows.
Firm cast on is important for the crescent because the shape needs to be supported during blocking to allow the lace points to stretch fully.
Wrong side rows are not included in the lace charts and should be worked as follows:
K2, purl to last 2 sts, end k2.
Abbreviations
Please see our standard abbreviations.
k-yo-k: Work knit-yarn over-knit into one stitch; 2 stitches increased.
sl2-k1-psso: Insert right needle into front of the next two stitches from left to right (as if to work a k2tog), slip the stitches together off the left needle; knit the next stitch; with the left needle pass the two slipped stitches over the knit stitch and off the needle; 2 sts dec’d (centered double decrease).
Garter Pattern
Row 1 (RS): K2tog, yo, knit to last 2 sts, end yo, ssk.
Row 2 (WS): Knit to end.
Short Rows – w&t (wrap and turn): Please see our tutorial. The short row wraps can be left unworked, hidden within the garter texture. Note: This is a description of just one of the many ways of working short rows; you can use any method you prefer.
Bead placement (optional): The beads are placed using a slender steel crochet hook. To place a bead on a stitch, insert the hook through the hole in the bead and slide the bead up onto the hook. Pick the stitch off the needle with the hook and slide the bead down onto the stitch. Slip the stitch back to left needle and knit it.
Charts
Chart A

click to enlarge
Chart B

click to enlarge
Chart C

click to enlarge
Written Instructions for Charts
Chart A
Row 1 (RS): K2tog, yo, k2, *yo, ssk, k1, k2tog, yo, k1, rep from * until 3 sts rem, k1, yo, ssk.
Row 3:K2tog, yo, k2, *k1, yo, sl2, k1, p2sso, yo, k2, rep from * until 3 sts rem, k1, yo, ssk.
Row 5: K2tog, yo, k1, bead, *k2tog, yo, k1, yo, ssk, bead, rep from * until 3 sts rem, k1, yo, ssk.
Row 7: K2tog, yo, k1, k2tog, *yo, k3, yo, sl2, k1, p2sso, rep from * until 8 sts rem, yo, k3, yo, ssk, k1, yo, ssk.
Chart B
Row 1 (RS): K2tog, yo, k2, *yo, ssk, k1, k2tog, yo, k1, rep from * until 3 sts rem, k1, yo, ssk.
Row 3: K2tog, yo, k2, *k1, yo, sl2, k1, p2sso, yo, k2, rep from * until 3 sts rem, k1, yo, ssk.
Row 5: K2tog, yo, k1, bead, *k2tog, yo, k1, yo, ssk, bead, rep from * until 3 sts rem, k1, yo, ssk.
Row 7: K2tog, yo, k1, k2tog, *yo, k1, (k1, yo, k1) in 1 stitch, k1, yo, sl2, k1, p2sso, rep from * until 8 sts rem, yo, k1, (k1, yo, k1) in 1 stitch, (k1, yo, ssk) x 2.
Chart C
Row 1 (RS): K2tog, yo, k2, *yo, ssk, k3, k2tog, yo, k1, rep from * until 3 sts rem, k1, yo, ssk.
Row 3: K2tog, yo, k2, *k1, yo, ssk, k1, k2tog, yo, k2, rep from * until 3 sts rem, k1, yo, ssk.
Row 5: K2tog, yo, k2, *k2, yo, sl2, k1, p2sso, yo, k3, rep from * until 3 sts rem, k1, yo, ssk.
Row 7: K2tog, yo, k2, *bead, k2tog, yo, k1, yo, ssk, bead, rep from * until 3 sts rem, k1, yo, ssk.
Row 9: K2tog, yo, k1, bead, *k2tog, yo, k3, yo, ssk, bead, rep from * until 3 sts rem, k1, yo, ssk.
Row 11: K2tog, yo, k1, k2tog, *yo, k5, yo, sl2, k1, p2sso, rep from * until 10 sts rem, yo, k5, yo, ssk, k1, yo, ssk.
Row 13: K2tog, yo, k2, *yo, ssk, bead, k1, bead, k2tog, yo, k1, rep from * until 3 sts rem, k1, yo, ssk.
Row 15: K2tog, yo, k2, *k1, yo, ssk, bead, k2tog, yo, k2, rep from * until 3 sts rem, k1, yo, ssk.
Row 17: K2tog, yo, k2, *k2, yo, sl2, k1, p2sso, yo, k3, rep from * until 3 sts rem, k1, yo, ssk.
PATTERN
With MC and US 6 / 4.00 mm needles CO 151 sts.
Knit 1 RS row through the back loops (twist stitches).
Switch to US 8 / 5.00 mm needles and knit 1 WS row.
Work short rows as follows:
You can use the traditional wrap & turn method as described in the Pattern Notes or any other method you prefer to work the short rows. The short row wraps can be left unworked, hidden within the garter texture.
Row 1 (RS): K3, place marker, knit to the last 3 sts, w&t.
Row 2 (WS): K3, place marker, knit to next marker, remove marker, w&t.
Row 3: K3, place marker, knit to next marker, remove marker, w&t.
Repeat rows 2 & 3 until fewer than 10 sts are left unworked on the right side at the center between the stitch markers.
Knit to end of RS row, remove markers.
Confirm that the number of sts on the needles remains the same; if different, make any necessary adjustments (increase or decrease) at the edges of the following row.
Next Row (WS): Knit to end.
Work 6 repeats of the two-row Garter Pattern (12 rows total), then one more RS row.
With CC work one WS Garter Pattern row.
Complete Rows 1 – 8 of the Chart A.
With MC work 4 repeats of the two-row Garter Pattern (8 rows total), then one more RS row.
With CC work one WS Garter Pattern row.
Complete Rows 1 – 8 of the Chart B. (199 sts on the needles after Row 7)
With MC work 3 repeats of the two-row Garter Pattern (6 rows total), then one more RS row.
With CC work one WS Garter Pattern row.
Complete Rows 1 – 18 of the Chart C.
With MC work 2 repeats of the two-row Garter Pattern (4 rows total).
Switch to US 9 / 5.50 mm needle and bind off on RS as follows:
*K2tog, k1, return sts to left needle, rep from * to end.
FINISHING
Weave in all loose ends. Wet-block the piece to measurements and shape as shown in the blocking schematic. Start by pinning the two short sides followed by the center point, then pin out the rest of the points along the edge (no need to pin the cast on edge). When completely dry, remove pins and trim all yarn tails.
ABOUT THE DESIGNER: SUSANNA IC
 After nine years in Europe, Susanna IC now lives deep in the heart of Texas with her husband, two sons, one guinea pig and countless balls of yarn. Besides a background in fashion design, she has a Master’s degree in art history and a Bachelors’s in studio arts, all of which continue to inspire her knitting.
Her projects and designs can be found on Ravelry and at www.ArtQualia.com


Leave a Reply